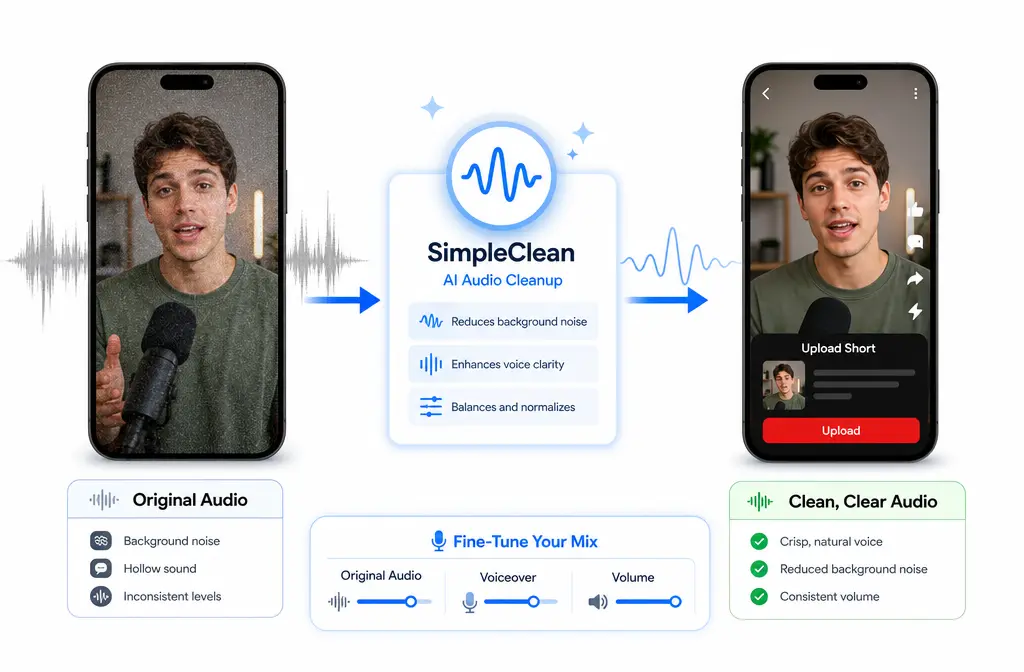
How to Remove Background Noise in YouTube Shorts: What Shorts Can Edit, What It Can’t, and the Best Cleanup Workflow Before Upload
Quick Answer
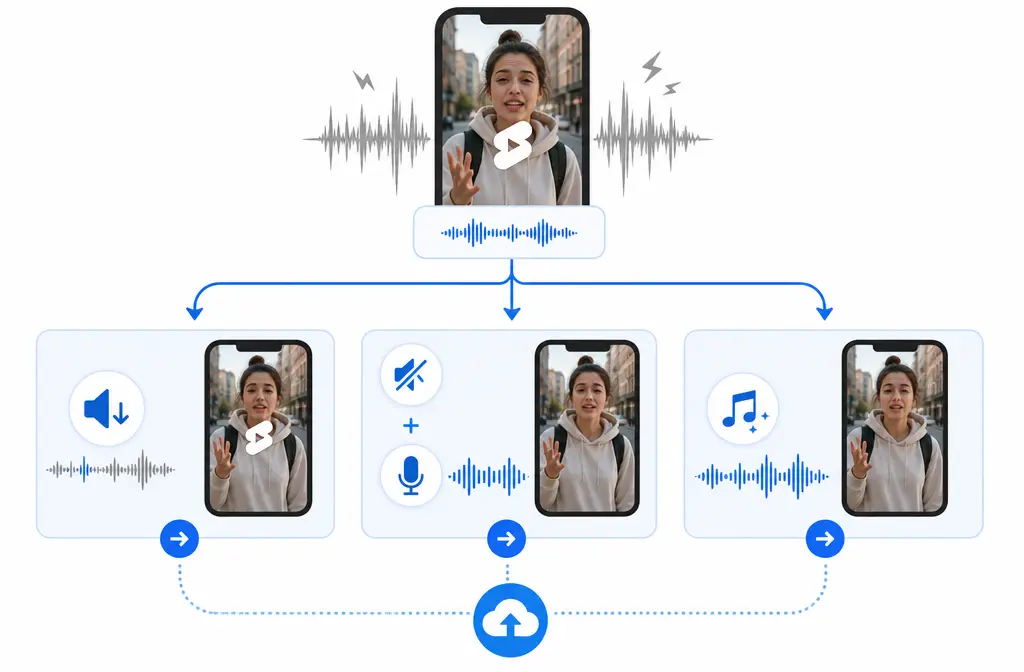
No: YouTube Shorts does not offer true one-click background-noise removal for original audio inside the Shorts editor. According to YouTube’s Shorts editing help, Shorts lets you add Sound, adjust Volume, record a Voiceover, and edit timing. What it does not do is separate your voice from noise already baked into the clip, such as fan hum, wind, traffic, hiss, or room echo.
If your Short is noisy, the fastest fix depends on the clip:
- Speech does not matter: lower or mute the original audio.
- Speech matters: clean the file before upload, then upload the cleaned video as a Short.
- The visuals matter more than live sound: mute original audio and add music or a fresh voiceover.
For creators who want a simple pre-upload cleanup path, you can clean noisy YouTube Shorts audio with SimpleClean before YouTube re-encodes the file.
What YouTube Shorts can edit vs what it cannot fix
The confusion usually comes from the fact that Shorts does have audio tools. But editing audio is not the same thing as denoising audio.
| Inside the Shorts editor | What it helps with | What it does not do |
|---|---|---|
| Volume | Lower the original clip audio relative to added sound | Does not remove hiss, hum, wind, traffic, or echo from the original track |
| Sound | Add music or other audio from YouTube’s tools | Does not preserve your voice while cleaning the noisy original recording |
| Voiceover | Record fresh narration over the Short | Does not repair the baked-in audio already recorded on location |
| Timing edits | Trim and align clips, music, and voiceover | Does not isolate speech from background noise |
That means this is the key distinction:
- Muting or lowering original audio = hiding the problem.
- Denoising = actually cleaning the speech signal.
If your original speech is important, lowering the volume is usually not enough.
Can YouTube Shorts remove background noise?
Not in the built-in Shorts editor based on the supplied official help documentation. The current YouTube help pages for Shorts editing list tools like Sound, Volume, and Voiceover, but they do not describe a true noise-removal feature for original recorded audio inside Shorts itself. So if your clip already contains room noise, street noise, AC hum, or wind, Shorts is not the place to do surgical cleanup.
This is why many creators get better results by cleaning the audio first, then uploading the final MP4 to Shorts. YouTube’s Shorts upload help confirms you can upload vertical or square video as a Short, so a pre-cleaned file fits the normal workflow.
Fastest fix by scenario
If you want the shortest path to a usable Short, use this decision tree.
- Light noise, speech unimportant: keep the clip, lower original audio, and lean on music or visuals.
- Speech matters and the clip is already recorded: clean the source or exported file first, then upload the cleaned version.
- Visual-only clip: mute original audio and add music, captions, or a fresh voiceover.
- You want an all-mobile workflow: consider YouTube Create before upload, since a reliable secondary source notes it includes an Audio Cleanup feature.
Best option for each type of Shorts creator
- Best for talking-head Shorts: pre-clean the audio before upload.
- Best for tutorial clips with screen text: mute noisy original audio and re-record voiceover.
- Best for b-roll or montage Shorts: mute original audio and use music responsibly.
- Best for mobile-only creators: try YouTube Create when you want mobile editing plus cleanup before uploading to Shorts.
The best cleanup workflow before uploading a Short
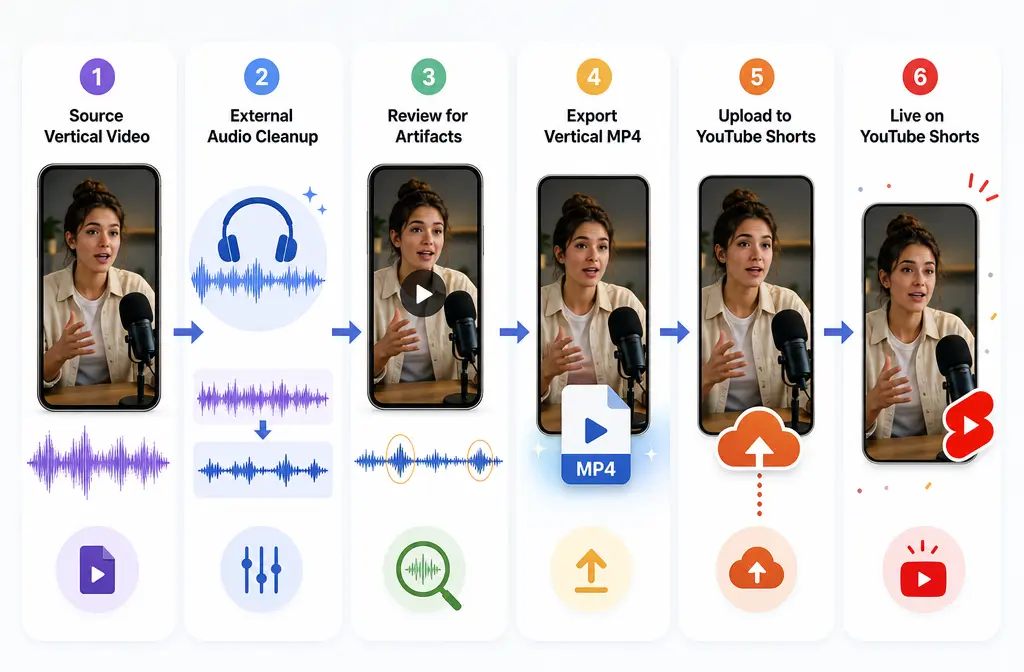
This is the most reliable workflow when you need your spoken voice to stay clear.
- Keep the source file if possible. Work from the original phone recording or the least-processed export you have.
- Clean the audio externally. Use a dedicated cleanup tool before the file goes into YouTube Shorts. You can start with SimpleClean if you want a fast speech-first cleanup step instead of opening a full audio editor.
- Listen for overprocessing. If the voice becomes robotic, watery, metallic, or hollow, back off the denoise amount.
- Export a clean vertical MP4. Since YouTube will re-encode the upload, start with the cleanest source you can.
- Upload as a Short. YouTube says Shorts can be vertical or square and can run up to 3 minutes.
- Add music only if you have the right to use it. If you add music outside Shorts, make sure it is licensed or otherwise safe to use. If you use YouTube’s own audio options, review the library and policy limits first.
Why this workflow usually sounds better
Once a noisy track is baked into a phone recording, good cleanup depends on processing the speech itself, not just turning the whole track down. That is the gap between the Shorts editor and a true pre-upload cleanup workflow.
If you are also adding on-screen text after cleaning the clip, Best AI Captions can help you create captions and subtitles for Shorts-style videos. If you plan to repurpose the same clean Short for multilingual audiences, Translate Dub is a natural next step for translated captions and dubbed versions.
Alternative workflow inside Shorts: mute original audio and record a fresh voiceover
If the original audio is beyond saving, Shorts still gives you a solid fallback: mute or lower the original audio, then record a new voiceover. The Voiceover tool is one of the clearest built-in ways to rescue a noisy Short when the visuals are still good.
This works well for:
- tutorials recorded in a noisy room
- walking clips with wind noise
- repurposed video where the live sound is not essential
- before-and-after demos where narration can be added later
This does not preserve the original live performance, but it is often faster than trying to salvage impossible audio.
When to use YouTube Create instead of the Shorts editor
If you want a mobile workflow but need cleanup before publishing, YouTube Create is worth knowing about. A cited secondary source from Android Authority reports that YouTube Create includes an Audio Cleanup feature. That makes it more relevant than the Shorts editor when your issue is baked-in noise, not just volume balance.
Use Shorts editor when:
- you only need quick timing edits
- you want to add sound from YouTube’s tools
- you are fine muting original audio and replacing it with voiceover
Use YouTube Create when:
- you want mobile editing plus audio cleanup before upload
- speech clarity matters
- you want to improve the file before it reaches Shorts
The main point: if your problem is real noise reduction, do not expect the Shorts editor alone to solve it.
Upload and music cautions
Two practical issues cause trouble after creators clean a Short: music rights and final upload quality.
1) Music and copyright
If you add music outside Shorts, make sure you have the rights to use it. If you use YouTube’s built-in audio options, review YouTube’s guidance on safe music use and note that YouTube’s help on upload issues also discusses limits tied to the Shorts Audio Library and commercial-use situations. Do not assume that “available in the app” means “safe for every use case.”
2) Preserve the cleaned audio as much as possible
- Upload a clean source rather than hoping YouTube improves it.
- Keep the video vertical for normal Shorts presentation.
- Use MP4 for the final video export when preparing a standard Short upload workflow.
- Do cleanup before upload, not after YouTube compresses the file.
How to avoid overprocessing
More denoise is not always better. Heavy cleanup can make speech sound:
- robotic
- watery
- hollow
- muffled
- unnaturally pumping between words
A good target is not “perfect silence.” It is clear speech that still sounds human. If the background softens but the voice stays intelligible, that is usually the better result for Shorts.
If you want a fast way to test this before upload, try a light pass to remove background noise from a YouTube Short before posting, then compare it against the untreated file on phone speakers and earbuds.
Troubleshooting a noisy YouTube Short
My voice is still muffled after cleanup
The denoise may be too strong, or the original recording may already be distorted. Reprocess more lightly, or replace the live sound with a fresh voiceover in Shorts.
The noise pumps in and out between words
This usually means the cleanup is too aggressive. Reduce the amount so the background stays more consistent and the voice sounds less processed.
My music is too loud under narration
Use Shorts’ volume controls to lower background sound relative to the voiceover. If narration is the point of the Short, favor speech clarity over music energy.
The cleaned file sounded fine locally, but worse after upload
YouTube re-encodes uploads, so minor artifacts can become more obvious. Start with the cleanest source possible, avoid overprocessing, and export a clean vertical MP4 before upload.
Can I keep my original voice and remove room noise?
Sometimes yes, but not inside the Shorts editor itself based on the provided documentation. You need external cleanup before upload, or a tool like YouTube Create if you want a mobile-first pre-upload option.
How to prevent background noise in future Shorts
The best fix is still prevention. YouTube’s filming tips for Shorts recommend recording in a space with minimum echo and background noise.
- Move away from fans, AC vents, traffic, and hard echoey rooms.
- Record a quick test before filming the full take.
- If a location is noisy but the visuals are important, plan on voiceover from the start.
- Keep a clean master version before adding music or platform-specific edits.
After cleanup: captions, translation, and distribution
Once your audio is clear, the next quality boost is accessibility and repurposing.
- Use Best AI Captions to add captions and subtitles to short-form video.
- Use Translate Dub if you want dubbed or translated versions for multiple audiences.
- Use Mallary.ai when you want to schedule and distribute the cleaned Short across social platforms, add first comments, or manage publishing from one dashboard or API.
If you also edit in other tools before publishing, you may find these SimpleClean guides useful: Remove Background Noise in VN Video Editor, How to Remove Background Noise in iMovie, and How to Remove Background Noise in Canva.
Bottom line
If you are asking how to remove background noise in YouTube Shorts, the honest answer is simple: the Shorts editor can edit around noisy audio, but it does not truly denoise original recorded sound. It can lower volume, add sound, and let you record voiceover. It cannot clean baked-in hum, hiss, traffic, wind, or echo from your original clip the way a dedicated cleanup step can.
So the best workflow is:
- keep the source file,
- clean the audio before upload,
- export a clean vertical MP4,
- then upload it as a Short.
If the original sound is unusable, mute it and record a fresh voiceover inside Shorts instead.
Sources and further reading
- Upload YouTube Shorts - YouTube Help - Primary source for Shorts upload basics including vertical or square uploads and the up-to-3-minute limit.
- Tips to film with mobile - Shorts - YouTube Help - Supports prevention advice to record in a space with minimal echo and background noise.
- The handy YouTube Create app is now in the US - Android Authority - Secondary source confirming YouTube Create includes an Audio Cleanup feature relevant to mobile-first workflows.
- How to Make YouTube Shorts (Complete Guide for 2026) | Reclip - Secondary context source for creator-facing Shorts workflow framing.