How to Remove Background Noise in iMovie: Mac Steps, iPhone Limits, and When to Clean the Exported File Online
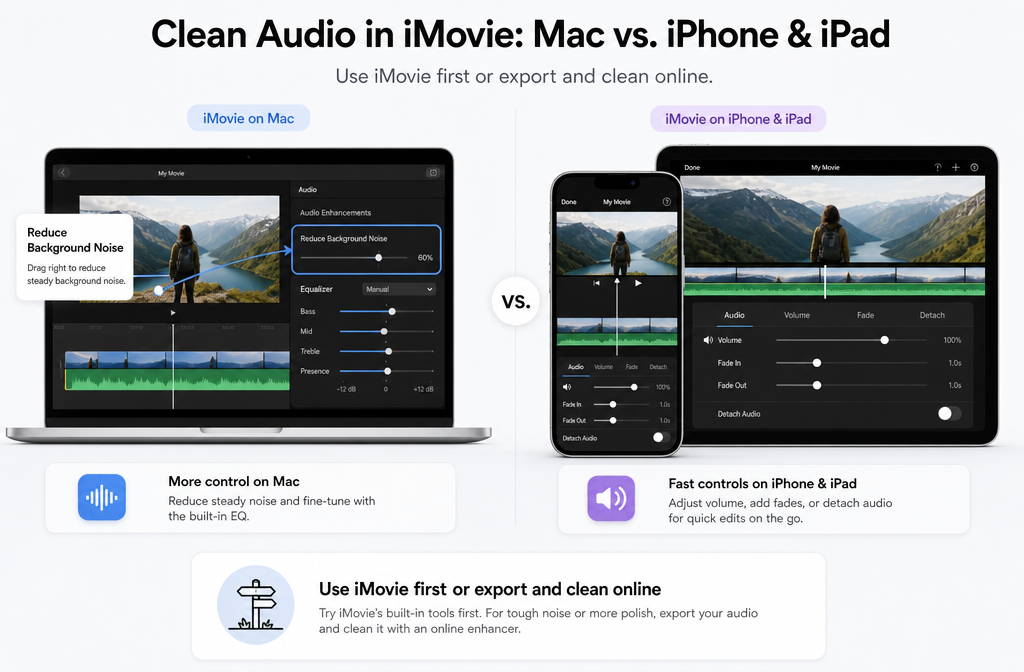
If you are trying to remove background noise in iMovie, the most important thing to know is that iMovie works very differently on Mac versus iPhone and iPad. On Mac, iMovie includes a real Reduce Background Noise control plus audio enhancement and EQ options. On iPhone and iPad, Apple documents basic audio editing tools like volume, fades, mute, detach, split, move, and delete audio sections, but not the same manual noise-reduction slider found on Mac.
That difference matters, because it changes the best workflow. If your clip only has light fan noise, HVAC, or room noise under clear speech, iMovie on Mac may be enough. But if your recording has wind, echo, barking, keyboard noise, clipping, heavy hum, or changing noise across the clip, you will usually get better results by exporting the file and cleaning the exported audio or video separately.
For that second step, you can try SimpleClean when you need to clean exported speech audio without reopening the whole edit. That is especially useful after you have already cut the video in iMovie and just want clearer dialogue.
Quick Answer
Can iMovie remove background noise? Yes, but mainly on Mac. Apple’s Mac version of iMovie includes:
- Auto audio enhancement
- A Reduce Background Noise checkbox and strength slider
- Equalizer presets such as Voice Enhance and Hum Reduction
- Export options for a movie file or audio-only
On iPhone and iPad, iMovie does not provide the same documented background-noise reduction slider. Instead, Apple documents tools to:
- Adjust clip volume
- Mute clips
- Add audio fades
- Detach audio
- Split, move, and delete noisy audio sections
- Share the movie as a video file
So the practical rule is simple:
- Mac: try iMovie’s built-in noise reduction first.
- iPhone/iPad: edit around the noise, export the video, then clean the exported file if needed.
What iMovie can actually do on Mac
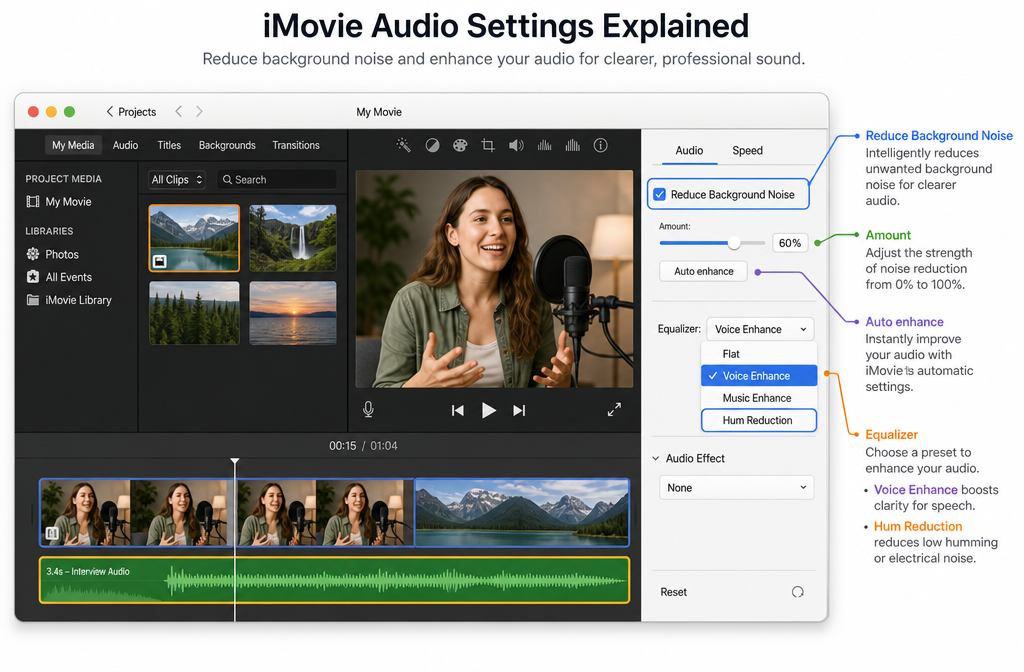
According to Apple’s iMovie for Mac documentation, you can correct and enhance audio using several built-in controls. The most relevant ones for speech cleanup are:
- Auto enhancement
- Reduce Background Noise with an adjustable percentage slider
- Equalizer presets including Voice Enhance and Hum Reduction
This makes iMovie on Mac a real first-pass tool for cleaning talking-head videos, tutorials, interviews, and simple voice content. It will not replace a dedicated restoration workflow, but it can improve mild, steady noise.
Apple also documents that on Mac you can share your project as a file and choose to export video and audio or audio only. That is useful when the visual edit is done but the spoken audio still needs stronger cleanup.
What iMovie can actually do on iPhone and iPad
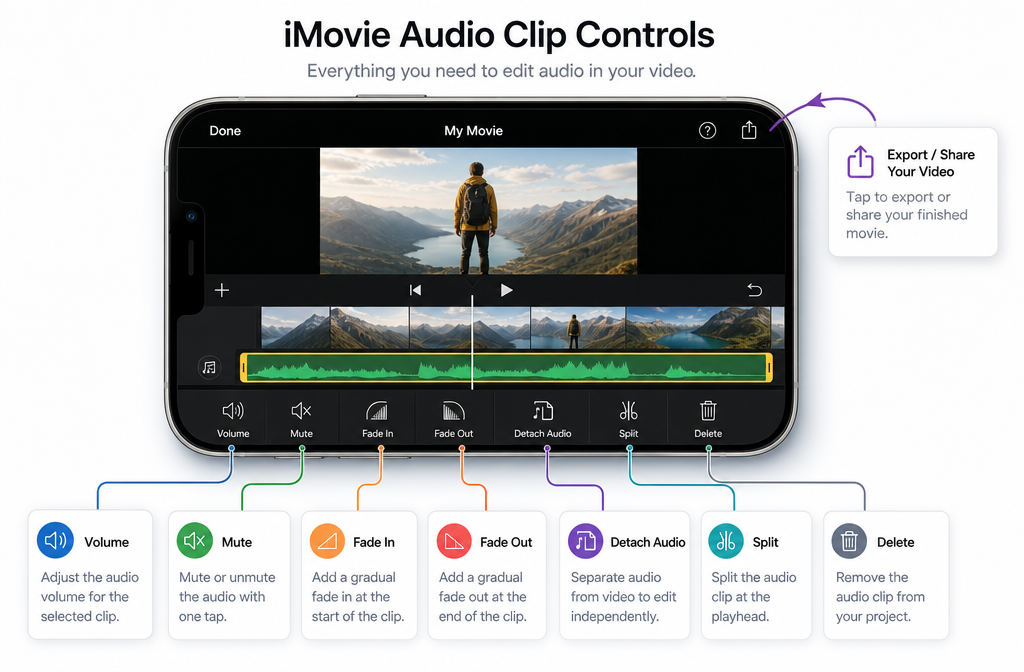
On iPhone and iPad, Apple’s documentation focuses on edit controls rather than dedicated noise reduction. You can:
- Change audio volume
- Mute a clip
- Add fade-in or fade-out
- Detach audio from video
- Split audio
- Move audio
- Delete unwanted audio sections
That means mobile iMovie is still useful for removing obvious distractions like a noisy start, a bump in handling noise, or a section with unusable background sound. But it is not the same as having a speech-focused denoise slider for the whole clip.
If you edit on iPhone or iPad and the result still sounds noisy, the realistic workflow is to export the movie and clean that exported file afterward.
Mac vs iPhone/iPad: which iMovie workflow is best?
| Device | What iMovie gives you | Best for | Main limit |
|---|---|---|---|
| Mac | Auto enhance, Reduce Background Noise, EQ presets, export audio-only or video | Light steady noise under clear speech | Can sound muffled if overused; limited for echo, wind, and overlapping noise |
| iPhone/iPad | Volume, mute, fades, detach, split, move, delete, export video | Quick edits, trimming noisy parts, simple mobile projects | No documented equivalent to the Mac background-noise reduction slider |
How to reduce background noise in iMovie on Mac
- Import your clip into iMovie. Open your project and select the video or audio clip that contains speech.
- Open the audio adjustment controls. In the viewer toolbar, open the audio controls for the selected clip.
- Try Auto first if you want a quick baseline. This can help, but do not assume it is the best final setting.
- Enable Reduce Background Noise. Check the box and start with a conservative amount rather than pushing it too high immediately.
- Listen carefully to the voice. If the room noise drops but the speech starts sounding dull, phasey, or closed-in, back the setting down.
- Test an EQ preset if needed. If speech still lacks clarity, try Voice Enhance. If a mains-style hum remains, test Hum Reduction.
- Play problem sections, not just one sentence. A setting that sounds fine in one moment can sound unnatural later if the background noise changes.
- Export when you are satisfied. If iMovie gets you close enough, export the movie. If not, export the file for separate cleanup.
Best practice: use the noise slider gently. In many speech clips, too much reduction does more harm than the original light background noise.
When iMovie on Mac is enough
- Steady fan noise
- Low HVAC rumble or whir
- Light room tone
- Minor constant hiss under otherwise clear dialogue
When iMovie on Mac is usually not enough
- Strong wind noise
- Noticeable room echo or reverb
- Overlapping voices or background conversation
- Clipping or distorted speech
- Heavy electrical hum
- Barking dogs
- Keyboard noise close to the mic
- Noise that changes throughout the clip
If you are in one of those harder cases, it often makes more sense to clean exported iMovie audio online after the edit instead of forcing iMovie to do a job it was not built for.
How to work around background noise in iMovie on iPhone or iPad
Because mobile iMovie does not document the same Mac-style noise reduction control, the best workflow is part editing, part triage.
- Open your project and review the noisy sections. Listen for bumps, handling noise, bad starts, loud breaths, or obvious room distractions.
- Adjust volume where helpful. Lower or mute unusable sections rather than keeping distracting audio all the way through.
- Detach audio if you need more control. Apple documents detaching audio so you can edit it separately from the video clip.
- Split and delete the worst parts. If the noise is only at the beginning or end of a clip, remove that section instead of trying to “fix” it globally.
- Add fades if the edits sound abrupt. Small fades can make trimmed sections sound more natural.
- Share the movie as a video file. Once the edit is done, export the movie and clean the exported file if the speech still needs help.
This is also the right time to think about the next steps after cleanup. If the cleaned video will be published on social platforms, Best AI Captions can help add captions and subtitles, and Translate Dub fits well if you need translated dubbing or multilingual captions. If you are distributing the final video across multiple channels, Mallary.ai is relevant for scheduling and publishing social posts after the audio is fixed.
How to export from iMovie for better cleanup
On Mac
Apple documents exporting via File > Share > File. From there, you can export:
- Video and audio if you want to keep the finished video intact
- Audio only if you just want the sound file for cleanup
Use audio-only export when:
- You only care about the spoken track
- You want the smallest, simplest cleanup workflow
- You may re-import the cleaned audio into the edit later
Use video export when:
- You want to preserve the completed edit exactly as-is
- You plan to clean the soundtrack attached to the final video file
- You are sending the finished clip directly for publishing or review
On iPhone and iPad
Apple documents sharing the movie as a video file with resolution choices. Since the mobile workflow is centered on the finished movie, exporting the video is the normal path before separate cleanup.
Should you use EQ or noise reduction in iMovie?
They do different jobs.
- Noise reduction is the better first choice for steady background noise.
- Voice Enhance can help speech cut through more clearly.
- Hum Reduction is more targeted when a hum remains.
In practice, many users get the best result by using a small amount of noise reduction first, then testing an EQ preset only if the speech still needs help. If you do it in the opposite order, you can end up emphasizing the wrong parts of the sound.
Troubleshooting iMovie audio cleanup
| Problem | Likely cause | What to do |
|---|---|---|
| Voice sounds muffled or robotic | Too much background-noise reduction | Lower the setting and retest. Mild noise is often better than overprocessed speech. |
| Hum is still audible | General denoise did not target the hum well | Try the Hum Reduction EQ preset on Mac, then export for stronger cleanup if needed. |
| Noise is mostly at the start or end of the clip | Handling noise, room movement, or late stop/start | Trim or split and delete the noisy edge sections, especially on iPhone/iPad. |
| Detached audio is out of sync | Audio was moved after detaching | Undo, realign carefully, and avoid extra moves unless necessary. |
| No noticeable improvement | Noise is too complex, too loud, or changes over time | Export the file and use separate cleanup instead of pushing iMovie harder. |
| Wind or echo still dominates | Problem is beyond basic iMovie correction | Export and use a dedicated cleanup step for speech repair. |
Best workflow by use case
Best for quick Mac cleanup
Use iMovie on Mac first if your clip has understandable dialogue and only mild, steady background noise.
Best for iPhone or iPad editing
Trim, detach, split, mute, and fade problem sections in iMovie mobile, then export the movie.
Best for hard audio problems
Export the finished file and use a separate cleanup tool when the recording has wind, echo, hum, barking, keyboard noise, or changing background sound. A practical next step is to remove background noise from an exported iMovie file after your edit is locked.
When to clean the exported file online instead of staying inside iMovie
Clean the exported file online when:
- You already finished the edit and do not want to rebuild it elsewhere
- The Mac denoise control makes the voice sound worse before the noise is actually gone
- You edited on iPhone or iPad and need more than volume and trimming
- You want a simple handoff step after export
If your issue is specific rather than general, these guides may help too:
- remove hiss from audio online
- remove echo from audio online
- remove fan noise from audio online
- remove air conditioner noise from video online
Final takeaway
If you want to remove background noise in iMovie, start by choosing the right workflow for your device. Mac iMovie has real background-noise reduction and EQ tools, so it is worth trying first for light, steady noise. iPhone and iPad iMovie are better viewed as editing tools for trimming, muting, and detaching audio rather than full denoise tools.
And if iMovie gets you only halfway there, do not keep pushing until the voice sounds unnatural. Export the audio or video, then use a separate cleanup step. That is often the faster path to clearer speech and a more watchable final result.
Sources and further reading
- Apple Support — Correct and enhance audio in iMovie on Mac - Primary source for Mac audio tools including Auto, Reduce Background Noise, and EQ presets.
- Apple Support — Export a movie, trailer, or clip as a file in iMovie on Mac - Primary source for Mac export workflow and audio-only or video-plus-audio export options.
- Apple Support — Adjust audio in iMovie on iPhone - Primary source for iPhone audio controls like volume, mute, fades, ducking, and speed.
- Apple Support — Edit audio clips in iMovie on iPhone - Primary source for detaching, splitting, moving, and deleting audio on iPhone.
- Apple Support — Share your movie as a video file in iMovie on iPhone - Primary source for iPhone export and share options.
- Apple Support — Share or export your iMovie project - High-level Apple reference for export and share paths across devices.
- iDownloadBlog — How to reduce background noise in iMovie - Useful SERP context confirming common Mac-focused advice and the iPhone/iPad limitation gap.