How to Remove Background Noise in Canva: Enhance Voice Steps, Limits, and When to Clean the Exported File Online
Quick Answer
Yes, Canva can reduce background noise with Enhance Voice, but it is designed for video and audio files that contain voice. In Canva’s editor, the control usually lives under Audio tools: select your video clip or uploaded audio track, open Audio tools, turn on Enhance Voice, and adjust the strength slider if available. According to Canva’s help documentation, the feature is available on Canva Pro, Canva Business, and Canva Enterprise, and each use counts against your monthly AI allowance. If your recording has heavy wind, room echo, strong hum, hiss, overlapping speakers, or mostly non-speech audio, Canva may not be enough, so exporting the file and cleaning it separately is often the better workflow.
For harder fixes after export, you can clean exported Canva audio with SimpleClean.
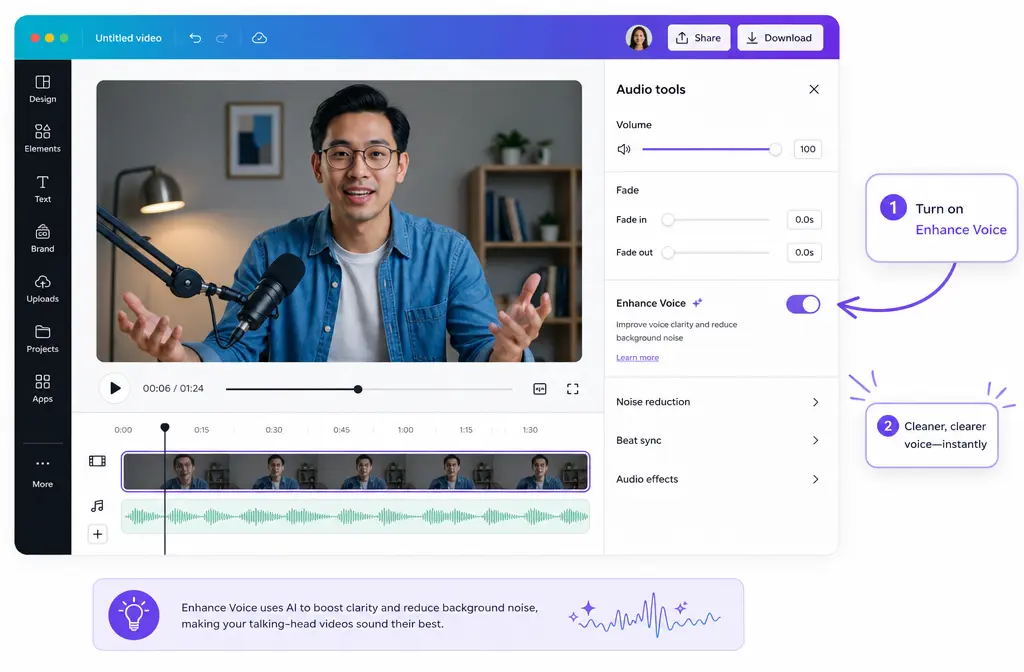
Where Enhance Voice lives in Canva right now
On desktop, the usual path is straightforward:
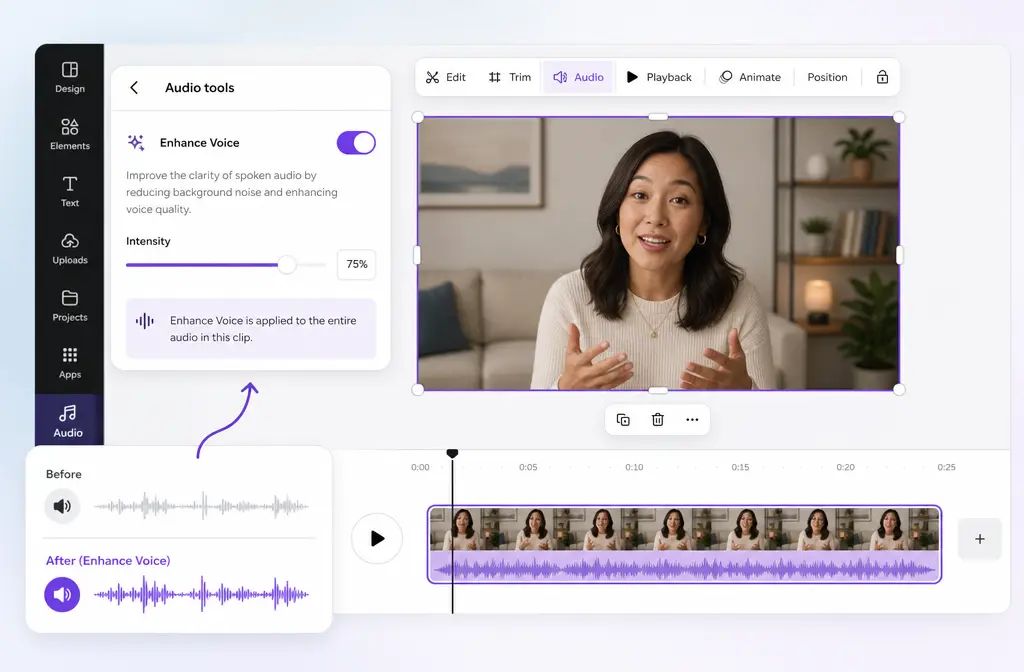
- Upload your video or audio into a Canva project
- Select the clip or audio track on the timeline
- Open Audio tools
- Toggle Enhance Voice on
- Adjust the enhancement strength if Canva shows the slider
Canva’s help center also indicates the feature is available across desktop and mobile workflows, but if you want the clearest path for troubleshooting, desktop is the easiest place to start.
Best for: talking-head videos, tutorials, webinars, voiceovers, meeting recordings, reels, and social clips where speech is the main thing you want people to hear clearly.
Who Canva background-noise cleanup works best for
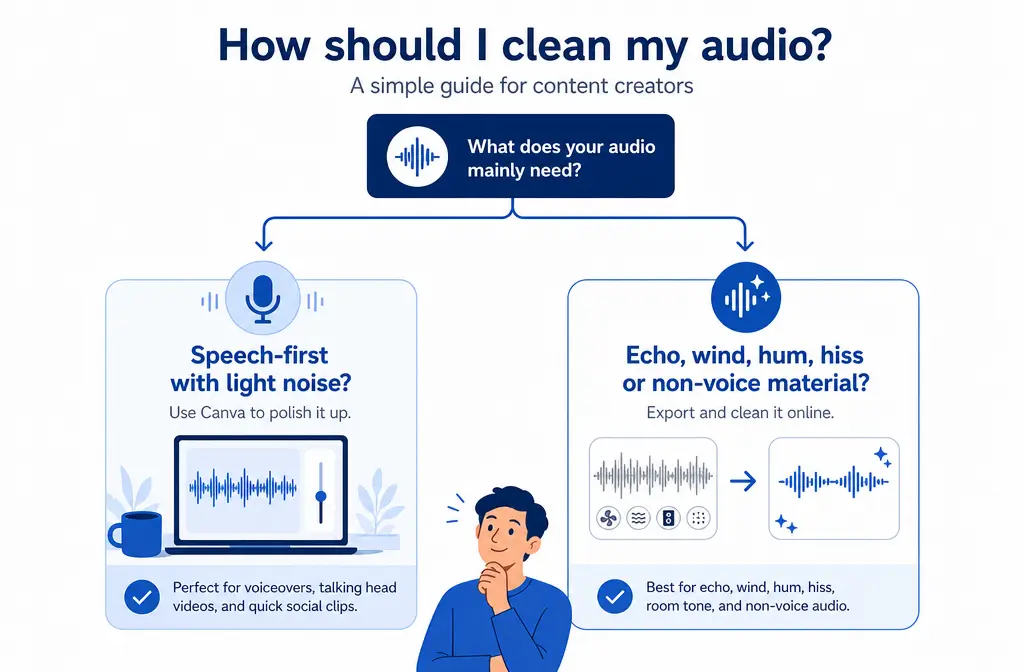
Canva’s own documentation frames Enhance Voice around files that contain voice. That makes it a strong first-pass tool for speech-first content, especially when you want a quick improvement without leaving the editor.
- Good fit: webcam videos, course lessons, explainer clips, presentations, webinars, interview clips, and voiceover tracks
- Less ideal: music-first content, environmental ambience, field recordings, crowded backgrounds, strong reverb, or complex layered noise
If your goal is simply to make a spoken recording easier to understand before export, Canva is convenient. If your audio problem is more technical than that, a dedicated cleanup step after export is usually faster than fighting a limited one-toggle workflow.
Exact desktop steps for video clips
- Open your Canva design. Start with a video project or drop your video into an existing design.
- Upload the source file. Canva supports common video uploads including MP4, MOV, MKV, WEBM, and MPEG.
- Select the video clip on the canvas or timeline.
- Open Audio tools. This is where Canva places audio cleanup controls for eligible media.
- Turn on Enhance Voice. Canva will process the clip to reduce background noise and bring speech forward.
- Adjust strength if shown. Start conservatively. Too much enhancement can make speech sound overly processed.
- Preview before exporting. Listen to a few difficult sections, not just the cleanest sentence.
Tip: Compare the original and enhanced sound before committing. A lighter setting often keeps the voice more natural.
Exact desktop steps for uploaded audio files
Most Canva tutorials only explain the video route, but Canva also supports an audio-file workflow for voice-containing files.
- Upload the audio file into your Canva project.
- Add it to the timeline.
- Select the audio track.
- Open Audio tools.
- Enable Enhance Voice.
- Adjust the amount if Canva gives you the slider.
- Preview carefully to make sure the result still sounds natural and intelligible.
This matters if you recorded narration separately and only use Canva for final assembly.
What Canva requires before Enhance Voice will work
| Requirement | What to know |
|---|---|
| Type of file | Enhance Voice is for video and audio that contain voice. |
| Eligible plans | Canva’s help documentation points to Canva Pro, Canva Business, and Canva Enterprise. |
| AI usage | Each use counts against your account’s monthly AI allowance. |
| Video uploads | Canva supports common formats including MP4, MOV, MKV, WEBM, and MPEG. |
| Video export | Canva’s video pages describe finished video downloads as MP4. |
That last point is important: if Canva gives you a partial improvement but not a complete fix, you can export the project as MP4 and run a second cleanup pass elsewhere.
Best settings advice: how to avoid overprocessed voice
- Start low. If a strength slider appears, small adjustments are safer than maxing it out immediately.
- Check sibilance and consonants. Listen for harsh S sounds, lisping, or watery artifacts.
- Preview a noisy section. Test the worst part of the file, not the best part.
- Compare against the original. A slightly noisy but natural voice can be better than a heavily processed one.
- Use Canva as a first pass. If the voice is clearer but still flawed, export and finish cleanup on the file itself.
If you plan to publish clips widely after cleanup, you can add subtitles with Best AI Captions, translate and dub versions with Translate Dub, and distribute finished posts across channels with Mallary.ai.
Troubleshooting: can’t find Audio tools or Enhance Voice
1. Audio tools is missing
First, make sure you have actually selected the video clip or audio track. Canva often shows media-specific controls only when the relevant item is selected.
2. Enhance Voice is missing
The most likely reasons are:
- Your file may not be recognized as a voice-containing clip
- Your account may not be on an eligible paid plan
- You may have run into your account’s AI allowance
3. You are on the free plan
Based on Canva’s help language, do not assume Enhance Voice is included for free. If you do not see it, plan access is one of the first things to verify.
4. The result is weak
That usually means the problem is outside Canva’s sweet spot. Canva is built around making speech clearer, not solving every audio defect. Tougher issues often need a dedicated cleanup step after export.
5. The voice sounds artificial
Back off the enhancement amount and compare again. Stronger processing is not always better.
Canva vs exported-file cleanup: which is better?
| Situation | Use Canva only | Export and clean the file online |
|---|---|---|
| Talking-head clip with light background noise | Yes, usually a good fit | Optional |
| Voiceover with mild room noise | Usually worth trying first | If Canva leaves artifacts or noise behind |
| Heavy wind noise | Often not enough | Recommended |
| Room echo or reverb | Often limited | Recommended |
| Hum or hiss | May help somewhat, results vary | Usually better |
| Overlapping background voices | Can struggle | Recommended |
| Music, ambience, or non-speech audio | Not the intended use case | Better choice |
When Canva is enough vs when to clean the exported file online
Use Canva alone when:
- Your clip is mainly spoken voice
- The background noise is light to moderate
- You want a quick cleanup without leaving the editor
- You are already exporting the project as MP4 from Canva anyway
Export and clean separately when:
- The recording has heavy wind
- You hear obvious room echo or reverb
- There is strong hum, hiss, or HVAC noise
- Other voices compete with the main speaker
- The source is not primarily spoken voice
- Canva makes the voice clearer but still not polished enough
This is where SimpleClean fits naturally. Canva is convenient inside the editor, but a separate cleanup pass makes more sense when the exported file still has technical problems that a voice-focused toggle did not fully solve.
SimpleClean handoff workflow after Canva export
- Try Enhance Voice in Canva first. This gives you the fastest built-in improvement for speech-first material.
- Export your project. Canva’s finished video downloads are typically MP4.
- Upload the exported file to SimpleClean.
- Use the second pass for tougher problems. This is especially useful for wind, echo, hum, hiss, or noisy recordings that are still distracting after Canva.
- Publish the improved version. Add captions, translate versions if needed, and schedule distribution across channels.
If your Canva export still sounds rough, remove echo and heavy noise from the exported Canva file before you publish it.
After cleanup, you can use Best AI Captions for subtitles, Translate Dub for multilingual versions, and Mallary.ai to schedule and publish clips across multiple social platforms from one workflow.
What you can export from Canva after cleanup
For video workflows, Canva’s feature pages describe downloading finished videos as MP4. That means your realistic fallback path is simple:
- Clean the voice in Canva as much as possible
- Export the project as MP4
- Run deeper cleanup on the exported file if needed
If you need similar guidance in other editors, see our guides on removing background noise in Clipchamp, removing background noise in CapCut, and cleaning screen recording audio online.
Bottom line
Canva’s Enhance Voice is a useful built-in option when your file contains speech and you want a fast cleanup directly in the editor. It is best viewed as a voice-first enhancer, not a universal audio repair suite. For simple talking-heads, tutorials, webinars, and voiceovers, it may be all you need. For tougher problems like wind, echo, hum, hiss, or non-voice material, export the file and use a dedicated cleanup step after Canva.
Frequently asked questions
Does Canva remove background noise for free?
Do not assume so. Canva’s help documentation ties Enhance Voice to Canva Pro, Canva Business, and Canva Enterprise, and each use counts against a monthly AI allowance.
Where is Enhance Voice in Canva?
Usually under Audio tools after you select a video clip or audio track in the editor.
Can Canva clean audio-only files or only video?
It can work on both video and audio files, as long as they contain voice.
Why is Enhance Voice missing in my Canva account?
Common reasons include being on a non-eligible plan, reaching an AI allowance limit, or using media that Canva does not treat as voice-containing.
Does Canva remove echo or just background noise?
Canva positions Enhance Voice around reducing background noise and highlighting speech. If your main problem is strong room echo or reverb, results may be limited.
Can Canva clean music, ambience, or non-speech audio?
That is not the intended use case. Canva’s help documentation says Enhance Voice works with files that contain voice.
What video formats can I upload to Canva?
Canva supports common uploads including MP4, MOV, MKV, WEBM, and MPEG.
What format does Canva export video in after cleanup?
Canva’s video feature pages describe downloading finished videos as MP4.
Sources and further reading
- Canva Audio Enhancer / Enhance Voice feature page - Primary source for what Enhance Voice does, basic workflow, use cases, and MP4 download mention.
- Canva Help: Remove background noise in video and audio using Enhance Voice - Primary source for video and audio-file workflows, voice-containing file limitation, plan eligibility, and AI allowance note.
- Canva Pricing - Source for current plan framing and AI allowance language context.
- Canva Share Video - Source for supported video upload formats and MP4 export wording.
- Canva Video Transitions - Secondary confirmation of supported video upload formats.
- ICEdit: How to Remove Background Audio Noise in Canva - SERP competitor benchmark showing typical thin coverage to improve upon.
- ASAP Guide: How to Clean Up Background Noise in Your Canva Videos - SERP competitor benchmark for basic workflow and FAQ structure.