How to Fix Zoom Noise Suppression Not Working
If Zoom is still letting through keyboard clicks, fan noise, barking, or nearby voices, the problem usually is not that Zoom has no suppression at all. It is more often one of five things: you are in the wrong microphone mode, Original sound for musicians is enabled, Zoom is using the wrong input device, you are on the web app instead of the desktop app, or your organization manages the setting centrally.
There is also a second possibility: Zoom is working, but live suppression has hit its limits. Steady fan noise and light typing are easier to reduce live than wind, speaker bleed, room echo, or overlapping nearby talkers. In those cases, cleaning the exported recording afterward is often the better move.
Quick Answer
If Zoom noise suppression seems broken, do this first:
- Use the Zoom desktop app, not the web app, if you want the full microphone mode controls.
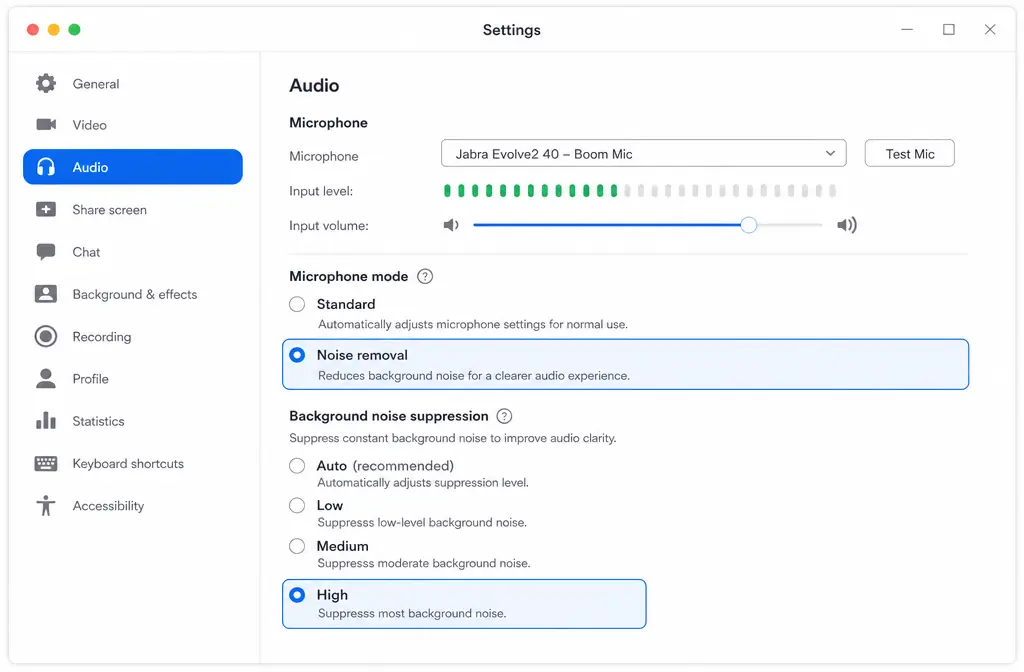
- Go to Settings > Audio and make sure the correct microphone is selected by name.
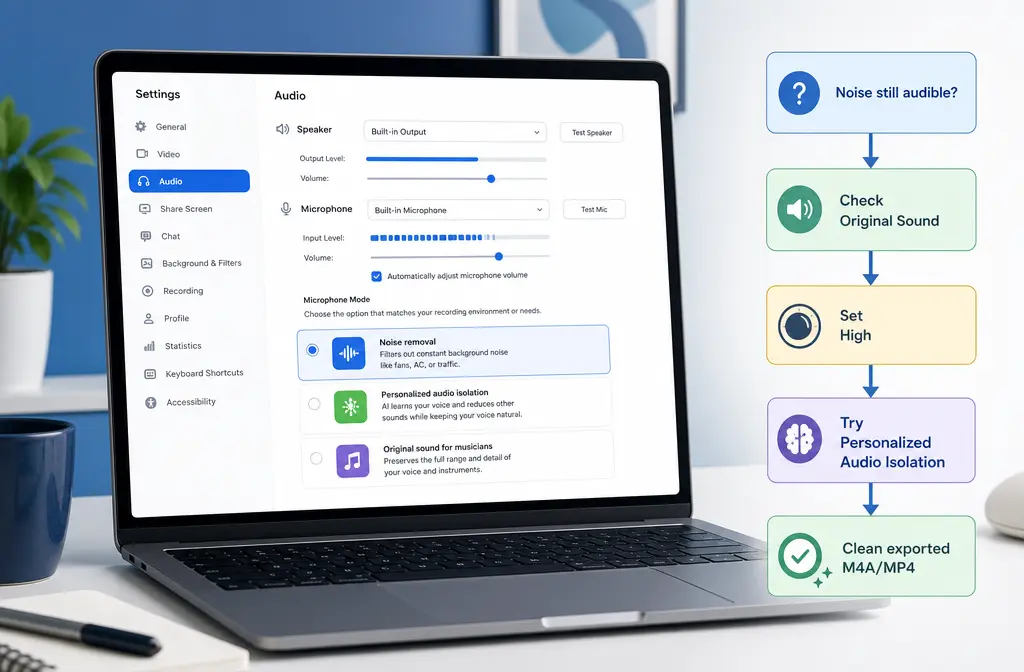
- Set Microphone mode to Noise removal.
- Set Background noise suppression to High.
- Confirm Original sound for musicians is off.
- If the real problem is nearby voices, try Personalized Audio Isolation instead of standard noise removal.
- If your voice starts sounding clipped or chopped, back off from High or move the mic closer.
When those steps still do not rescue the call, export the recording and clean Zoom recording audio with SimpleClean afterward instead of over-processing the mic live.
60-second checklist
- Open the desktop Zoom app.
- Go to Settings > Audio.
- Under Microphone, pick the exact mic you want, not a vague default if multiple devices are connected.
- Under Microphone modes, choose Noise removal.
- Set Background noise suppression to High.
- Make sure Original sound for musicians is turned off.
- Join a test meeting and type, run a fan, or speak from another seat to verify the result.
If High is already on and nearby speech still gets through, skip ahead to Personalized Audio Isolation. If your voice sounds worse with High, skip to the section on chopped audio.
What “Zoom noise suppression not working” usually means
In practice, users usually mean one of these symptoms:
- No audible change at all when switching suppression levels
- Keyboard noise or fans still audible even on High
- Nearby voices still pass through, especially in shared rooms
- Your own voice gets clipped, pumped, or chopped instead
Each symptom points to a slightly different fix, so the fastest path is to diagnose by pattern instead of randomly toggling settings.
Where to check Zoom’s microphone modes on desktop
Zoom’s current desktop audio model includes three microphone modes:
- Noise removal
- Personalized audio isolation
- Original sound for musicians
The most common failure is that users expect Zoom to suppress noise while they are actually in a mode that changes or bypasses that processing.
Noise removal levels explained
| Setting | Best for | Watch out for |
|---|---|---|
| Auto | General everyday meetings | May not be aggressive enough for louder environments |
| Low | When you want lighter processing | Lets more background noise through |
| Medium | A middle ground for normal office noise | Can still miss louder nearby distractions |
| High | Fans, keyboards, and more difficult noise | Most aggressive; Zoom notes it may increase CPU use |
If you hear no change between Auto and High, check for the conflicts below before assuming the feature is broken.
Fix #1: Turn off Original Sound for Musicians
This is one of the biggest reasons Zoom suppression appears to vanish.
Original sound for musicians is designed for situations where users want less speech-focused processing. That can be useful for music or high-fidelity audio, but it is a bad fit if your goal is blocking fan noise, keyboard clicks, or room chatter.
Users often enable it for a one-off music, podcast, or soundcheck session and forget to turn it back off. Then at the next normal meeting, Zoom suddenly seems to stop suppressing background noise.
Check both:
- Your desktop Audio settings
- Any in-meeting microphone mode switch if you changed modes after joining
If you need speech cleanup, use Noise removal or Personalized audio isolation, not Original Sound.
Fix #2: Make sure Zoom is using the correct mic
Another common cause is simple but easy to miss: Zoom is listening to the wrong device.
For example, you may think Zoom is using your headset mic, but it is actually pulling from a laptop’s integrated mic across the room. In that case, suppression may be active, but the raw input is already too roomy, noisy, or distant to sound good.
In Settings > Audio, choose the microphone by its actual device or driver name rather than relying on a generic system default. This matters even more if you use:
- USB mics
- Bluetooth headsets
- Docking stations
- Virtual audio devices
- Audio-routing apps
If possible, compare a headset mic against your built-in laptop mic. For speech, the closer mic usually wins because it captures more voice and less room noise before Zoom even starts processing.
Fix #3: Use the desktop app if possible
The Zoom web app does not present the exact same experience as the desktop app. According to Zoom support, the web app may offer a choice between Zoom background noise removal and browser-built-in suppression.
That means two users can both say “Zoom suppression is on” while actually using different processing paths.
Best for most troubleshooting: the desktop app.
Use the web app only if you must: then verify whether you are using Zoom’s own noise removal or the browser’s built-in suppression.
Fix #4: Switch to Personalized Audio Isolation when nearby speech is the real problem
Standard noise suppression is not always the best tool for nearby human voices. If your main issue is a coworker, teacher, child, or other talker in the same room, Personalized Audio Isolation may be the better fit.
Zoom describes this mode as intended for crowded environments. It works best when Zoom can identify your voice clearly, and a voiceprint can improve that behavior. This is especially important if you are not using a headset mic.
One key caveat from Zoom’s documentation: if you select Personalized Audio Isolation with a non-headset mic and no voiceprint, Zoom can automatically fall back to standard background noise removal.
So if isolation seems unimpressive on a laptop mic, that does not always mean the feature failed. It may mean the setup is not ideal for it.
Best-for recommendations
- Noise removal: Best for fans, typing, and general meeting cleanup
- Personalized Audio Isolation: Best for shared rooms and nearby voices
- Original Sound for Musicians: Best when you intentionally want less speech-focused processing, not when you want stronger suppression
Fix #5: Check for admin-managed settings
If you are on a work or school Zoom account, your local controls may not tell the whole story. Zoom allows organizations to manage client behavior centrally, including background noise suppression policies for managed Zoom clients.
That matters when:
- Your setting seems to reset
- You cannot change the suppression level
- Your Zoom behaves differently from screenshots in support articles
- A coworker on the same organization account sees the same limitation
If this sounds familiar, ask your admin whether the client is managed and whether suppress-background-noise behavior is centrally configured.
Fix #6: Rule out app conflicts and routing mistakes
Zoom can only process the audio signal it receives. If another app, driver, or routing layer is already changing that signal, results can be inconsistent.
Common conflict points include:
- Virtual audio devices that reroute the mic
- System audio-routing tools
- Bluetooth headset quirks, especially when a device switches into a lower-quality mono headset profile
- Wrong input selected after reconnecting a USB mic or dock
If Zoom suppression suddenly got worse after adding another audio tool, test with a simpler chain:
- Disconnect extra virtual devices if possible.
- Select the physical mic directly in Zoom.
- Rejoin a test meeting.
- Then add your other apps back one at a time.
If you regularly use external processing before Zoom, you may also like our guide on fixing Krisp not working or our comparison of Krisp vs OBS RNNoise.
Why Zoom is still picking up background noise
Sometimes Zoom is functioning normally, but the noise type is simply hard to remove live.
Usually easier for Zoom to reduce live:
- Steady fan noise
- Light HVAC hum
- Moderate keyboard noise
Usually harder to fix live:
- Strong wind
- Speaker bleed
- Echoey rooms
- Overlapping nearby talkers
- Distant mics in reflective spaces
If your room is echoey or your mic is far away, Zoom has to guess what to keep and what to suppress. That is when speech quality often falls apart before the noise fully disappears.
If Zoom is cutting out your voice instead
More aggressive suppression is not always better. If your own voice sounds clipped, chattery, or unnatural, try these fixes:
- Drop from High to Medium or Auto
- Move the mic closer to your mouth
- Use a headset mic instead of a distant laptop mic
- Try Personalized Audio Isolation if the real problem is nearby speech, not fan noise
The general rule is simple: better raw mic placement lets Zoom use less aggressive processing.
How to save a noisy Zoom meeting afterward
If the live meeting is already done, you still have a cleanup path. Zoom documents that recordings can produce MP4 video and M4A audio files, and computer recordings can also include separate audio files for each participant.
That is useful because post-recording cleanup is often safer than trying to force maximum suppression live. You can work on the exported file without risking chopped speech during the call.
How to clean the recording after export
- Finish the meeting and export or locate the Zoom recording.
- Look for the MP4 and/or M4A file.
- If you enabled separate participant audio in a computer recording, choose the noisiest track or the mixed track you want to improve.
- Upload the file to SimpleClean.
- Clean the speech track after the meeting instead of relying only on live suppression.
- Re-export for sharing, editing, or clipping.
This is the best fallback when Zoom settings are already maxed out but the call still contains fan noise, room noise, or chatter. If your issue is more like outdoor rumble, see our guide on the best app to remove wind noise from video.
After cleanup: captions, translation, and publishing
Once the audio is usable, you may want to repurpose the meeting or webinar:
- Use Best AI Captions to add captions and subtitles to the cleaned video.
- Use Translate Dub if you want to translate, dub, and caption it for multilingual viewers.
- Use Mallary.ai if your team wants to schedule clips, publish them across social platforms, and manage distribution from one workflow.
That makes the fallback more practical: first clean the noisy Zoom export, then caption it, translate it if needed, and distribute it without re-recording the whole session.
Quick comparison: what to try first
| Symptom | Most likely cause | Best first fix |
|---|---|---|
| No change at all | Wrong mode, wrong mic, or web app path | Use desktop app, confirm mic, set Noise removal to High |
| Suppression disappeared after audio tweaking | Original Sound for Musicians enabled | Turn Original Sound off |
| Nearby people still heard clearly | Standard suppression is the wrong tool | Try Personalized Audio Isolation |
| Your voice is getting chopped | Suppression too aggressive or mic too far away | Lower aggression and move mic closer |
| Settings will not stick | Managed Zoom client or admin policy | Ask your admin about centrally managed noise settings |
| Recording is still noisy after the meeting | Live suppression hit its limits | clean the exported Zoom audio |
Bottom line
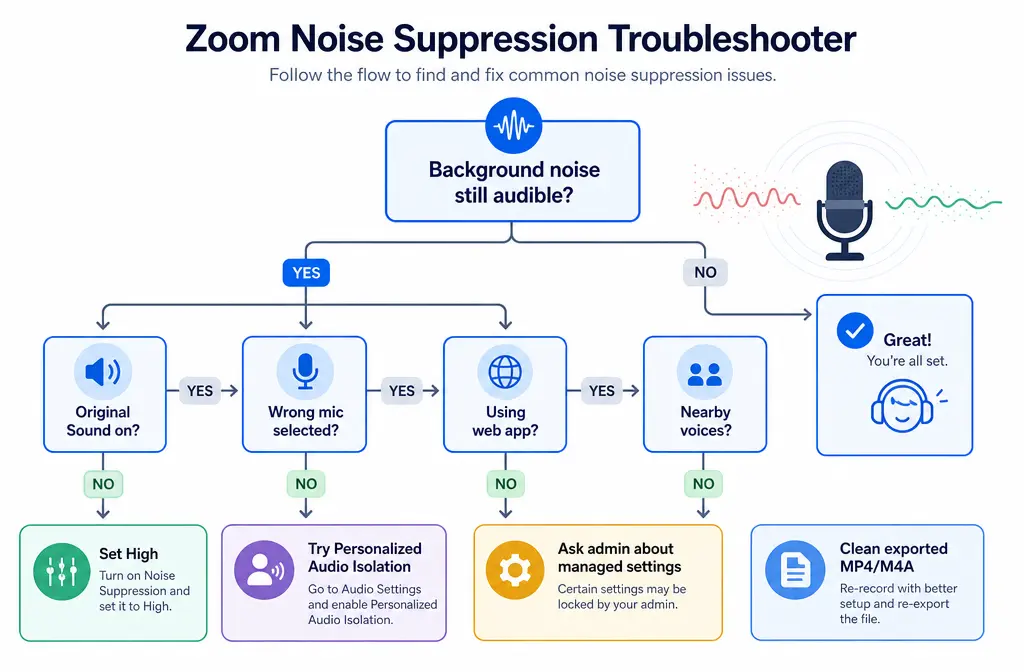
When Zoom noise suppression is not working, the fastest diagnosis order is:
- Confirm you are on the desktop app.
- Pick the correct microphone by name.
- Use Noise removal and test High.
- Turn Original sound for musicians off.
- Switch to Personalized Audio Isolation if nearby speech is the main issue.
- Check whether your organization manages the setting centrally.
- If the live call is already recorded, clean the exported MP4 or M4A afterward.
That last step is often the most practical. Live suppression is helpful, but it is not magic. If the meeting matters and the audio is still rough, fix noisy Zoom recordings with SimpleClean after export and work from the actual file instead of fighting the call in real time.
Sources and further reading
- Zoom Support — Setting up professional audio for Zoom Meetings - Official source for microphone modes, suppression levels, Original Sound, in-meeting switching, and web-app behavior.
- Zoom Support — Configuring and using personalized audio isolation - Official source for Personalized Audio Isolation behavior, voiceprint details, and fallback caveat with non-headset mics.
- Zoom Support — Understanding recording file formats - Official confirmation of MP4 and M4A recording outputs and separate audio files for computer recordings.
- Zoom Support — Getting started with computer and cloud recording - Official recording workflow support for the post-meeting cleanup fallback.
- Zoom Support — Changing group settings for managed Zoom Clients - Official support for the admin-managed settings angle, including centrally set suppression behavior.
- Zoom Support — Using Zoom on a laptop - Official support for integrated mic limitations and selecting devices by their actual names.
- Zoom Community — Audio Suppression Not Working - Real-world user evidence that High suppression can still appear ineffective in some setups.