How to Fix Microsoft Teams Noise Suppression Not Working: Missing Options, Voice Isolation, Music Mode, and Better Fallbacks
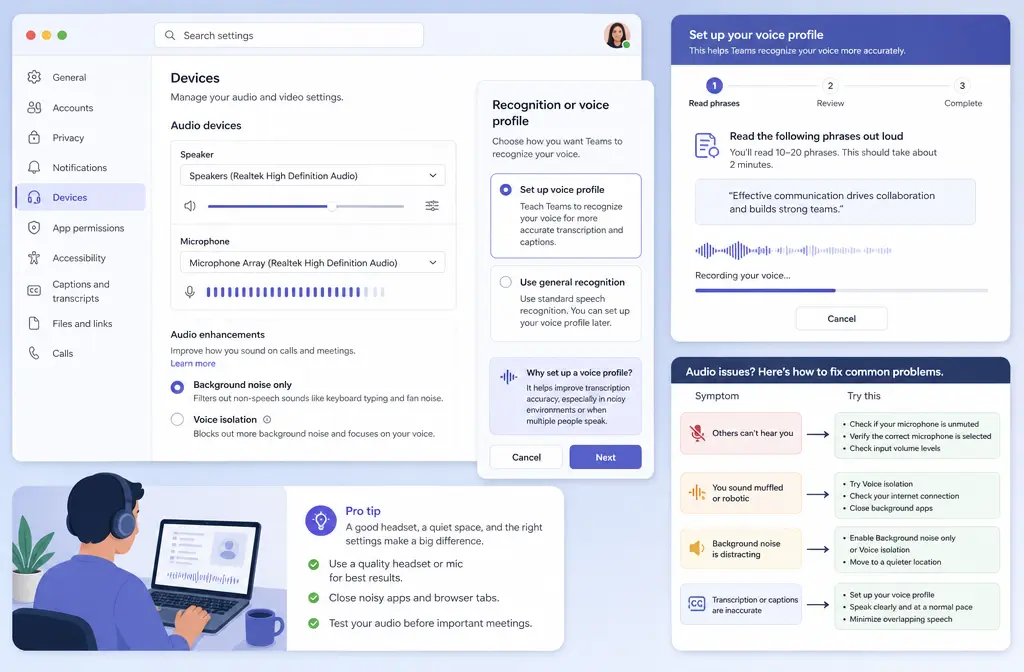
If Microsoft Teams noise suppression is not working, the fix usually falls into one of three buckets: the wrong Teams mode is selected, the wrong mic or permission layer is blocking the feature, or you are expecting Teams to do a job it was not designed to do. In current Teams, Microsoft separates Background noise only from Voice isolation. Background noise suppression can reduce sounds like keyboard clicks and room noise, while Voice isolation is the feature aimed at filtering out other people speaking near you. If the setting is missing, Recognition is unavailable, or nearby voices still leak through, the cause may be app version, browser/device selection, or an admin-controlled policy. And if the noisy audio is already recorded, Teams cannot truly repair the saved file after the meeting.
Quick Answer
Start here if you need the fastest path:
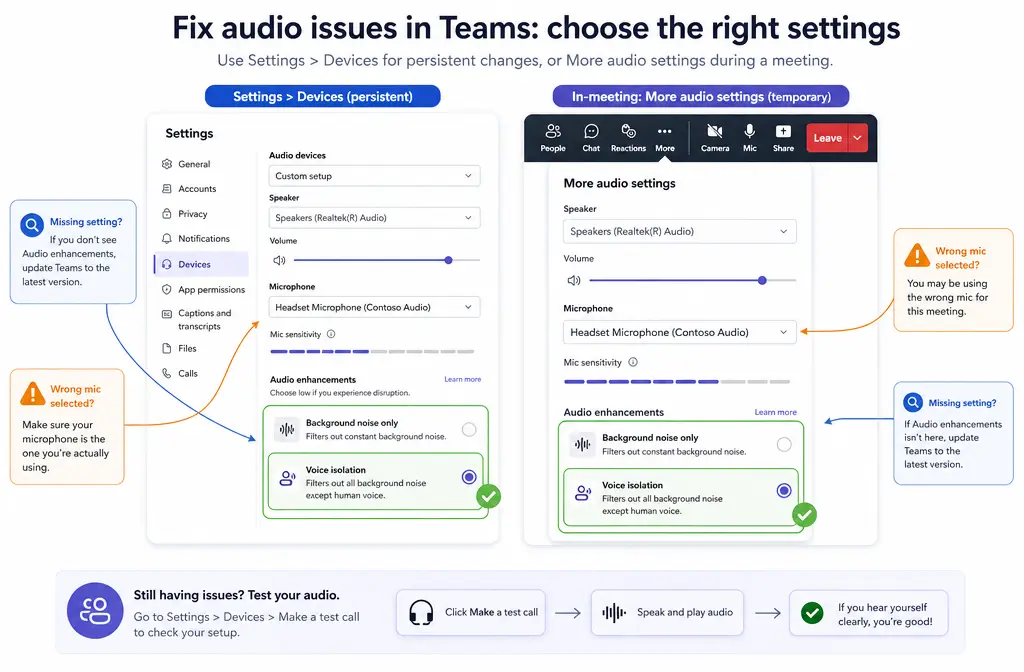
- If the noise suppression option is missing, check Settings > Devices or the in-meeting More audio settings path in Teams, then confirm you are using the desktop app and the correct microphone.
- If keyboard noise or fan noise is still audible, switch to Background noise only, then run a Make a test call check to confirm you are testing the right mic.
- If nearby coworkers’ voices still get through, standard suppression may not be enough. Try Voice isolation, which may require a voice profile if you are not using a headset.
- If your voice sounds muffled, clipped, or robotic, the suppression may be too aggressive for your setup or the wrong device is selected.
- If music, instruments, or training-video audio is getting damaged, turn off suppression for that scenario and use High fidelity music mode and/or Include sound when sharing computer audio.
- If the audio is already recorded and noisy, Teams is the wrong layer to fix it. You will need a post-processing workflow such as SimpleClean for exported audio or video files.
60-second symptom-to-fix table
| What you hear | Most likely cause | Best next step |
|---|---|---|
| Noise suppression setting is missing | Wrong Teams area, browser limitation, wrong app context, or policy control | Check Settings > Devices and in-meeting More audio settings; if Voice isolation or Recognition is missing, contact IT |
| No audible difference after enabling suppression | Wrong microphone selected or permissions/device routing issue | Verify the input device, mic permissions, and use Make a test call |
| People still hear keyboard clicks | Suppression is on the wrong mode or the mic is too close to the keyboard | Use Background noise only and retest while typing briefly |
| Nearby voices still leak through | Background suppression is not the same as speaker filtering | Use Voice isolation and complete the voice profile setup if required |
| Your voice becomes thin, robotic, or cuts out | Suppression is harming speech pickup, or Bluetooth/device selection is wrong | Retest with the correct mic, then reduce reliance on suppression for that device |
| Music or shared video audio sounds bad | Suppression is treating wanted audio as noise | Use High fidelity music mode or Include sound instead |
| Recorded MP4/M4A/WAV is still noisy after the meeting | Teams only handled live input, not file repair | Export and clean the Teams recording with SimpleClean |
Where the setting moved in current Teams
Microsoft’s current support guidance places these controls in two main areas:
- Before or outside meetings: Settings > Devices
- During a meeting: the More audio settings area
In current Teams, Microsoft distinguishes between:
- Background noise only: intended to reduce unwanted background sounds
- Voice isolation: intended to isolate your voice from other voices around you
This distinction matters because many “noise suppression not working” complaints are really “I need Voice isolation, not ordinary background suppression.”
Why nearby voices may still leak through
If your problem is that a nearby coworker, family member, or call-center neighbor is being heard on your mic, Background noise only may not solve it well enough. Microsoft’s documentation specifically frames Voice isolation as the feature for separating your voice from other nearby speakers.
That means:
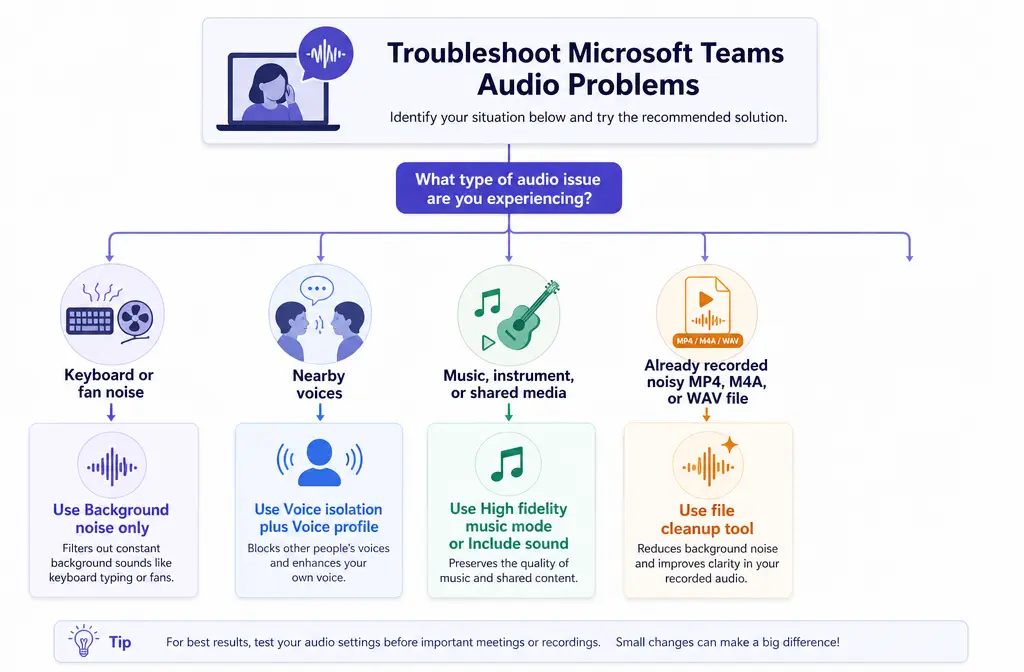
- Typing, fan noise, and air conditioner noise point more toward Background noise only.
- Another person talking near you points more toward Voice isolation.
For users who are not using a headset, Microsoft says Voice isolation may require a voice profile. If you keep testing standard suppression against nearby speech and hear no real improvement, stop looping on the wrong setting and switch to Voice isolation troubleshooting.
Why Voice isolation or the Recognition tab may be missing
If you do not see Voice isolation, the Recognition tab, or the option to create a voice profile, Microsoft’s support guidance says you may need to contact your IT administrator. Microsoft Learn also documents that availability can be controlled by Teams policies.
In practical terms, that means missing options can come from:
- Your organization has not enabled the relevant Voice isolation setting or policy
- Your account is managed and the feature is restricted by admin controls
- You are testing in a context where the expected control does not appear
Best for users: If you are on a personal or unmanaged setup, keep troubleshooting your app, device, and permissions. If you are on a work-managed tenant and Recognition is absent, do not waste an hour reinstalling things before checking with IT.
What to tell your IT admin
Keep it simple: “Voice isolation and/or Recognition is missing in Teams on my account. Can you confirm whether the Voice isolation policy is enabled for my user?” That request lines up with Microsoft’s admin documentation and gets you to the right team faster.
Why Teams can sound robotic or cut off your voice
Sometimes the feature is technically working, but the result sounds worse. Common symptom patterns include speech becoming muffled, choppy, or slightly robotic. Based on Microsoft’s own separation of features, that usually means one of these is happening:
- You selected a suppression mode that is too aggressive for the kind of audio you are sending
- The wrong microphone is selected in Teams
- The operating system or browser is feeding Teams a different input than the one you think you are using
- A Bluetooth device is the active mic instead of your intended microphone
When that happens, do not judge the result from live conversation alone. Use Microsoft’s built-in Make a test call workflow so you can hear a short recording back and compare before and after changes.
How to troubleshoot by symptom
1) The setting is missing
- Open Teams Settings > Devices and look for the audio controls there.
- If you are already in a meeting, open the in-meeting More audio settings area.
- Confirm you are troubleshooting the correct account and the correct microphone.
- If the missing item is specifically Voice isolation or Recognition, contact your IT admin because policy can govern availability.
2) There is no audible change
- Check the selected microphone in Teams.
- Confirm mic permissions at the OS and browser level if applicable.
- Run Make a test call in Teams.
- Create a short test: speak normally, then type for two seconds, then stop.
- Play back the test and compare with the setting off versus on.
If the before/after recordings sound identical, you may be using the wrong input device or testing a noise type that the chosen mode is not designed to target.
3) Keyboard clicks are still getting through
Keyboard noise is a classic example of background noise, not voice isolation. Start with Background noise only. If the result is still weak, the remaining issue may be physical rather than software-only, such as mic placement or desk vibration. Teams can reduce noise, but it cannot guarantee total removal of every impact sound in every setup.
4) Nearby voices are still leaking
This is where many users pick the wrong fix. If another human voice is the main problem, move to Voice isolation. If prompted, create the required voice profile. Microsoft’s documentation indicates that voice profiling is part of getting Voice isolation to work properly for some setups.
5) Music, instruments, or media audio sound broken
If suppression seems to “ruin” a guitar demo, piano, vocal performance, training clip, or screen-shared video, that is not necessarily a bug. In that scenario, the system may be suppressing audio you actually want to keep.
Use these Microsoft-recommended paths instead:
- High fidelity music mode for music and instrument scenarios
- Include sound when sharing computer audio in a meeting or live event
Microsoft also notes a Mac audio-driver requirement for sharing computer sound in some cases, so if Include sound is unavailable or inconsistent on Mac, check that guidance.
How to test changes the right way
The best Teams troubleshooting is boring and repeatable. Change one thing, test it, listen back, then change the next thing.
Before/after checklist
- Pick the exact microphone you want to use in Teams
- Confirm Windows, macOS, or browser permissions allow mic access
- Choose the correct Teams mode: Background noise only, Voice isolation, or music-related mode
- Run Make a test call
- Record the same 10-second sample each time
- Compare playback, not just live impressions
Best setting for each situation
| Situation | Best Teams choice | Why |
|---|---|---|
| Typing, fan, HVAC, general room noise | Background noise only | This is the standard noise-reduction use case |
| Nearby people talking | Voice isolation | Designed to isolate your voice from other nearby voices |
| Headset user in a mostly quiet room | Usually minimal intervention needed | A headset often reduces room pickup before software helps |
| Music lesson, instrument demo, singing, rehearsal | High fidelity music mode | Suppression may damage wanted audio |
| Sharing a video, webinar clip, or training audio | Include sound | Sends the computer audio directly instead of relying on mic pickup |
| Noisy recording after the meeting | Post-process the exported file | Teams is for live audio handling, not true saved-file repair |
When Teams is the wrong tool
Teams can help with live input, but it is not a full repair tool for audio that has already been recorded and exported. If you finished the meeting and now have a noisy MP4, M4A, or WAV, changing Teams settings will not clean that file retroactively.
That is the point where a file-based workflow is faster. You can repair a noisy Teams recording with SimpleClean instead of trying to recreate the call or chase live settings after the fact.
If you are turning that cleaned meeting into content, you can also:
- Add subtitles with Best AI Captions
- Create multilingual versions with Translate Dub
- Schedule clips and publish them across channels with Mallary.ai
That workflow fits especially well for webinars, internal training, customer demos, podcasts, and repurposed meeting highlights.
How to fix Microsoft Teams noise suppression not working
- Open the current Teams audio settings.
Check Settings > Devices outside a meeting or More audio settings during a meeting. - Match the mode to the problem.
Use Background noise only for non-voice noise and Voice isolation for nearby speakers. Use High fidelity music mode for music or instrument content. - Verify the microphone input.
Make sure Teams is using the mic you actually intend to use, especially if Bluetooth or a webcam mic is also connected. - Check permissions.
Review operating system and browser microphone permissions if Teams cannot access the expected input properly. - Run Make a test call.
Record a short sample and compare playback before and after you change the setting. - Set up Voice isolation if needed.
If you are not using a headset, create the voice profile if Teams prompts you to do so. - Escalate missing Recognition or Voice isolation to IT.
Microsoft documents admin policy control here, so missing controls may not be a user-side error. - Use a fallback for already-recorded files.
If the meeting is over and the exported recording is noisy, clean the exported Teams audio with SimpleClean.
Better fallback: live suppression vs file cleanup
Use Teams settings when:
- You are trying to improve the sound of an upcoming or live meeting
- The problem is device choice, permission, or the wrong Teams mode
- You need to reduce live background pickup
Use file cleanup when:
- The meeting is already recorded
- The exported file is noisy even though the call is over
- You need a cleaner deliverable for replay, training, clips, or publishing
For related troubleshooting, see Google Meet noise cancellation not working, Zoom noise suppression not working, and Krisp not working if your setup overlaps with other apps or third-party processing layers.
Final takeaway
Most Microsoft Teams noise suppression failures are not random. They come from using the wrong mode for the problem, testing the wrong microphone, or expecting regular background suppression to block nearby voices that really require Voice isolation. For music and shared media, suppression can look “broken” because it is removing audio you actually want. And for already-recorded files, Teams simply is not the repair tool. Fix the live settings first, test them with a short call, and if the recording is already done, move to a dedicated cleanup workflow with SimpleClean.
Sources and further reading
- Manage audio settings in Microsoft Teams meetings | Microsoft Support - Official source for current Teams audio settings paths and the distinction between Background noise only and Voice isolation.
- Voice isolation in Microsoft Teams calls and meetings | Microsoft Support - Official source for what Voice isolation does, voice profile setup, and Recognition-related guidance.
- My microphone isn't working in Microsoft Teams | Microsoft Support - Official source for mic permissions, device selection, and Make a test call workflow.
- Use high-fidelity music mode to play music in Microsoft Teams | Microsoft Support - Official source for music and instrument scenarios where suppression is the wrong choice.
- Share sound from your computer in Microsoft Teams meetings or live events | Microsoft Support - Official source for Include sound behavior and Mac audio-driver caveat.
- Teams settings and policies reference | Microsoft Learn - Official admin reference confirming policy-controlled availability related to Voice isolation.
- Manage voice isolation for your users' Microsoft Teams calls and meetings | Microsoft Learn - Official admin-side explanation for Voice isolation management and why some users may not have access.