Quick Answer
If you need to remove background noise in REAPER, the best built-in tool for spoken voice is usually ReaFIR in Subtract mode when the noise is steady, such as hiss, fan noise, AC noise, or faint hum. ReaGate is not true denoise; it only reduces what you hear during quieter gaps by muting audio below a threshold. For most voice cleanup, the safest built-in order is:
- ReaFIR first for steady noise reduction
- Optional ReaGate for pauses only, if room noise is still obvious between phrases
- ReaEQ for a light high-pass filter or narrow cuts for hum/rumble
- Gentle compression only if needed after cleanup
REAPER handles constant background noise fairly well because its built-in ReaFIR subtraction mode is specifically suited to steady hiss and hum. But if the noise changes over time, overlaps the voice, or includes keyboard clicks and echo, you will often get metallic or underwater artifacts if you push too hard. In those cases, it is usually faster to clean exported voice audio with SimpleClean after rendering a WAV from REAPER.
What REAPER can and cannot fix for speech
REAPER is a strong editing environment because it supports applying FX in real time and non-destructively, then rendering the result to common formats including WAV, MP3, FLAC, MOV, and MP4. That makes it a practical place to try a first cleanup pass before deciding whether the file needs separate processing.
What it usually can help with:
- Steady hiss
- Constant fan or AC noise
- Low-level broadband background noise
- Some hum or rumble, especially when paired with EQ after denoise
- Noise between spoken phrases, if a gate is used carefully
What it usually cannot fully repair:
- Noise that changes constantly during the take
- Keyboard clicks and mouse taps during speech
- Strong room echo or reverb
- Background sounds that overlap the same frequencies as the voice
- Bad clipping or severe recording distortion
The practical takeaway is simple: use REAPER for steady noise and basic dialogue polish, but do not keep stacking harsher settings if the voice starts sounding phasey, metallic, or underwater.
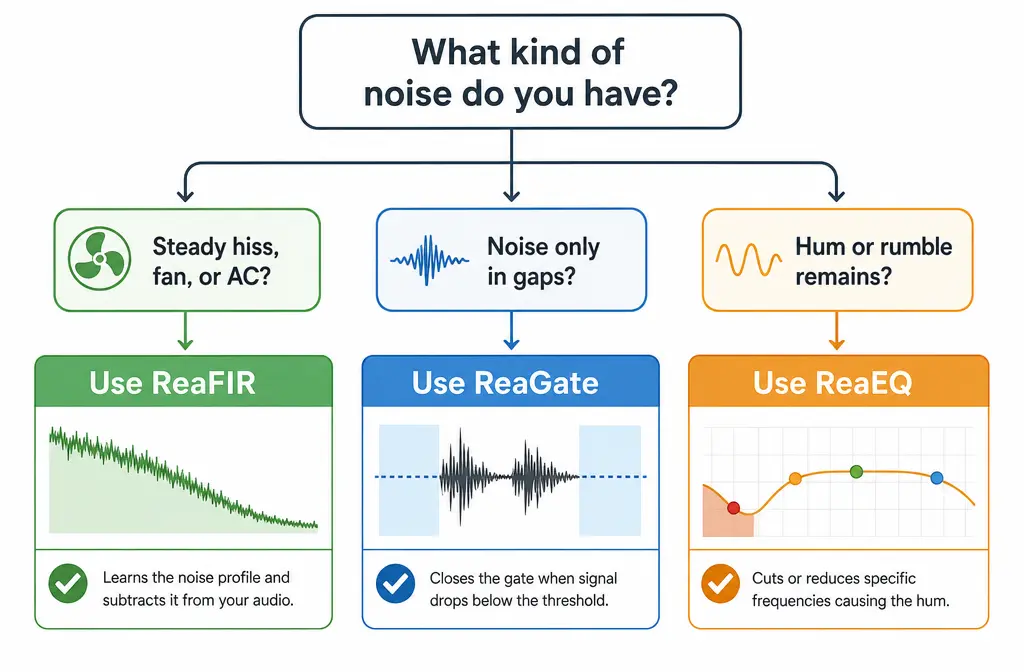
ReaFIR vs ReaGate vs EQ: which one is actually right for your noise?
| Tool | Best for | What it does well | Main limitation |
|---|---|---|---|
| ReaFIR | Steady hiss, hum, fan, AC noise | Subtracts a learned noise profile from the signal | Can make speech metallic if pushed too far or if the noise changes |
| ReaGate | Quiet gaps between phrases | Reduces room noise when nobody is talking | Does not remove noise underneath speech |
| ReaEQ | Rumble, hum frequencies, tonal cleanup | Useful after denoise for high-pass filtering or narrow cuts | Cannot act like full broadband noise reduction |
Best for most spoken-word tracks: start with ReaFIR, use ReaGate only if the pauses still sound noisy, and then use small EQ moves.
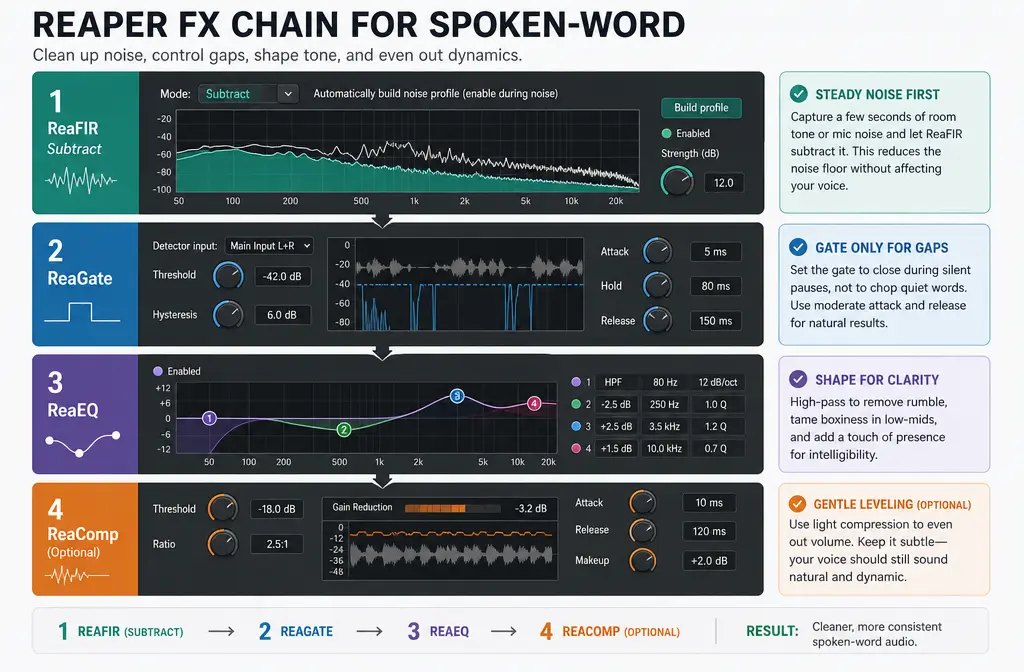
Best built-in FX order for dialogue cleanup in REAPER
For voice, podcasts, tutorials, screen recordings, and YouTube dialogue, this is the most reliable order to try first:
- ReaFIR to reduce steady background noise before any dynamics processing makes that noise more obvious.
- ReaGate only if needed, and only lightly, so it tidies pauses instead of chopping syllables.
- ReaEQ for cleanup moves such as a high-pass filter to remove low rumble, or a narrow notch if hum remains.
- Gentle compression if the voice still needs level control after cleanup.
This order matters. If you compress first, you may bring up the very noise you wanted to reduce. If you gate too early or too aggressively, you can create unnatural starts and ends on words.
If your goal is a fast speech-first workflow, this chain is usually better than experimenting with multiple corrective plugins at once.
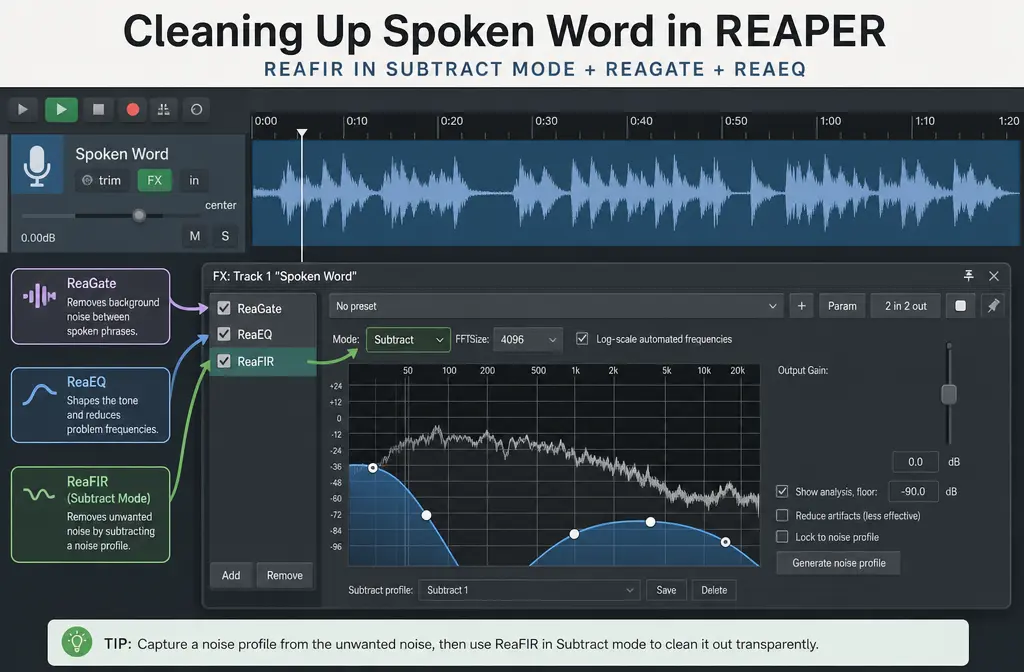
How to use ReaFIR to remove background noise in REAPER
Official REAPER documentation describes ReaFIR’s subtraction mode as excellent for noise reduction when you have steady background noise such as hum or hiss. That is the exact use case you should target.
Step-by-step workflow
- Find a short noise-only section. Before the speaker starts, or between phrases, locate a moment where only the background noise is present.
- Open the track FX chain. Insert ReaFIR on the voice track.
- Set ReaFIR to Subtract mode. This tells the plugin to remove a learned noise profile rather than boost or compress frequencies.
- Enable the noise-profile learning option. In ReaFIR, use the control that tells it to build the profile automatically while the noise-only sample plays.
- Play the noise-only region. Let ReaFIR “listen” briefly to the background noise so it can draw the subtraction curve.
- Disable learning. Turn the learning option off once the profile is captured.
- Play actual speech. Listen to a normal talking section and reduce only as much as needed.
- Bypass and compare. Toggle the plugin on and off to make sure the voice still sounds natural.
Good signs:
- The hiss or fan sound drops noticeably
- The voice remains intelligible
- The room tone is less distracting but not unnaturally hollow
Warning signs:
- Esses and consonants sound smeared
- The voice gets swirly or metallic
- Breaths sound phasey
- The room sounds like it is pumping in and out
If you hear those problems, back off. With ReaFIR, lighter settings usually beat aggressive ones for spoken voice.
How to reduce hum and rumble after denoise
ReaFIR can handle some steady noise, but low-end problems often need a small EQ move afterward.
Use ReaEQ after ReaFIR for:
- Low rumble: add a gentle high-pass filter
- Residual hum: try a narrow cut on the offending hum frequency if it remains obvious
- Muddy speech: use very light cleanup moves rather than broad, heavy scoops
This is one reason EQ belongs after denoise in a speech workflow: you first reduce the steady noise floor, then make focused tone corrections.
When ReaGate helps, and when it makes dialogue worse
ReaGate is useful, but only when you treat it as a gap cleaner, not as a denoiser.
Use ReaGate when:
- The room noise is mostly noticeable between phrases
- You want cleaner pauses in a podcast or tutorial recording
- The speaker has clear gaps between sentences
Do not expect ReaGate to:
- Remove hiss under active speech
- Fix fan noise that continues while someone is talking
- Repair overlapping noise events
If the gate threshold is too high, it can:
- Clip word beginnings
- Cut off quiet phrase endings
- Make the dialogue sound choppy
- Draw attention to the room tone changing on and off
For spoken voice, subtle is better. If the gate is obvious, it is probably too aggressive.
Why ReaFIR makes your voice sound metallic or underwater
This is one of the most common complaints, and it usually means one of three things:
- The noise was not steady enough. ReaFIR works best on constant background noise, not changing noise.
- The subtraction was pushed too hard. Heavy reduction often removes voice detail along with the noise.
- The learned profile was poor. If the “noise-only” sample included breaths, room movement, or speech, the profile can be inaccurate.
If your recording includes changing room tone, laptop fan ramps, street sounds, or clicks during speech, REAPER may only partially improve it. That is the point where it often makes more sense to remove background noise from exported audio with SimpleClean instead of forcing a harsher ReaFIR curve.
Troubleshooting common REAPER noise-removal problems
ReaFIR is not learning the noise profile
- Make sure the plugin is in Subtract mode
- Use a section with only background noise, no speech
- Confirm the learning option is enabled while that section plays
- Stop learning once the profile is captured
I do not have a clean noise-only sample
You can still try ReaFIR, but results are less predictable. In that case, use the quietest available room-tone section you have, keep the reduction mild, and compare constantly against the original.
The gate chops off words
- Lower the threshold
- Use less aggressive gating overall
- Rely more on ReaFIR for constant noise and less on the gate for active speech
Keyboard clicks in a screen recording
Keyboard clicks are transient noises, not steady noise. ReaGate may hide some clicks during silent gaps, but clicks that happen while you speak usually will not be removed cleanly by a subtractive denoiser.
Echo or reverb in the room
REAPER can help with noise reduction, but room echo is a different problem. If the voice already sounds distant and reflective, no simple built-in chain will fully restore it. Mild improvement may be possible, but full repair should not be expected.
When to clean the exported file online instead of fighting the mix inside REAPER
Use REAPER first when the problem is mostly steady hiss, fan noise, or low-level hum. But stop and switch workflows if:
- The noise changes over time
- The voice gets metallic before the noise is low enough
- You are cleaning screen recordings with keyboard clicks
- You need a fast result for publishing rather than a deep manual mix
- You are working with video dialogue and only need cleaner speech in the final file
In those cases, render a high-quality file first, then process the exported file separately. SimpleClean fits naturally here when you want to clean podcast audio, recorded dialogue, tutorials, or exported screen-capture audio without spending more time adjusting a difficult REAPER chain.
How to export a WAV from REAPER for better cleanup quality
REAPER supports rendering to common formats including WAV, MP3, FLAC, MOV, and MP4. For best cleanup flexibility, export a WAV first before making a compressed MP3 or final MP4.
- Finish your first-pass cleanup in REAPER. Keep it conservative.
- Open the Render dialog.
- Choose WAV as the output format.
- Render the cleaned file.
- Use that WAV for additional cleanup if needed.
- Create MP3 or MP4 only after the audio is where you want it.
This preserves more detail for follow-up processing than going straight to a more compressed delivery file.
Best workflow by use case
- Best for steady hiss, fan, or AC noise: ReaFIR in Subtract mode
- Best for cleaner pauses between sentences: light ReaGate after ReaFIR
- Best for hum or low rumble: ReaEQ after denoise
- Best for changing noise or overlapping distractions: export WAV and use a separate cleanup workflow
- Best for quick publishing after cleanup: clean the audio, add subtitles with Best AI Captions, create multilingual versions with Translate Dub, and schedule distribution clips or episode promos with Mallary.ai
Final recommendation
If you are deciding between ReaFIR and ReaGate in REAPER, the short answer is this: use ReaFIR for actual steady-noise reduction, and use ReaGate only to tidy quiet gaps. Then apply light EQ, and compress only if needed. That is the fastest reliable built-in chain for speech.
When the recording problem is more complex than steady hiss or hum, do not spend an hour forcing the mix. Render a WAV, then use a dedicated cleanup step on the exported file. That is often the faster path to cleaner dialogue and a more natural-sounding voice.
If you also work in other editors, you may want these related guides: remove background noise in Audacity, remove background noise in OBS Studio, and remove background noise in Premiere Pro.
Sources and further reading
- REAPER User Guide hub - Official REAPER documentation hub confirming current manuals and terminology.
- ReaEffects Guide PDF - Primary official source for ReaFIR, ReaGate, and ReaEQ behavior, including ReaFIR subtraction mode and ReaGate function.
- REAPER User Guide PDF - Official user guide covering rendering workflow and broader REAPER usage.
- REAPER technical specifications - Official source for supported rendering and file-format capabilities.
- REAPER product overview - Official source confirming real-time and non-destructive FX workflow.
- Amazing FREE Denoiser in REAPER - SERP competitor used for scope comparison and to improve on common ReaFIR-only tutorials.
- Removing noise with ReaFir video tutorial | The REAPER Blog - REAPER-specific tutorial reference supporting the steady-noise use case.
- Audio Effects in REAPER | Vancouver Public Library - Supplemental beginner-oriented reference for broader REAPER effects context.