How to Remove Background Noise in Audacity: When Noise Reduction Is Enough vs When to Clean the Exported File Online
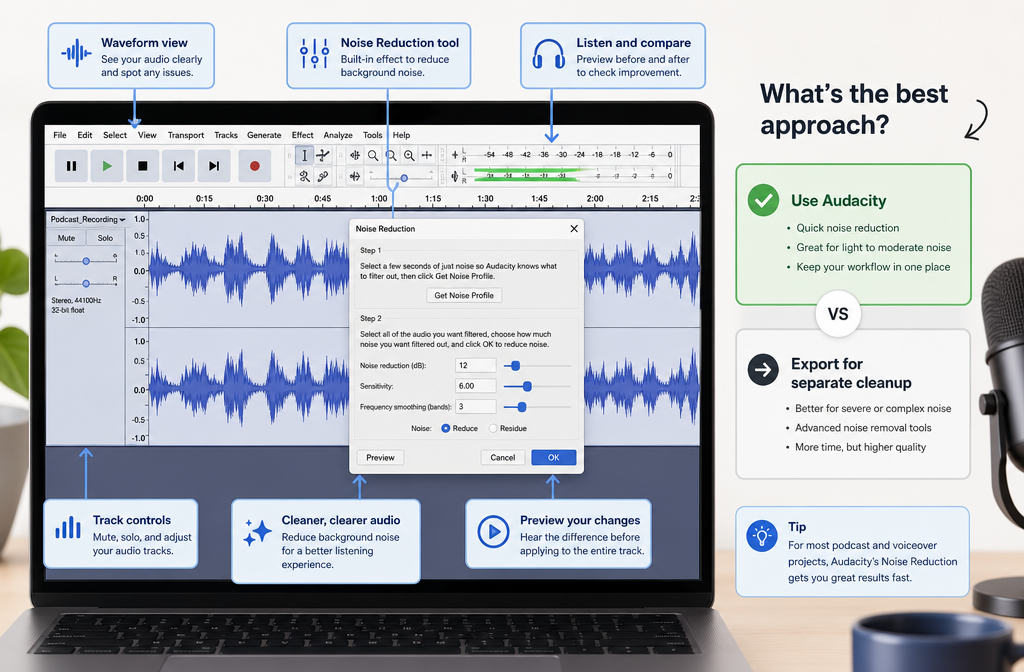
If you already have a noisy voice recording open in Audacity, the best next step depends on the type of noise. Audacity works well when the noise is steady and predictable, like hiss, fan noise, light buzz, or a constant hum. It works much less well when the noise changes over time, overlaps with speech, or comes from the room itself, like traffic, crowd chatter, echo, or background music.
For most spoken-word creators, the smartest workflow is simple: try Audacity first with a moderate Noise Reduction pass, preview carefully, and stop before the voice starts sounding metallic or underwater. If the noise is still distracting, or the fix starts hurting the voice, export the file and use a separate cleanup workflow instead. If you want a faster exported-file option, you can clean podcast audio with SimpleClean after exporting from Audacity.
Quick Answer
Use Audacity first for constant background noise when your voice is clearly louder than the noise. Export the file for separate online cleanup when the problem is variable noise, room echo, overlapping voices, traffic, or a mixed recording that needs more than one repair step.
- Good fit for Audacity: steady hiss, fan noise, light electrical buzz, 50/60 Hz hum
- Usually a weak fit for Audacity alone: background conversation, traffic, loud room echo, music under speech, changing noise
- Best beginner workflow: get a real noise profile, apply moderate reduction, preview, then back off if the voice gets watery or muffled
- Best export format for later cleanup: WAV, if possible
When Audacity is enough vs when to export for separate cleanup
| Situation | Try in Audacity? | Why |
|---|---|---|
| Steady hiss or fan noise | Yes | Noise Reduction is designed for constant noise patterns |
| Low hum at 50/60 Hz | Yes | Notch Filter can target hum frequency and harmonics |
| Noise mostly between phrases | Yes, with Noise Gate after reduction | Noise Gate can reduce leftover noise in pauses |
| Traffic changing over time | Usually export | Variable noise is harder for profile-based reduction |
| Background conversation or overlapping voices | Usually export | Speech-shaped noise overlaps too much with the main voice |
| Strong room echo | Usually export | Echo is not the same problem as steady noise |
| Voice already sounds damaged after one pass | Export | More manual reduction often adds artifacts instead of clarity |
This is the main decision most tutorials skip. Audacity is not bad at noise reduction. It is just strongest on the kind of noise its tool was built for: a repeatable background profile. The more your problem behaves like hiss or hum, the more likely Audacity is enough. The more your problem behaves like competing speech or room reflections, the more likely a separate cleanup pass is faster and cleaner.
What Audacity removes well
According to the Audacity manual and support documentation, Noise Reduction works best when you can capture a noise-only sample and the unwanted sound stays fairly constant. In speech editing, that usually means:
- Microphone hiss
- Computer fan or HVAC wash
- Steady room noise
- Light buzz
- Electrical hum, especially when combined with Notch Filter
That is why Audacity can work nicely for podcasts, voiceovers, tutorials, and interviews recorded in a mostly stable room. If the speaker is clear and the background noise does not shift much, one moderate pass often improves intelligibility without much damage.
What Audacity struggles with
Audacity's own documentation also makes the limits clear. Noise Reduction is less effective when the noise is loud, highly variable, or too similar to the wanted signal. For spoken-word recordings, that usually includes:
- Traffic that rises and falls
- Crowd chatter or background conversation
- Overlapping voices
- Loud room echo or reverb
- Music playing under speech
- Mixed problems, such as hiss plus echo plus chatter
If your recording has these issues, you can still test Audacity first, but do not expect a notch or profile-based reduction pass to fully solve them. In those cases, exporting the file and using a dedicated cleanup workflow is often the more efficient path. That is especially true if you are cleaning speech for publishing, transcription, or repurposing clips.
How to remove background noise in Audacity
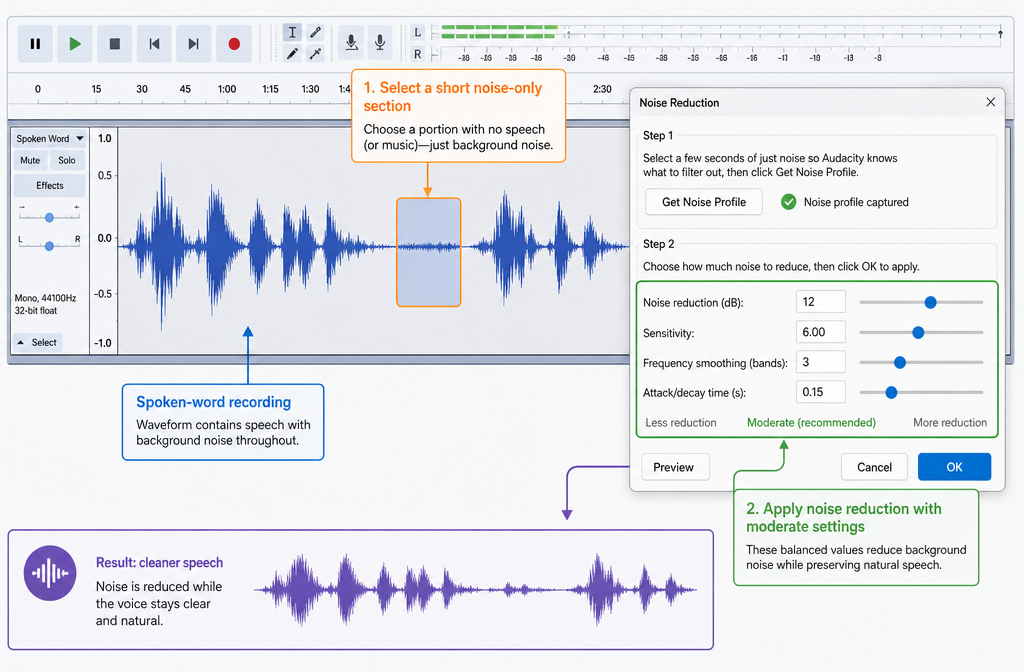
- Duplicate or save a raw copy first. Keep the original recording untouched so you can compare later or restart if needed.
- Find a noise-only section. Select a short area where no one is speaking and only the unwanted noise is present.
- Get the noise profile. Open Noise Reduction and capture that selected noise sample.
- Select the audio you want to clean. Usually this is the full spoken track.
- Apply a moderate reduction pass. Use gentle settings first rather than pushing one slider aggressively.
- Preview before committing to stronger settings. Listen for metallic, muffled, watery, or underwater artifacts.
- Adjust gradually. If needed, change reduction, sensitivity, and smoothing in small steps instead of maxing out any single control.
- Only add more tools when the problem is specific. Use Noise Gate for pauses, or Notch Filter for hum.
This speech-first workflow lines up with Audacity's manual guidance: capture a true noise sample, preview residue, and use trial and error carefully. The biggest beginner mistake is trying to force silence out of a noisy recording in one heavy pass.
Recommended starter settings for speech
The supplied Audacity feature and beginner-oriented sources support a moderate starting approach rather than an extreme one. The exact best settings depend on the recording, but the practical pattern is consistent:
- Start moderate
- Preview
- Lower the amount if the voice gets dull or swirly
- Adjust reduction, sensitivity, and frequency smoothing together instead of overusing one slider
For speech, that usually sounds better than trying to remove every trace of noise. A little residual background noise is often less distracting than a damaged voice.
If your main question is, How do I remove background hiss in Audacity without making voice sound muffled? the answer is: use a real noise profile, keep the first pass moderate, and stop as soon as intelligibility improves. Do not chase perfect silence if the voice quality starts falling apart.
Should you use Noise Gate or Noise Reduction first?
In most speech-cleanup cases, use Noise Reduction first and Noise Gate after if needed.
- Noise Reduction helps with constant noise under the whole recording.
- Noise Gate is better for reducing leftover noise in the quiet gaps between phrases.
Audacity's alternative noise reduction guidance supports this order. A gate is not the right fix for noise that sits underneath active speech, because it mainly acts when the wanted signal drops below a threshold. In plain English: it can clean pauses, but it cannot magically separate voice from noise while someone is talking.
So if noise still hangs between words after a moderate reduction pass, then add a gate. If the noise remains clearly audible during speech itself, a gate will not solve the core problem.
How to remove 50/60 Hz hum in Audacity
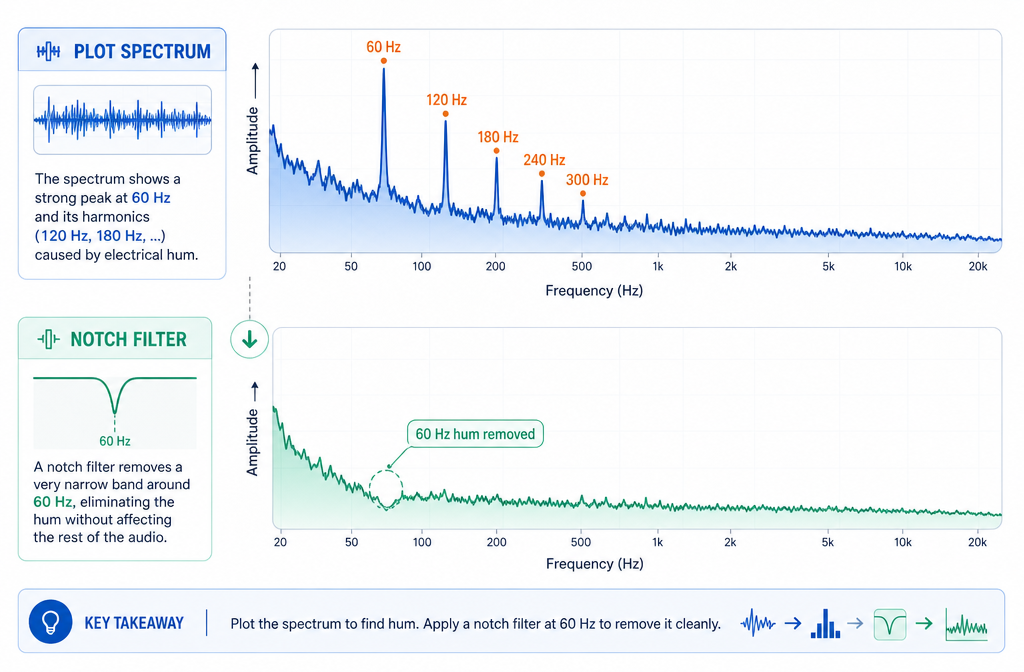
If the problem is electrical hum rather than broad hiss, use Notch Filter, not just general Noise Reduction. Audacity support specifically recommends using Plot Spectrum to find the exact hum frequency first.
- In the U.S., start by checking around 60 Hz
- In many other regions, start by checking around 50 Hz
- Also check harmonics above the base hum frequency
This matters because hum often appears at the base frequency and its multiples. If you only reduce general noise, the recording may still retain a low buzz. A targeted notch can be much cleaner for that specific job.
Troubleshooting common Audacity noise reduction problems
| Problem | Likely cause | What to try |
|---|---|---|
| Voice sounds muffled | Too much reduction or poor profile match | Lower reduction, preview again, keep more natural room tone |
| Voice sounds metallic or underwater | Reduction and/or sensitivity too aggressive | Back off settings and avoid repeated heavy passes |
| Audio sounds choppy in pauses | Gate threshold too aggressive | Use gentler Noise Gate settings or skip the gate |
| Noise remains between words | Residual room noise after reduction | Add Noise Gate after Noise Reduction |
| Hum is still there | Wrong tool for tonal noise | Use Plot Spectrum, then Notch Filter the exact 50/60 Hz frequency and harmonics |
| Traffic or chatter still under speech | Noise is variable and overlaps voice | Export for separate online cleanup instead of pushing Audacity harder |
If you are wondering, Why does Audacity noise reduction make my audio sound underwater? the usual answer is overprocessing. Audacity's manual explicitly warns that stronger settings can leave artifacts. In practice, that means the cure becomes more distracting than the original noise.
When exporting the file for separate online cleanup is better
Export the file and switch workflows when any of these are true:
- The noise changes over time
- The background includes other voices
- The recording has both noise and echo
- You have already tried moderate Audacity settings and the voice now sounds unnatural
- You want faster turnaround without manual filter hunting
This is where SimpleClean fits naturally. Instead of stacking manual passes inside Audacity, you can export the spoken track and use a separate cleanup step when the native tools stop being efficient. That approach is especially useful for interview edits, course audio, downloaded video soundtracks, and speech-first content that needs to be clear quickly.
If your issue is more specific than general noise, these guides may also help:
- remove hiss from audio online
- remove background conversation from audio online
- remove echo from audio online
- remove traffic noise from video online
- clean podcast audio online
Exact export workflow from Audacity
- Keep the raw project. Save your original Audacity project or duplicate the track before final cleanup.
- Export WAV for highest-quality cleanup. If you plan more processing, WAV is the safest choice.
- Use MP3 only if needed. It is acceptable when you need a smaller file, but it is not the best choice before further repair.
- For video workflows, export the cleaned audio separately. Then pair it back with your video in your editor if needed.
So, Should I export WAV from Audacity before using an online audio cleaner? Yes, when possible. That preserves the most quality for any next cleanup step.
Best-for recommendations
- Best for beginners with steady hiss or fan noise: Audacity Noise Reduction with a moderate first pass
- Best for leftover noise in pauses: Audacity Noise Gate after Noise Reduction
- Best for electrical hum: Audacity Notch Filter after identifying the exact frequency with Plot Spectrum
- Best for mixed speech problems and faster cleanup: export the file and remove background noise from exported audio in a separate workflow
- Best for creators republishing video clips: clean the audio first, then add subtitles with Best AI Captions
- Best for multilingual publishing: after cleanup, use Translate Dub to translate, dub, and caption your videos
- Best for distribution and scheduling: once the cleaned clip is ready, publish and schedule it across channels with Mallary.ai
That last workflow is practical for podcasters, educators, and creators: clean the speech, caption it, translate it if needed, then distribute clips or full episodes through one publishing system.
Best practices before and after cleanup
- Keep a copy of the raw file
- Compare processed audio against the original, not just against silence
- Avoid repeated destructive passes
- Use the lightest processing that improves clarity
- Match the tool to the problem: profile reduction for constant noise, gate for pauses, notch for hum
The cleanest sounding result is usually not the most aggressively processed one. For speech, natural tone and intelligibility matter more than removing every trace of background sound.
Final takeaway
Audacity is absolutely worth trying first when your recording has steady background noise and the voice is still clearly dominant. But if the voice starts sounding muffled, metallic, or underwater before the problem is solved, that is your sign to stop pushing the built-in tools. Save the raw version, export a WAV, and move to a separate cleanup workflow instead.
If you want the simplest next step after Audacity, you can clean exported voice recordings with SimpleClean and continue from there.
Sources and further reading
- Audacity Support — Noise reduction & removal - Primary source for current Noise Reduction, Noise Gate, and Notch Filter workflows.
- Audacity Manual — Noise Reduction - Primary source for noise profile workflow, artifact warnings, and limitations with loud or variable noise.
- Audacity Manual — Alternative Noise Reduction Techniques - Source for when Noise Gate helps after Noise Reduction.
- Audacity Feature Page — Remove Background Noise - High-level explanation of settings and starter ranges for Noise Reduction.
- Tom's Hardware — How To Remove Background Noise, Distortion in Audacity - Practical support for Plot Spectrum and filter-based cleanup ideas.
- Buzzsprout — How to Remove Background Noise in Audacity (3 Steps) - Beginner SERP framing and moderate starter-setting approach for speech cleanup.