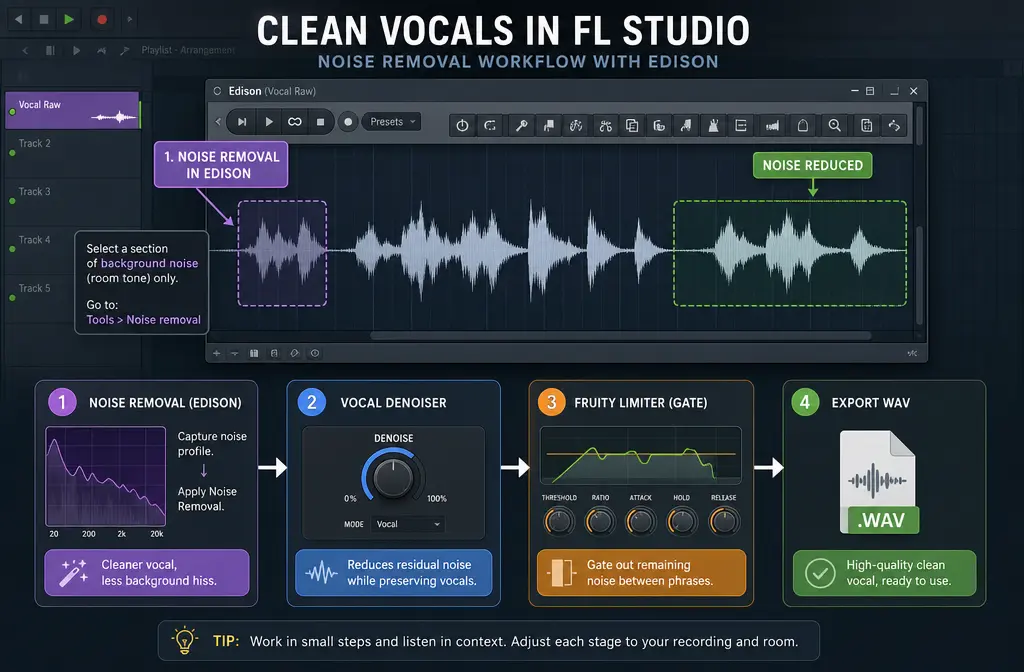
Quick Answer
To remove background noise in FL Studio, pick the tool based on the noise type:
- Edison Noise Removal Tool is best for steady background noise like hiss, hum, AC rumble, mains buzz, or constant room tone. Image-Line describes it as a tool for continuous background noises and notes that it is not designed for transient sounds such as door slams or bird calls. Source
- Vocal Denoiser is best when voice and noise overlap and you need to push the vocal forward against other sounds. Image-Line describes it as an AI vocal extraction tool that lets you rebalance detected vocal versus other sounds. Source
- Fruity Limiter in gate mode is best only for muting noise between phrases, not for noise that continues under spoken words or vocals. Its gate controls are for suppression when the gate closes, not full denoising under active speech. Source
- EQ is for shaping leftovers after denoise, not for true noise removal. Source
For spoken voice, the safest FL Studio order is usually: 1) denoise, 2) light EQ, 3) compression or leveling, 4) final WAV render. If the noise changes constantly, covers the words, or your voice starts sounding watery or metallic, stop pushing FL Studio harder and clean exported vocal audio with SimpleClean instead.
Best FL Studio Tool by Noise Type
| Noise problem | Best FL Studio tool | Why | Not ideal for |
|---|---|---|---|
| Hiss, static, fan, AC, mains hum, steady room tone | Edison Noise Removal Tool | Designed for continuous background noise using a learned noise profile | Transient sounds or rapidly changing noises |
| Noise overlapping speech or vocals | Edison Vocal Denoiser | Rebalances detected vocal against other sounds | Pure gap muting between lines |
| Noise only in pauses between words | Fruity Limiter gate | Suppresses noise when the gate closes | Noise riding under active speech |
| Leftover harshness, rumble, or tonal buildup | Fruity Parametric EQ 2 | Shapes frequencies after cleanup | Full denoising by itself |
| Heavy, changing, speech-covered noise that causes artifacts | Export WAV and clean separately | Lets you avoid overprocessing inside the mix chain | Quick one-plugin FL Studio fix |
What FL Studio Can and Cannot Truly Fix
FL Studio does have real noise-reduction options. The most important one is Edison’s Noise Removal Tool, which Image-Line says is for continuous background noises. That means it works best on sounds that stay fairly constant over time, such as hiss, electrical hum, camera motor noise, or air conditioner noise. Image-Line manual
But the same manual also warns that the tool is not designed for transient sounds. That matters because many beginners try to use denoise on problems that are really editing problems rather than steady-noise problems.
In plain English:
- FL Studio can reduce steady noise well if you have a short noise-only section to sample.
- FL Studio can help voice-vs-noise separation with Vocal Denoiser. Source
- FL Studio can suppress silent gaps with a gate. Source
- FL Studio cannot perfectly restore badly buried speech if the noise is constantly changing or masking the vocal itself.
- FL Studio cannot make every bad recording sound studio-clean without tradeoffs.
That tradeoff is usually artifacts: underwater textures, metallic consonants, dullness, or pumping. When you hear those, back off.

Method 1: Use Edison Noise Removal for Constant Hiss, Hum, or AC Noise
This is the stock FL Studio method most people should try first when the noise is consistent from start to finish.
According to the Image-Line Noise Removal Tool manual, the basic workflow is to load Edison, find a short section that contains only the unwanted noise, acquire that profile, then apply reduction to the larger selection.
Best for
- Mic hiss
- Electrical hum
- Fan or AC noise
- Steady computer noise
- Constant room tone
How to do it
- Open Edison on the relevant mixer track or audio clip, then load the recording into Edison if needed. Edison manual
- Find a noise-only region where nobody is speaking.
- Select that noise-only part.
- Open the Noise Removal Tool and acquire the noise profile. Source
- Select the larger vocal area you want to clean.
- Preview lightly first instead of going aggressive immediately.
- Use “Output noise only” as a safety check. Image-Line specifically recommends this so you can hear what is being removed. Source
- Back off the settings if you hear wanted vocal audio getting stripped out.
- Accept the cleanup once the noise drops without damaging the voice too much.
What to listen for
- If the hiss drops and the voice still sounds natural, you are in the right zone.
- If S sounds, breaths, or room detail start sounding swirly, you pushed too far.
- If low hum remains, you can often clean the rest later with light EQ shaping.
This preview-first approach is the difference between a usable spoken track and a brittle one.
Method 2: Use Vocal Denoiser When Noise Overlaps the Voice
This is the section many competing tutorials skip. Image-Line describes Vocal Denoiser as an AI vocal extraction tool that lets you rebalance the detected vocal against other sounds, including unwanted noise. Source
That makes it the more logical FL Studio-native option when the problem is not just constant hiss in the background, but mixed-in noise that sits under the words.
Best for
- Speech recorded in a noisy room
- Voiceovers with background activity plus voice overlap
- Tutorial audio where room sound competes with speech
- Rough vocal takes where the voice needs separation from surrounding sound
When it beats standard Edison denoise
Use Vocal Denoiser instead of regular Noise Removal when:
- You do not have a clean noise-only section
- The noise changes too much for a single noise profile
- The vocal feels buried under general background sound
- Profile-based denoise causes too many artifacts
Practical tip
Do not stack heavy Noise Removal and heavy Vocal Denoiser together just because both exist. Start with the one that matches the main problem. If Vocal Denoiser gets you most of the way there, follow with only light EQ and dynamics.
If you publish tutorials or clips after cleaning the audio, this is also a good point to add subtitles with Best AI Captions, especially when denoise improves clarity but you still want viewers to catch every word.
Method 3: Use Fruity Limiter as a Gate for Silences Only
Fruity Limiter is not a true denoiser. Image-Line’s documentation shows its gate controls handle threshold, gain, and release behavior. That means it can suppress noise when the gate is closed, but it does not remove noise that continues while the vocal is active. Source
Best for
- Podcast pauses
- Breaths between lines
- Muting idle room tone between phrases
- Cleaning gaps after denoise
Not best for
- Hiss under every word
- Hum under sustained vocals
- Noisy speech recorded in a bad room
If you set the threshold too high, the gate will chop off word beginnings and endings. If release is wrong, it can pump open and closed unnaturally. Think of Fruity Limiter as a finishing tool for pauses, not your main background-noise remover.
Best Cleanup Order for Spoken Voice in FL Studio
For dialogue, podcasts, tutorials, rap takes, and voiceovers, the cleanest order is usually:
- Denoise first with Edison Noise Removal or Vocal Denoiser
- Apply light EQ to shape leftovers
- Add compression or leveling after the noise problem is reduced
- Render or export WAV for your final cleaned take
Why this order works:
- If you compress first, you often bring the background noise up.
- If you EQ first, you may waste time shaping noise that should have been removed earlier.
- If you gate first, you only clean pauses, not the actual spoken lines.
For leftover tonal cleanup, use Fruity Parametric EQ 2 conservatively. EQ is useful for trimming some low rumble or softening leftover hiss, but it does not replace denoise. EQ reference

How to Export the Cleaned Take Back to the Playlist or Save a WAV
Once your audio sounds right, you have two common FL Studio paths:
Send the cleaned audio back into the project
- Use Edison’s send or drag workflow to place the cleaned audio back into the Playlist or Channel Rack. Edison manual
- This is useful when you want to keep arranging, mixing, or comping inside the same project.
Save the cleaned file as audio
- Save or export the cleaned recording from Edison as a separate file. Source
- If you are done editing, render the project or stem as WAV or FLAC. The Image-Line export documentation confirms these export options. Export documentation
- FL Studio also notes that rendering is non-real-time. Source
If your next step is outside FL Studio, export a WAV rather than pushing more plugins onto a damaged voice.
When to Stop Inside FL Studio and Clean the Exported File Online Instead
This is the decision point most tutorials under-explain.
Stay inside FL Studio when:
- The noise is mostly steady
- You have a usable noise-only region
- Light denoise already sounds natural
- The gate only needs to tidy pauses
Export the cleaned or raw WAV for separate cleanup when:
- The noise changes constantly
- The noise overlaps speech heavily
- Edison starts sounding underwater or metallic
- You do not have a clean noise print
- You need a faster speech-first cleanup workflow after recording
That is where SimpleClean fits naturally: export the WAV, clean the spoken audio separately, then bring the result back into your edit if needed.
If your FL Studio tools start trading noise for artifacts, remove background noise from your exported FL Studio WAV with SimpleClean. This is often the simpler move for podcasts, voiceovers, course lessons, and talking-head videos where intelligibility matters more than preserving a full music-style plugin chain.
If you are republishing the cleaned audio as short videos, multilingual clips, or social posts, you can pair that workflow with Translate Dub for translated and dubbed versions, then use Mallary.ai to schedule and distribute those finished clips across social platforms.
Troubleshooting FL Studio Noise Removal
My voice sounds underwater or metallic
- You removed too much.
- Re-open the tool and back off the reduction amount.
- Use the Output noise only check in Edison to make sure you are not removing voice detail. Source
- If the noise overlaps speech too much, try Vocal Denoiser or export the WAV for separate cleanup.
My gate chops off words
- Lower the gate threshold.
- Adjust release so the gate closes more naturally.
- Remember Fruity Limiter is only for silences, not main denoising. Source
The voice became dull after denoise
- Use less reduction.
- Add only light EQ afterward to restore balance.
- Do not over-stack multiple cleanup processes.
I do not have a noise-only region
- Try Vocal Denoiser first. Source
- If that still struggles, export the WAV and clean it separately.
There is still hum or rumble left
- Use denoise first.
- Then make small EQ moves for leftovers rather than trying to EQ the whole problem away.
Prevention Tips for the Next Recording
The fastest denoise is the denoise you do not need.
- Record as dry and clean as possible. Recording guide
- Turn off fans or loud AC if you can.
- Move the mic closer to the speaker.
- Reduce keyboard and desk noise during takes.
- Capture a second or two of room tone before speaking in case you need a noise profile later.
- Avoid recording with heavy processing baked in when you may need repair later.
If you clean audio for video, captions can also carry clarity when some room noise remains. After cleanup, Best AI Captions can help make spoken content easier to follow.
Edison vs Vocal Denoiser vs Fruity Limiter: Which Should You Use?
- Choose Edison Noise Removal if your problem is steady hiss, hum, buzz, or AC noise.
- Choose Vocal Denoiser if your problem is voice competing with background sound.
- Choose Fruity Limiter if your problem is noise in the gaps only.
- Choose export-and-clean if all of the above start damaging the vocal.
If you also edit in other apps, you may want related guides on removing background noise in REAPER, removing background noise in Logic Pro, or removing background noise in Audacity.
Final Take
The best way to remove background noise in FL Studio is not to reach for every stock tool at once. Use the one that matches the problem:
- Edison Noise Removal for constant noise
- Vocal Denoiser for voice-vs-noise separation
- Fruity Limiter for silent gaps only
- EQ for light shaping after cleanup
And if FL Studio starts trading noise for artifacts, do not force it. Export a WAV and clean a noisy FL Studio voice export with SimpleClean instead.