How to Remove Background Noise in Premiere Pro: When Premiere Is Enough vs When to Clean the Exported File Online
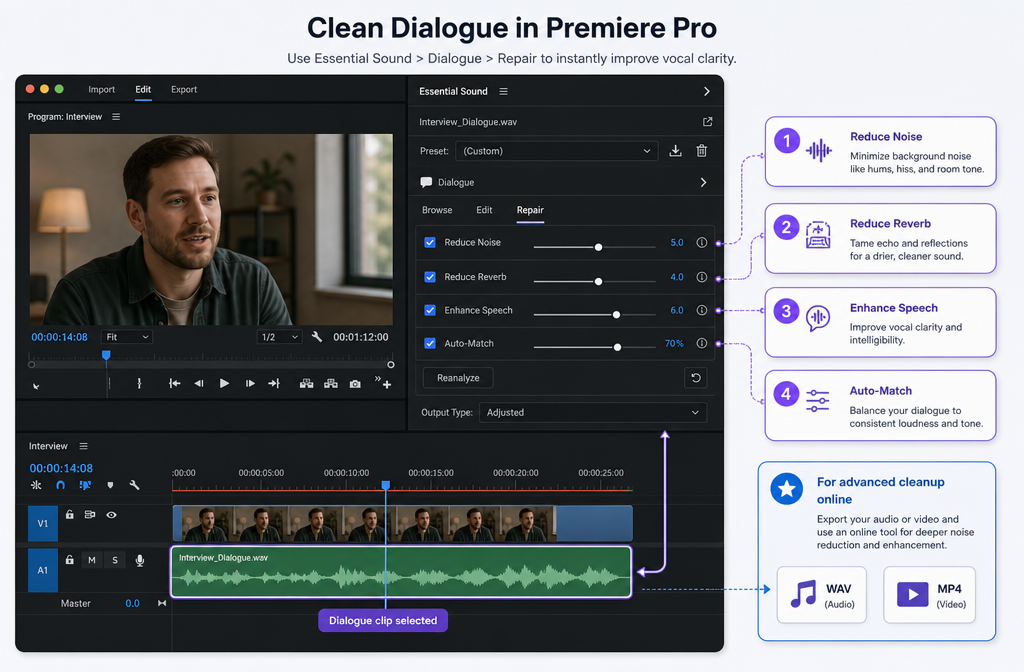
If you are already editing in Premiere Pro, the fastest path is usually to try Adobe’s built-in dialogue cleanup first. For mild steady noise, that often means tagging the clip as Dialogue in Essential Sound, using Repair controls like Reduce Noise and Reduce Reverb gently, then re-leveling with Auto-Match. But if the result turns metallic, swirly, phasey, or unnaturally flat, it is often faster to export the file and do a separate cleanup pass on the audio itself.
Quick Answer
To remove background noise in Premiere Pro without plugins:
- Select your dialogue clip.
- Open Essential Sound and tag it as Dialogue.
- In Repair, start with modest Reduce Noise and Reduce Reverb settings rather than pushing them hard.
- If the clip is spoken dialogue and you want a faster AI cleanup pass, try Enhance Speech.
- After cleanup, use Auto-Match to bring clips back to a consistent loudness.
- If Premiere starts making the voice sound robotic or collapses the ambience too much, export a WAV for audio-only cleanup or an MP4/MOV if you want to keep video attached for a separate online pass.
Premiere generally works best on mild, steady noise like fan noise, hiss, or hum. It is less reliable on severe echo, wind, or overlapping voices. That is the point where SimpleClean becomes a practical handoff instead of forcing Premiere to do the last 20% badly.
What Premiere Pro can fix well vs poorly
| Noise problem | Usually worth trying in Premiere first? | Best first move | When to export instead |
|---|---|---|---|
| Steady fan noise | Yes | Essential Sound > Dialogue > Repair > Reduce Noise | If speech gets metallic before the fan is low enough |
| Light hiss | Yes | Reduce Noise gently, then re-level | If clarity drops more than the hiss improves |
| Hum or low traffic rumble | Partly | Noise reduction first, then EQ to tame low end | If rumble is still masking the voice |
| Mild room reverb | Sometimes | Reduce Reverb conservatively | If the voice turns hollow or phasey |
| Heavy echo / reverberation | Usually limited | Try only a light pass | Export for separate cleanup quickly |
| Wind noise | Usually limited | Try a minimal pass if needed | Export for stronger repair workflow |
| Overlapping voices / background conversation | Poor candidate | Set expectations low | Export and test a dedicated cleanup pass |
The big idea is simple: Premiere is strong when the noise is steady and the speech is already fairly usable. It is weaker when the problem is complex, changing, or mixed into the voice itself.
Fastest built-in method: Essential Sound for dialogue repair
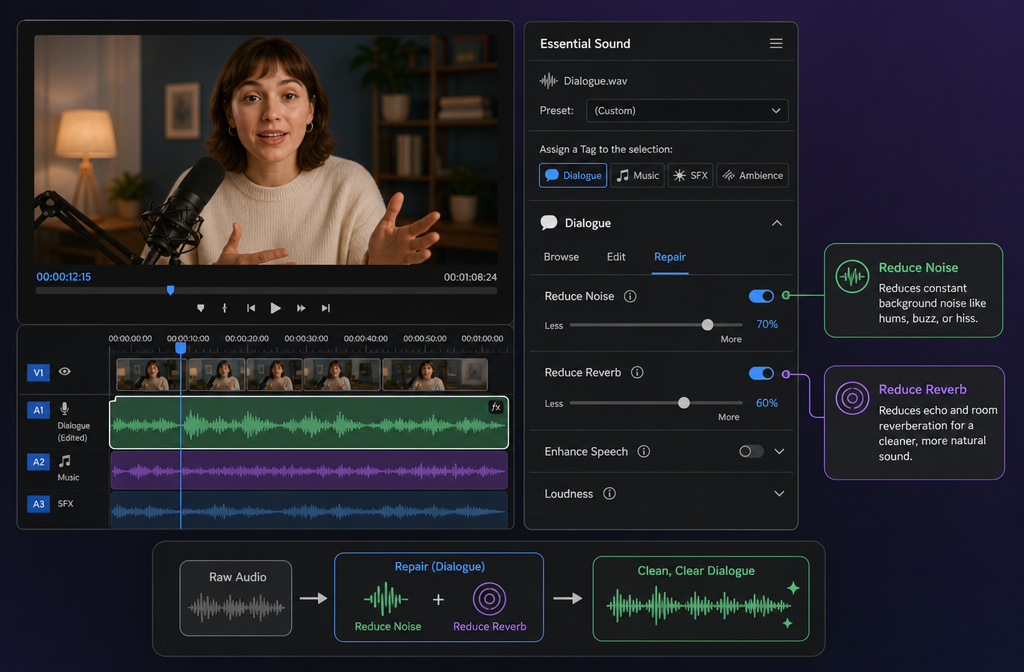
Adobe’s official workflow is to classify the clip, use the dialogue repair controls, start with defaults, and then adjust level afterward if repair lowers the clip volume. For most editors, this is the fastest first attempt because it stays inside the timeline.
How to remove background noise in Premiere Pro with Essential Sound
- Select one or more dialogue clips. If you are fixing a whole talking-head section, select all similar clips together.
- Open the Essential Sound panel.
- Tag the clips as Dialogue. This unlocks the dialogue tools Adobe documents for cleanup and loudness.
- Open Repair.
- Turn on Reduce Noise. Start gently. If the noise drops but the voice still sounds natural, keep going carefully. If the voice starts sounding watery or robotic, back off.
- Use Reduce Reverb only if needed. Adobe explicitly includes this in the same repair workflow, but it is one of the easiest controls to overdo.
- Listen in context. Soloing the clip is useful, but also audition it against music, room tone, and surrounding edits.
- Re-level the result. Adobe notes that repaired clips often need level adjustment afterward.
This approach is best for:
- YouTube talking heads
- Courses and explainers
- Interviews with steady HVAC or computer fan noise
- Batch cleanup across many similar clips
This approach is weaker for:
- Very echoey rooms
- Wind-heavy outdoor speech
- Street interviews with changing traffic beds
- Clips where another voice overlaps the speaker
When to use Enhance Speech instead of standard Reduce Noise
Enhance Speech is Adobe’s AI speech-cleanup option inside Premiere Pro. It makes sense when your priority is spoken-word intelligibility and you want a faster, more speech-focused result than manual repair sliders alone.
Use Enhance Speech when:
- The clip is clearly dialogue-first
- You want a quick cleanup pass without leaving Premiere
- Standard Reduce Noise is not getting far enough
- You can accept that the result may sound more processed than gentle repair
Do not lead with Enhance Speech when:
- You need to preserve stereo ambience
- The room sound matters to the final feel
- You are already hearing artifacts from other processing
- The clip has problems beyond speech cleanup, like severe wind or complex overlapping background audio
Important caveat from Adobe: Enhance Speech supports mono and stereo input, but stereo clips are output as a mono downmix. If preserving stereo space matters, check that before you commit the effect across a project.
That single detail changes the workflow for many editors. If your original clip has useful stereo ambience, a direct Premiere AI speech pass may not be the right finishing move.
Important caveat: stereo-to-mono behavior in Enhance Speech
This is one of the easiest Premiere audio surprises to miss. According to Adobe’s Enhance Speech technical requirements, the feature supports mono and stereo clips only, and stereo clips are processed to a mono downmix output.
So if you are cutting:
- a two-mic stereo setup,
- a camera clip where stereo room feel matters, or
- a scene where you want to keep environmental width,
test Enhance Speech on one short section first. If the image still works but the audio space feels narrower or more centered than you want, stop there and choose a lighter Essential Sound repair pass or export for separate cleanup.
How to tame low-end rumble or hum after noise reduction
Noise reduction often handles the obvious broadband noise first, but a low-end problem can still remain underneath the voice. In practical editing terms, that means you may reduce the hiss or fan wash, yet still hear traffic rumble, AC throb, or electrical-feeling low-frequency mud.
The useful order is:
- Reduce noise first.
- Then apply EQ moves to tame remaining low-end rumble or hum.
- Then check level again, because filtering can change perceived loudness.
This order matters because if you EQ too aggressively before cleanup, you can make the voice thinner without solving the actual noise problem. If the low end is still distracting after a reasonable EQ pass, that is another sign the file may clean up better as a separate exported audio repair job.
If your main issue is HVAC or AC bed rather than broad noise, this companion guide may help: remove air conditioner noise from video online.
How to level clips after cleanup with Auto-Match loudness
Adobe specifically documents that repaired clips often need level adjustment afterward. That is why many editors think noise reduction “made the audio worse” when the real issue is simply that the cleaned clip became quieter.
After your repair pass:
- Select the cleaned dialogue clips.
- Keep them tagged as Dialogue in Essential Sound.
- Use Auto-Match to normalize loudness across the selected clips.
This is especially helpful when:
- you cleaned multiple takes recorded at different distances,
- repair lowered one clip more than another, or
- you want a quick consistency pass before final mixing.
If you plan to add subtitles after cleanup, Best AI Captions is a natural next step for turning cleaned speech into readable on-screen captions and subtitles.

Premiere-first workflow for single clips vs many clips
Best workflow for a single noisy clip
- Tag as Dialogue.
- Try Reduce Noise gently.
- Add a little Reduce Reverb only if clearly needed.
- Test Enhance Speech on a duplicate if speech clarity is still weak.
- Compare against the untreated clip.
- Auto-Match loudness.
- If artifacts show up, export that clip for separate cleanup.
Best workflow for many similar clips
- Select clips from the same setup.
- Apply the same Dialogue classification and initial repair settings.
- Spot-check several clips, not just one.
- Use Auto-Match after repair for consistency.
- If some clips fall apart while others work, do not keep pushing the whole batch. Export the problem clips separately.
This is where a hybrid workflow is efficient: use Premiere to get 70 to 80 percent there on everything, then only export the stubborn clips for extra cleanup.
When Premiere starts sounding metallic, swirly, phasey, or too processed
These are the main failure modes that tell you to stop turning the knob up:
- Metallic or robotic voice: the cleanup is removing too much along with the noise.
- Swirly or phasey texture: common when reduction is too aggressive for the material.
- Hollow voice: often a sign that reverb reduction went too far.
- Flat, lifeless ambience: speech may be cleaner, but the scene no longer sounds natural.
Once you hear those artifacts, more Premiere processing rarely fixes them. It usually just trades one problem for another. At that point, export and compare a separate cleanup pass on the rendered file.
Export workflow: WAV vs MP4/MOV before separate cleanup
Adobe’s export tools make it straightforward to hand off either audio-only or a full video file.
Export WAV when:
- you only need to repair the audio,
- you want a clean audio-focused handoff, or
- you plan to reimport the repaired track into the same sequence.
Export MP4 or MOV when:
- you want to keep the video attached,
- you are handing the file to someone else for review, or
- you want one self-contained file for cleanup and approval.
In other words, use WAV for the purest audio-repair workflow and MP4/MOV when the video context matters.
SimpleClean handoff: clean the exported file online, compare, then reimport
If Premiere gets close but not all the way there, the cleanest workflow is often to export the file, run a separate cleanup pass, and then compare it back in the edit.
- Export a WAV if you only need audio repair, or MP4/MOV if you want the picture attached.
- Upload the exported file and clean exported Premiere audio with SimpleClean.
- Compare the cleaned version against your in-Premiere result.
- Keep whichever version sounds more natural and intelligible.
- Reimport the repaired file into Premiere if needed.
This is especially useful for stubborn fan noise, traffic wash, or clips where Premiere cleanup starts sounding synthetic. It also gives you a cleaner source before downstream tasks like subtitle generation, multilingual dubbing with Translate Dub, or republishing short clips across channels with Mallary.ai.
If you are working on related problems, you may also want these guides:
- remove hiss from audio online
- remove traffic noise from video online
- remove reverb from video online
- remove fan noise from audio online
Best-for recommendations
- Best for quick in-timeline fixes: Essential Sound Repair on mild, steady noise.
- Best for speech-first clips that need faster cleanup: Enhance Speech, as long as mono output from stereo is acceptable.
- Best for preserving natural sound when Premiere is getting artifacty: export and compare a separate cleanup pass.
- Best for many similar interview clips: batch the Premiere-first workflow, then isolate only the failures for external repair.
Troubleshooting
Why does Premiere denoise make my voice sound robotic?
Usually because the cleanup is too aggressive for the amount or type of noise. Back down Reduce Noise, use less Reduce Reverb, and compare against the original. If the clip still needs more help, export it for a separate cleanup pass instead of pushing harder.
Noise is still present after Reduce Noise
That usually means the remaining problem is not just broad background noise. You may be hearing low-end rumble, hum, or reverb. Try a light EQ move after noise reduction for rumble or hum. If the noise is complex or changing, export the file for another pass.
The level dropped after repair
This is expected often enough that Adobe calls it out. Use Auto-Match loudness or manually adjust clip level after repair.
Enhance Speech changed my stereo clip
That is consistent with Adobe’s documented behavior: stereo clips are output as a mono downmix. If that is a problem for your project, revert and use Essential Sound Repair more gently or move to a separate cleanup workflow.
Can Premiere remove echo or reverb?
Premiere can reduce some reverb with the Dialogue Repair tools, but severe echo is still one of the weakest cases for fully natural cleanup. Use Premiere for a light improvement pass, not a miracle expectation.
FAQ
How do I reduce background noise in Premiere Pro without plugins?
Use Essential Sound. Tag the clip as Dialogue, open Repair, start with Reduce Noise and Reduce Reverb gently, then use Auto-Match loudness after cleanup.
What is the difference between DeNoise, Reduce Noise, and Enhance Speech in Premiere Pro?
In the Adobe sources used for this guide, the documented built-in paths are Essential Sound’s Reduce Noise control and Enhance Speech. Reduce Noise is part of the dialogue repair workflow in Essential Sound. Enhance Speech is Adobe’s AI speech cleanup option. You will also see DeNoise mentioned in many tutorials, but this guide focuses on the Adobe-documented Essential Sound and Enhance Speech workflows because they are the most direct in-app paths covered by the supplied sources.
Does Enhance Speech in Premiere Pro turn stereo into mono?
Yes. Adobe documents that stereo clips processed with Enhance Speech are output as a mono downmix.
Should I export WAV from Premiere before cleaning audio online?
Yes, if you only need audio cleanup. Export WAV for an audio-only workflow. Export MP4 or MOV when you want to keep the video attached.
How do I remove AC hum or traffic rumble in Premiere Pro?
Start with dialogue noise reduction first, then use EQ to tame remaining low-end rumble or hum. If the voice still sounds masked, export the file for further cleanup.
How do I normalize loudness after noise reduction in Premiere Pro?
Use Auto-Match loudness in Essential Sound after your repair pass so cleaned clips sit more consistently in the edit.
Bottom line: start inside Premiere because it is fast and often good enough for steady noise. But if Premiere starts sounding processed before the problem is solved, do not fight it. Export the file, compare a separate pass, and bring back the version that sounds cleaner and more natural.
Sources and further reading
- Adobe Help — Reduce noise and reverberation in Premiere Pro - Official basis for Dialogue tagging, Reduce Noise, Reduce Reverb, starting with defaults, and adjusting clip level after repair.
- Adobe Help — Audio editing with Essential Sound panel - Official support for Essential Sound classification, dialogue repair workflow, presets, and loudness tools.
- Adobe Help — Apply Enhance Speech - Official source for using Enhance Speech inside Premiere Pro.
- Adobe Help — Enhance Speech technical requirements - Official caveat that Enhance Speech supports mono/stereo only and outputs stereo clips as mono downmix.
- Adobe Help — Auto-match audio loudness - Official source for Auto-Match as the loudness finishing step after cleanup.
- Adobe Help — Export video and audio files - Official support for exporting WAV audio-only files or video deliverables before external cleanup.
- Adobe Help — Export options in Premiere - Official export workflow context inside Premiere and Media Encoder.