Quick Answer
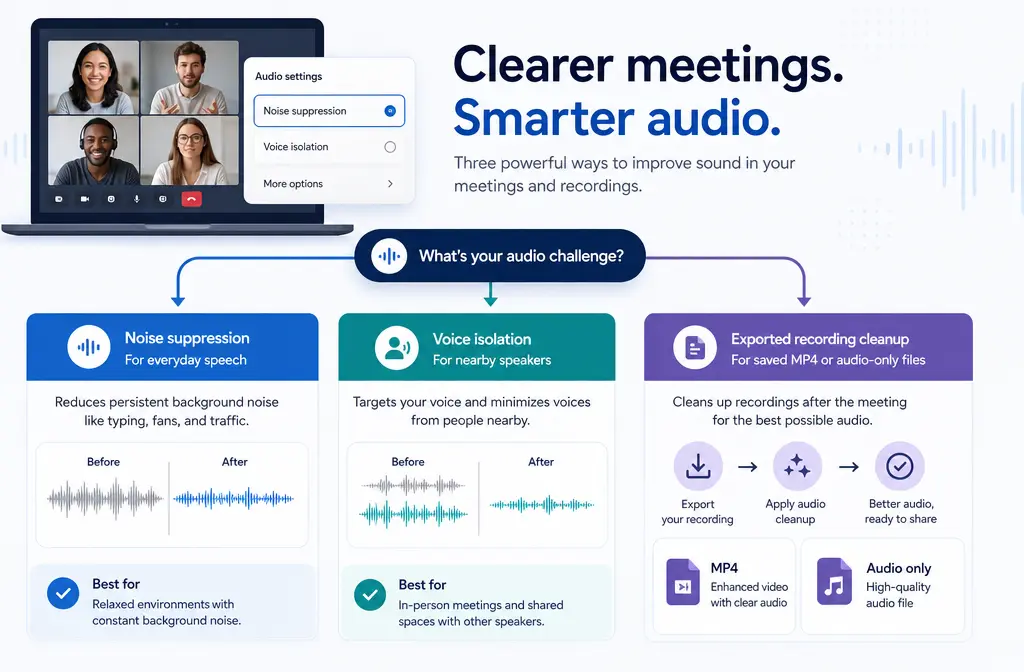
To remove background noise in Microsoft Teams, start with Noise suppression. It is the best default choice for most spoken meetings. If your bigger problem is other people talking near you, use Voice isolation instead, because it is designed to recognize and prioritize your voice after you create a voice profile. If the live meeting sounds better but the saved recording still has fan noise, HVAC hum, room tone, or echo, download the MP4 or audio-only recording from OneDrive or SharePoint and clean the exported file separately with SimpleClean.
One important warning: High fidelity music mode is not a speech-cleanup feature. It is meant for music and can disable suppression and other effects to preserve audio fidelity, which is usually the opposite of what you want in a normal Teams meeting.
Microsoft Teams background noise removal: the fastest decision tree
If you want the shortest path to clearer speech, use this framework:
- Use Noise suppression if you are dealing with keyboard noise, air conditioning, fans, or everyday room noise during a call.
- Use Voice isolation if nearby voices are bleeding into your mic and you want Teams to focus on your voice.
- Do not switch on High fidelity music mode for interviews, classes, standups, or sales calls just to “improve audio.” It is for music sharing, not spoken-word cleanup.
- Export the recording afterward if the meeting is already done or if the saved file still sounds noisy even after Teams improved the live call.
| Option | Best for | What it does | Main caution |
|---|---|---|---|
| Noise suppression | Most meetings and calls | Reduces background sounds around speech | Higher suppression can sound overprocessed in tougher conditions |
| Voice isolation | Shared rooms or nearby speakers | Uses a voice profile to focus on your voice and filter other sounds, including other nearby voices | May be missing if Recognition or voice enrollment is disabled by IT policy |
| High fidelity music mode | Music lessons, instrument demos, audio playback | Preserves music detail and can turn off suppression and other effects | Usually worse for regular spoken meetings |
| Exported-file cleanup | Noisy saved recordings | Cleans the downloaded MP4 or audio-only recording after the meeting | Requires downloading the recording first |
How to change Noise suppression in Teams
Microsoft says Teams includes built-in noise suppression on desktop, mobile, Teams Rooms on Windows, and Windows AVD. For most users, Auto is the default starting point.
Change Noise suppression from the main Teams app
- Open Teams.
- Select Settings and more.
- Go to Settings.
- Select Devices.
- Under Noise suppression, choose your setting.
Change Noise suppression during a meeting
- In the meeting window, open More.
- Open Settings.
- Go to Device settings.
- Find Noise suppression.
- Choose the option that fits your situation.
On supported iOS devices, Microsoft documents Auto, Low, and High options.
What Auto, Low, and High are actually best for
Teams documentation explains the choices, but most people need a plain-English version before the setting names are useful.
- Auto: Best first choice for almost everyone. Teams decides how much cleanup to apply based on what it hears.
- Low: A lighter touch when you want some background reduction without pushing the speech too hard.
- High: Best when there is a lot of non-speech noise and speech intelligibility matters more than natural sound.
The tradeoff is simple: the more aggressively a system suppresses sound, the easier it is for speech to start sounding processed. If voices become choppy, slightly watery, or less natural, step back from the most aggressive setting if possible.
This matters most in tougher environments like:
- laptop mics in echoey rooms
- busy home offices
- meetings with a loud fan or HVAC nearby
- calls where more than one person is speaking close to the same microphone
If nearby voices are the main issue, do not keep cranking speech suppression and hoping for a miracle. That is usually the point where Voice isolation is the better tool.
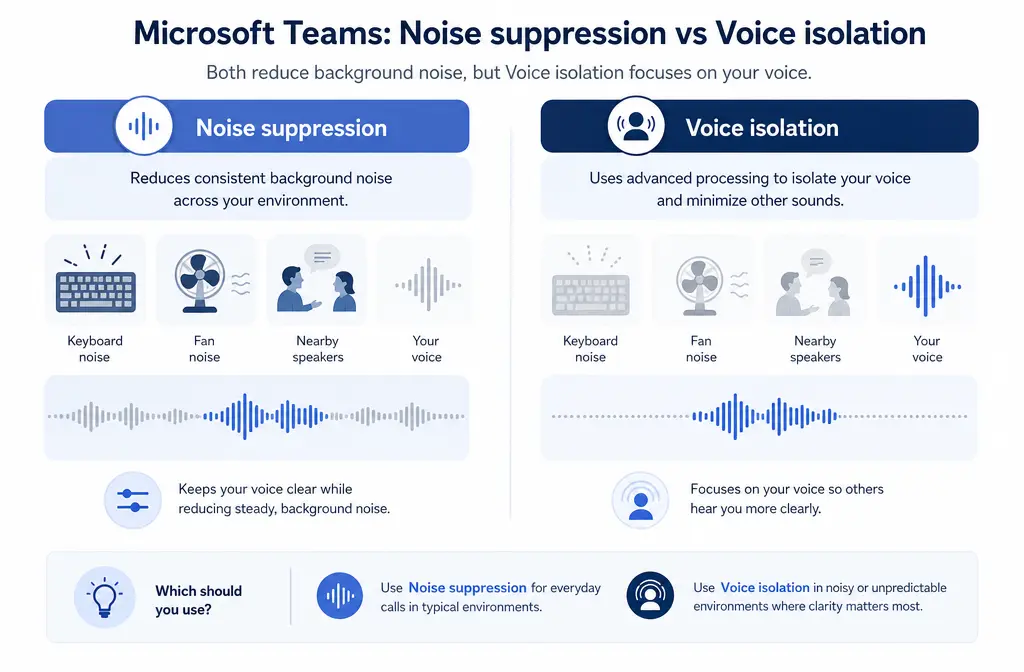
Noise suppression vs Voice isolation in Teams
Here is the difference in one sentence: Noise suppression reduces background sounds in general, while Voice isolation tries to keep your specific voice and reject other audio, including nearby talkers.
Use Noise suppression when:
- you want a quick fix with no setup
- the problem is fan noise, keyboard noise, room noise, or general clutter
- you are on a normal work call and just need clearer speech fast
Use Voice isolation when:
- other people are talking in the same room
- you work from shared spaces
- you want Teams to identify your voice rather than broadly suppress everything else
How Voice isolation works
Microsoft describes Voice isolation as a separate AI feature that uses a voice profile. Creating that profile takes about 30 seconds. Once enabled, Teams can use it to focus on your speech in calls and meetings.
That makes Voice isolation especially useful for:
- remote workers taking meetings from coworking spaces
- teachers or tutors working near other speakers
- interviewers in shared offices
- team leads joining calls from home while others are talking nearby
Microsoft also notes a privacy point many articles skip: face and voice profiles are only used for the purposes the user directly consented to.
How to set up Voice isolation in Microsoft Teams
- Open Teams.
- Go to Settings.
- Look for Recognition or the voice profile setup area.
- Create your voice profile by following the prompts.
- When available, enable Voice isolation for calls and meetings.
If you do not see the Recognition option, Microsoft says to contact your IT admin. This is not always a user mistake. Microsoft Learn confirms that admins can disable Voice isolation access or voice enrollment through Teams policies.
Why Voice isolation may be missing in Microsoft Teams
If the option is not there, the most common explanations are practical ones:
- Teams needs updating. Older app versions can miss newer audio features.
- Your device is under heavy load. Microsoft notes device load can affect performance.
- Your voice profile may need to be recreated. If results are poor, rebuilding it can help.
- Your organization may block it. If Recognition or enrollment is disabled by policy, you may not be able to turn it on yourself.
That last point matters because many guides imply that missing Voice isolation means you clicked the wrong menu. Sometimes the real fix is simply asking IT whether the policy is disabled.
Troubleshooting checklist
- Update the Teams desktop or mobile app.
- Close other heavy apps if your device is overloaded.
- Try a better mic or a headset if your current mic captures too much room sound.
- Recreate the voice profile if Teams offers the option.
- Ask your admin whether Recognition, voice enrollment, or Voice isolation has been disabled by policy.
Can Teams remove other people talking in the same room?
Sometimes, yes, but not perfectly. If other nearby speakers are your main problem, Voice isolation is the Teams feature most directly designed for that. Regular Noise suppression can help with general sound clutter, but it is not the same as telling Teams, “Keep only my voice.”
Even then, expectations matter. Teams can improve clarity, but it cannot guarantee perfect separation in every shared-room setup, especially if:
- multiple voices are equally close to one mic
- your room is very echoey
- you are using a poor laptop microphone
- the background speaker is much louder than you are
If this is a recurring problem, a headset mic is often the simplest non-software upgrade.
When not to use speech-first suppression: High fidelity music mode
High fidelity music mode is one of the easiest Teams audio settings to misuse. Microsoft says it is for playing music in Teams, and it can turn off suppression and other effects to preserve the audio more faithfully.
That is useful for:
- music lessons
- instrument demos
- sharing high-quality music playback
It is usually not what you want for:
- spoken meetings
- job interviews
- classes focused on speech
- podcast-style discussion calls
If your goal is cleaner voice, High fidelity music mode can work against you because the feature prioritizes fidelity over speech cleanup. In plain terms: great for music, wrong tool for everyday conversation.
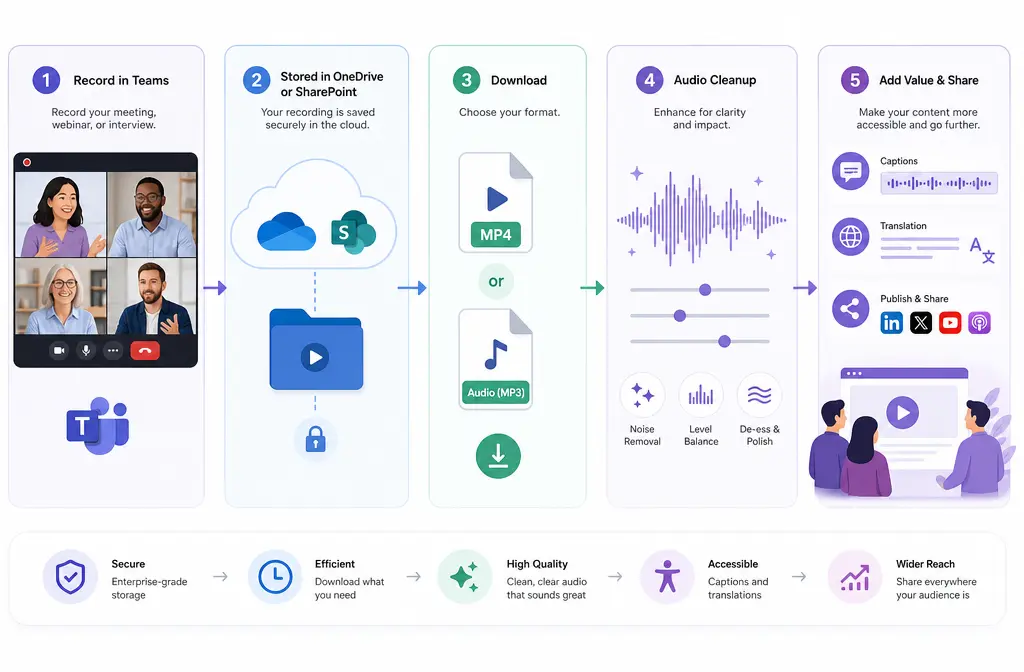
How to clean a Teams recording after the meeting
Teams can improve live audio, but that does not mean the saved recording will be perfect. If the meeting was captured with hum, fan noise, echo, or room tone, the best workflow is often to download the recording and clean the file separately.
Where Teams recordings are saved
Microsoft states that Teams recordings are stored in OneDrive and SharePoint. Microsoft also documents an audio-only recording option in Teams recording settings.
Post-recording cleanup workflow
- Find the meeting recording in OneDrive or SharePoint.
- Download the MP4 recording, or the audio-only version if that is what you saved.
- Listen for the real issue: fan noise, HVAC hum, echo, keyboard spill, or general room tone.
- Clean the exported file separately with clean Teams recording audio with SimpleClean.
- Save the cleaned version for reuse, delivery, or publishing.
This is the easiest bridge between live-call fixes and content quality. Teams may make the meeting easier to hear in the moment, while a dedicated cleanup pass helps when the recording is going to be shared, archived, or repurposed.
If you plan to publish the cleaned meeting clip later, Best AI Captions can help add captions and subtitles, Translate Dub fits if you need translated captions or dubbing for multilingual viewers, and Mallary.ai is a natural next step for distributing clips or recordings across social platforms from one workflow.
Best option by use case
- Best for most Teams meetings: Noise suppression on Auto first.
- Best for nearby speakers in the same room: Voice isolation.
- Best for music instruction or instrument demos: High fidelity music mode.
- Best for a noisy saved recording: Export the file and remove noise from a Teams recording with SimpleClean.
Practical tips if Teams audio still sounds bad
- Move the mic closer to your mouth.
- Use a headset instead of a laptop mic when possible.
- Reduce the noise at the source if you can: fans, open windows, or loud keyboards.
- Do not stack music mode with speech-cleanup expectations.
- If suppression sounds unnatural, try a less aggressive setting or switch to Voice isolation if nearby talkers are the issue.
- If the meeting has already been recorded, prioritize exported-file cleanup instead of chasing perfect live settings after the fact.
Related guides
If you also work across other meeting and editing tools, these SimpleClean guides may help:
- How to Remove Background Noise in Zoom
- How to Fix Metallic Voice After Noise Reduction
- How to Remove Background Noise From Video Online
Final takeaway
For most people, the right order is simple: start with Teams Noise suppression, switch to Voice isolation if nearby speakers are the real problem, avoid High fidelity music mode for normal spoken meetings, and download the recording for separate cleanup if the saved file still sounds rough.
That workflow matches how Teams is actually built. It also saves time: live settings for live clarity, exported-file cleanup for polished recordings.
Sources and further reading
- Reduce background noise in Microsoft Teams meetings - Primary source for Noise suppression availability, settings paths, and supported options.
- Voice isolation in Microsoft Teams calls and meetings - Primary source for what Voice isolation does, 30-second profile setup, and troubleshooting guidance.
- Manage voice isolation for your users' Microsoft Teams calls and meetings - Source for admin-policy caveats explaining why Voice isolation or enrollment may be unavailable.
- Create your Microsoft Teams recognition profile - Source for privacy and consent language around face and voice profiles.
- Use high-fidelity music mode to play music in Microsoft Teams - Source for explaining that High fidelity music mode is intended for music and can disable suppression and other effects.
- Start, stop, and find meeting recordings in Microsoft Teams - Source for recording storage location and the audio-only recording option.
- Delete a meeting recording in Microsoft Teams - Supporting source confirming Teams recordings are saved in OneDrive and SharePoint.