Quick Answer
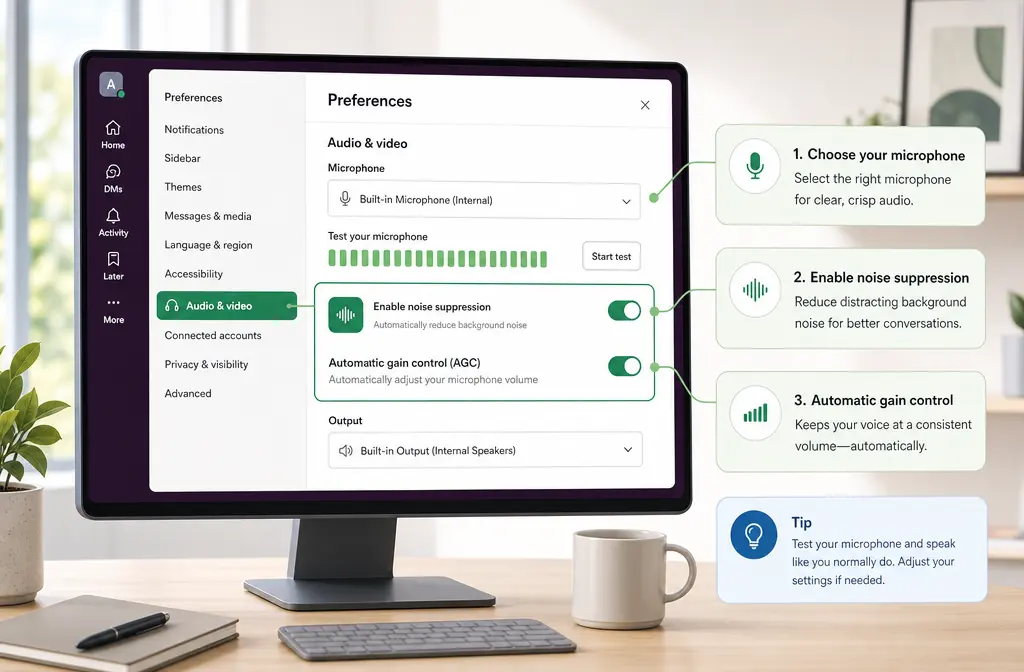
Yes, Slack Huddles can reduce background noise natively. In Slack, go to Preferences > Audio & video and turn on Enable noise suppression. For many people, that is enough for steady fan or HVAC noise. If your huddles still sound bad, test the selected microphone, check permissions, and make sure you are not stacking Slack’s own suppression on top of a third-party tool like Krisp.
The important catch: Slack huddles are live conversations, not Slack’s built-in recording format. If you need a clean file afterward, use a Slack clip or an external recording, then clean Slack clip audio with SimpleClean.
How to remove background noise in Slack Huddles
- Open Slack.
- Go to Preferences.
- Select Audio & video.
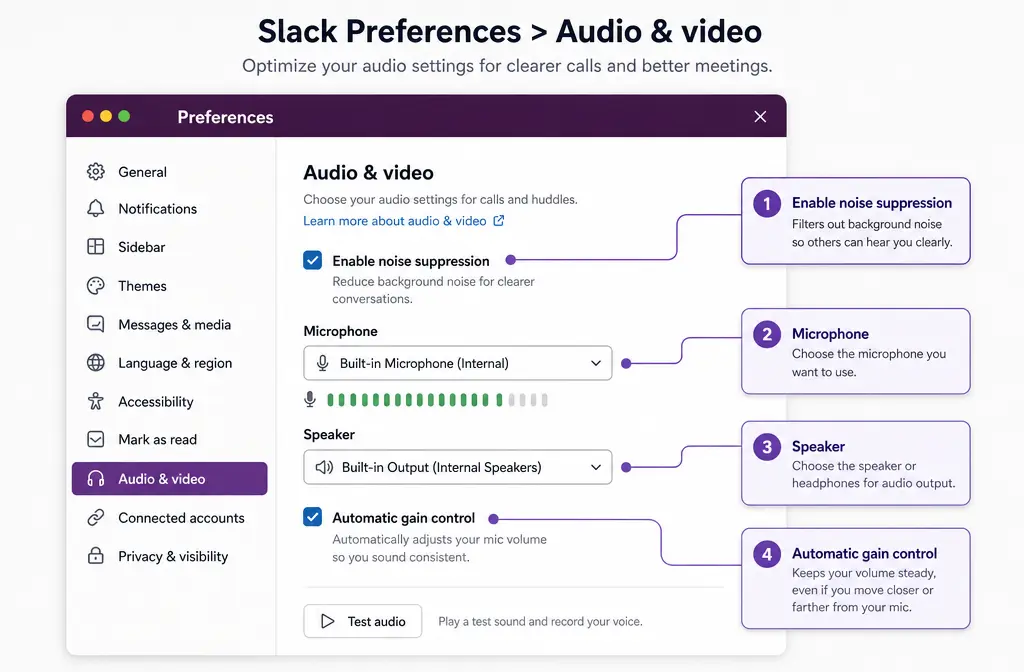
- Turn on Enable noise suppression.
- Confirm the correct microphone and speaker are selected.
- Test your mic level inside Slack.
- If audio sounds unnatural, review whether Automatic gain control should stay on or be turned off.
Slack also lets you choose your default microphone and speaker in the same settings area, which matters because background noise problems are often really device selection problems.
Where Slack’s noise suppression setting lives
The exact settings path is Preferences > Audio & video. Slack’s official huddles preferences page lists Enable noise suppression, Automatic gain control, and device selection in that area.
If you expected a separate “noise cancellation” menu, that is usually why people miss it. Slack keeps the huddle audio controls together with general audio and video preferences.
What Slack noise suppression fixes well, and what it does not
Slack’s built-in suppression is the best first step because it is already inside the app and fast to enable. But it works better on some noise types than others.
| Noise type | Best first fix | What not to do |
|---|---|---|
| Fan or HVAC hum | Turn on Slack noise suppression; keep mic closer to your mouth | Do not immediately add a second suppression app unless Slack alone fails |
| Keyboard clicks | Use a closer mic, lower mechanical noise at the source, then test Slack suppression | Do not expect suppression alone to fully remove loud key noise |
| Nearby voices | Move to a quieter space or use a better directional headset mic; consider Krisp if needed | Do not rely on aggressive double processing |
| Room echo | Change rooms, reduce hard reflections, use a headset mic closer to the mouth | Do not assume “noise suppression” will solve echo well |
| Mic too loud or distorted | Test mic level, switch devices, and review Automatic gain control | Do not keep boosting a bad mic signal with multiple processors |
In practice, steady background sound is the easiest case. Intermittent or speech-like noise, such as nearby talkers, is harder because the app has to guess what is your voice and what is not.
Should you leave Automatic gain control on in Slack?
Usually, yes, if you are using Slack by itself and just want stable voice level in everyday meetings. Automatic gain control, or AGC, helps normalize your mic volume.
But there are two common cases where turning it off makes sense:
- You are using Krisp as your live suppression layer. Krisp’s setup guide for Slack recommends disabling Slack’s own AGC and noise suppression to avoid double processing.
- Your voice sounds pumped, robotic, or oddly level-shifted after Slack boosts a noisy mic.
If you are troubleshooting, change one thing at a time. Do not switch AGC, suppression, mic hardware, and browser all at once or you will not know what fixed the problem.
Best workflow by situation
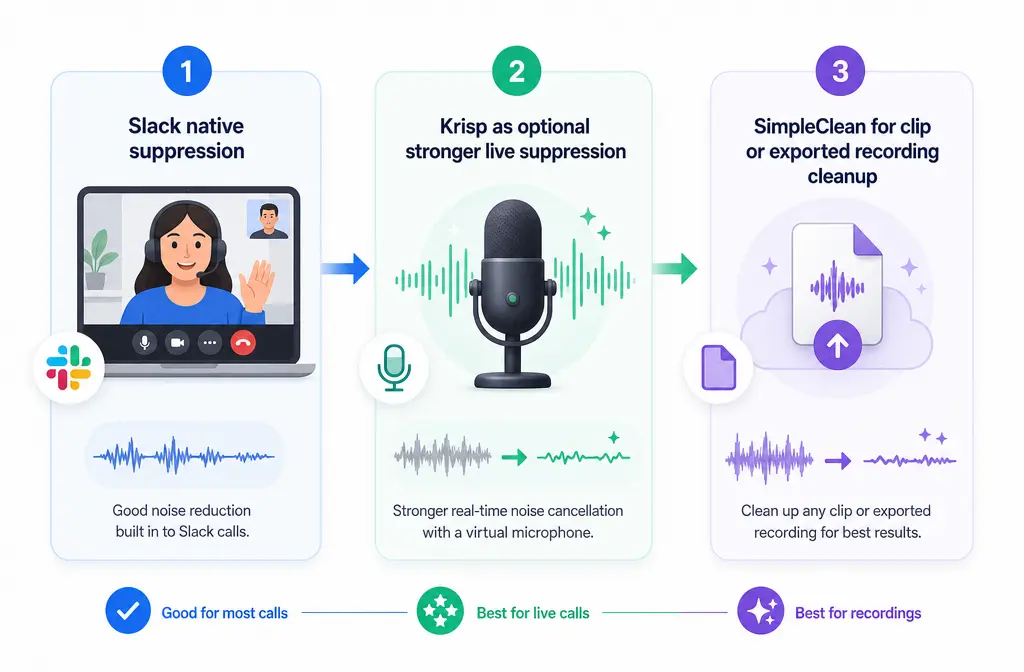
Best for most people: Slack native suppression
If you have mild fan noise, ordinary home-office background sound, or a decent headset mic, start with Slack alone. It is the simplest path and the least likely to create artifacts from stacked processing.
Best for harder live noise: Krisp with Slack configured correctly
If you work in a louder space or need stronger live suppression, Krisp is the clearest next step from the supplied sources. In Slack, select Krisp as the microphone and speaker, then disable Slack’s own noise suppression and AGC per Krisp’s setup guidance.
Best for a clean file after the fact: Slack clips or external recording plus cleanup
If the problem is in a recorded file, use a post-processing workflow instead of chasing perfect live audio. Since huddles themselves are live, your practical recording path inside Slack is usually a clip. After that, you can remove huddle recording noise with SimpleClean from the exported audio or video file.
How to test your mic and switch devices in Slack
Slack’s troubleshooting guidance points to basic checks that solve a surprising number of “background noise” complaints:
- Make sure the correct microphone is selected in Audio & video.
- Make sure the correct speaker is selected too.
- Test the microphone inside Slack.
- Reopen or restart the Slack app if audio suddenly changes.
- If the desktop app is the issue, try Slack in Chrome.
- Check operating system or browser permissions for microphone access.
A lot of users think Slack suppression is “not working” when Slack is actually listening to a laptop mic across the room instead of the headset they intended to use.
Do not stack processors blindly: Slack vs Krisp
This is the mistake that creates the most confusion.
If you use Slack’s own suppression and Krisp at the same time, you may get overprocessed audio, pumping, cut words, or metallic artifacts. Krisp’s official Slack setup instructions recommend:
- Select Krisp Microphone as Slack’s mic
- Select Krisp Speaker as Slack’s speaker
- Turn off Slack Enable noise suppression
- Turn off Slack Automatic gain control
If you want a deeper explanation of why too much denoising can make speech sound watery or robotic, see how to fix metallic voice after noise reduction.
Krisp setup for Slack Huddles
- Install and open Krisp.
- In Slack, open Preferences > Audio & video.
- Set the input device to Krisp Microphone.
- Set the output device to Krisp Speaker.
- Turn off Slack Enable noise suppression.
- Turn off Slack Automatic gain control.
- Join a huddle and do a short voice test.
This setup is for users who need stronger live cleanup than Slack alone provides. If Slack’s native suppression already sounds clear, keep the simpler setup and avoid extra layers.
Important clarification: Slack huddles are live, while Slack clips are the recorded format
This distinction matters because many articles blur it.
- Slack huddles are live audio conversations. Slack’s huddles documentation focuses on live participation, notes threads, canvases, and settings.
- Slack clips are Slack’s built-in recordable audio or video messages, and Slack says clips can be up to 5 minutes long.
- Slack clips can also generate an optional transcript after sharing.
So if you need something you can upload, export, archive, caption, or clean later, think clip rather than “recorded huddle.”
For multilingual teams, a practical workflow is: clean the clip audio, add subtitles with Best AI Captions, or translate and dub the finished clip with Translate Dub.
AI notes, transcripts, and searchable records: what Slack does and does not do
Slack also separates AI huddle notes from recordings. On paid plans, Slack AI can generate huddle notes and create a canvas with an embedded transcript. According to Slack’s help documentation, those transcripts do not appear in search results, and AI notes are not available when external people or guests are in the huddle.
That means these are three different things:
- Live huddle audio
- AI notes and transcript inside Slack
- A separate Slack clip or external recording file
If your goal is better live sound, use suppression settings. If your goal is a clean shareable media asset, use a clip or external recording and then process the file.
What to do if noise suppression is missing or not helping
- Reopen Slack or restart the desktop app.
- Try Slack in Chrome if the desktop app behaves differently.
- Verify microphone permissions on Mac, Windows, or in the browser.
- Confirm you selected the intended mic, not the laptop array mic.
- Check whether another app is already processing your audio.
- Test on a different headset or microphone.
- Check your connection quality, since poor network conditions can sound like “bad audio” even when the mic is fine.
If your voice sounds robotic or cuts in and out, the issue may be network quality or overprocessing rather than simple background noise.
Troubleshooting matrix for Slack huddle audio quality
| Symptom | Likely cause | Try this |
|---|---|---|
| Suppression option seems ineffective | Wrong mic selected or noise source too close | Switch to the correct mic and move it closer to your mouth |
| Voice sounds robotic or chopped | Stacked processing or network quality issue | Disable one suppression layer; check bandwidth |
| Desktop app audio is bad, browser is better | App-specific issue | Restart app; test in Chrome as Slack recommends |
| Mic does not work in huddles | Permissions issue | Check OS or browser microphone permissions |
| Audio drops on work network | VPN, proxy, firewall, or network configuration | Review Slack’s huddles network and system configuration guidance |
| Echo or roomy sound | Speaker bleed or reflective room | Use headphones or a headset mic and reduce room reflections |
Slack’s huddles network guide also points to VPN, proxy, firewall, codec, and hardware-acceleration factors when huddle quality is degraded. That matters if the sound problem appears only on one network or managed work device.
If you need a clean file after recording
If your Slack clip or externally captured huddle audio still has fan noise, hiss, hum, or mild echo, upload the file to SimpleClean. This is the right place for cleanup that happens after recording, instead of trying to force live suppression to do everything.
A simple workflow looks like this:
- Record a Slack clip or capture audio externally.
- Export the file you actually need to keep.
- Use clean noisy Slack recordings with SimpleClean.
- Add subtitles with Best AI Captions if the clip will be watched silently.
- Use Translate Dub if you need multilingual versions.
- Schedule and distribute the finished asset with Mallary.ai if your team republishes updates across social channels or customer communities.
If you also work across other meeting tools, you may want our related guides on removing background noise in Zoom and removing background noise in Microsoft Teams.
Plan limits and huddle basics people often confuse
- Slack says huddles support up to 50 participants on paid plans.
- Slack says video in huddles supports up to 25 people at a time.
- On free workspaces, huddles are limited to two-person huddles for 30 minutes.
Those limits matter when you are diagnosing quality too. A lightweight one-to-one test is often the fastest way to tell whether your problem is mic setup, plan confusion, or broader meeting conditions.
Sources and further reading
- Slack — Adjust your huddles preferences - Primary source for built-in noise suppression, AGC, device selection, captions, join-muted, and background blur.
- Slack — Troubleshoot audio and video issues in Slack - Primary source for device tests, permissions, app/browser troubleshooting, and bandwidth checks.
- Slack — Use huddles in Slack - Primary source for participant limits, supported platforms, huddle links, notes thread, and canvas behavior.
- Slack — Use AI to take huddle notes in Slack - Primary source for AI notes/transcription behavior, paid-plan availability, transcript visibility, and external-user limitations.
- Slack — Record audio and video clips in Slack - Primary source for clips as the actual recordable Slack media format, including the 5-minute limit and transcript option.
- Slack — Guide to network and system configuration for Slack huddles - Primary source for VPN/proxy/firewall/codec/hardware-acceleration causes of degraded huddle quality.
- Krisp Help — Set up Slack with Krisp - Official source for the third-party virtual mic workflow and recommendation not to double-process audio.