How to Fix CapCut Noise Reduction Not Working: Missing Toggle, Muffled Voice, Wind Limits, and Better Fallbacks
If CapCut noise reduction is not working, the problem usually falls into one of four buckets: the feature is missing, you selected the wrong clip or a clip with no usable audio, your CapCut version is outdated, or the noise in the recording is the kind CapCut does not handle well. CapCut officially offers background-noise cleanup tools, but feature placement can vary by platform and version, and results are best on mild, steady noise rather than harsh wind, echo, or complex crowd sound. CapCut’s background-noise tool, audio cleanup workflow, and version-check help page are the key official references.
Quick Answer
Here are the most common reasons CapCut noise reduction seems “not working”:
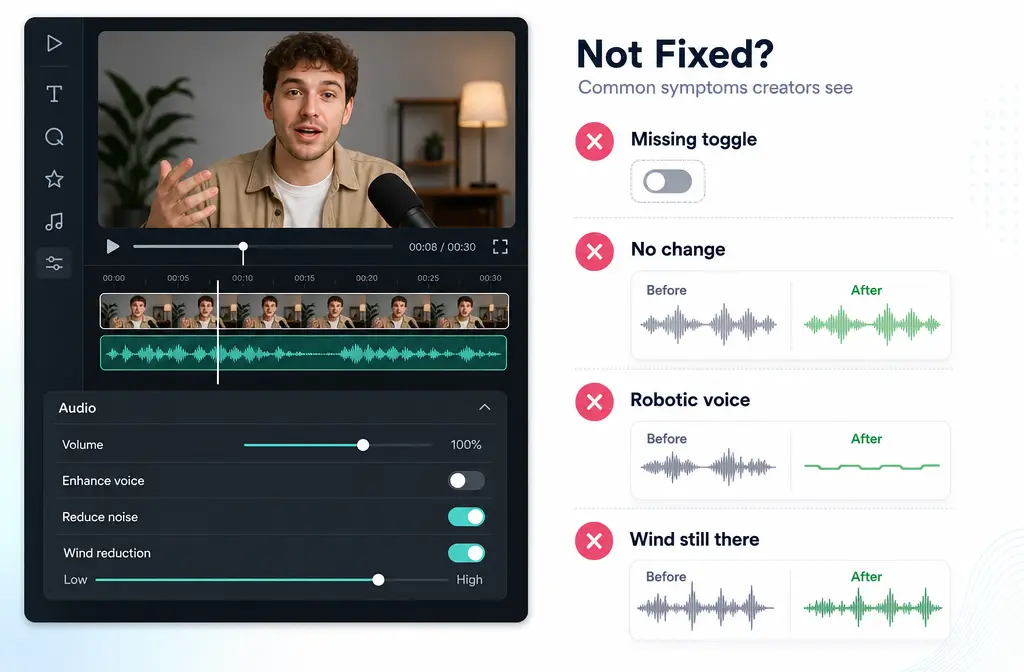
- The toggle is missing: You may have the wrong item selected, the clip may not contain usable audio, or your app/editor build may differ by platform or need updating.
- It turns on but you hear no change: CapCut works best on light, steady hum, hiss, fan noise, or room tone. It may do very little on intermittent traffic, crowd chatter, or speech-like background sound.
- Your voice becomes muffled, hollow, or robotic: You may be over-processing by stacking Reduce noise with voice enhancement or other audio effects too aggressively.
- Wind or echo is still there: That is often a tool-limit issue, not a user mistake. Strong wind and room reverb are harder problems than basic hiss removal.
If you need a fast rescue path, finish your edit, export the file, clean the spoken audio separately, then re-import it. That is often faster than endlessly re-tweaking CapCut. You can clean noisy spoken video audio with SimpleClean after export, then bring the improved track back into your timeline.
30-Second Diagnosis Table
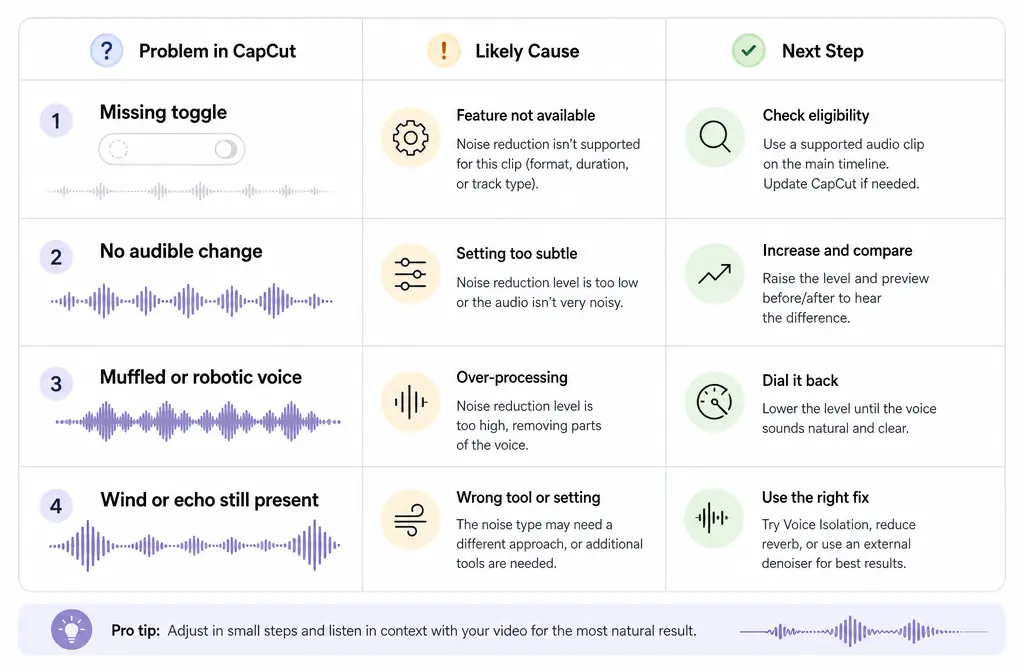
| Symptom | Most likely cause | Best next step |
|---|---|---|
| Reduce noise is missing | Wrong clip selected, no usable audio, outdated build, or different UI on Mobile/Desktop/Web | Select the actual video or audio clip, confirm it contains speech, check your version, and update CapCut |
| Reduce noise is on but nothing changes | The noise is too complex or too light to notice | Test on headphones, compare before/after, and expect best results only on steady hum or hiss |
| Voice sounds muffled or robotic | Over-processing from stacked cleanup tools | Back off other voice effects and compare Reduce noise alone vs combined processing |
| Wind, crowd, or echo remains | CapCut limit rather than user error | Export and clean separately, especially for outdoor wind or roomy speech |
Why CapCut Noise Reduction May Not Appear
CapCut does support background-noise reduction across its product family, but the exact path can vary. CapCut’s official audio and cleanup pages show noise-reduction workflows, and the company’s help docs specifically explain how to check your current version when features look different or missing. See CapCut Audio Tools, Clean Up Audio, and Where can I find my current version?.
Before assuming the feature is broken, check these basics:
- You selected the correct clip. In many editors, audio controls only appear when the actual media clip is selected.
- The clip contains usable audio. A silent clip or a clip with nearly no spoken content may not give you a meaningful denoise workflow.
- You are looking in a different CapCut variant. Mobile, Desktop, and Web do not always present identical menus.
- Your build may be outdated. CapCut’s official help pages point users to version checking and install/update guidance when functionality differs.
Where Is Reduce Noise in CapCut?
There is no single universal path for every user. Based on CapCut’s official documentation and the research brief, the control may appear under audio-related panels depending on platform and version. Treat these as likely paths, not guaranteed identical labels for every screen.
Mobile
- Select the video clip in your timeline.
- Open the audio controls for that clip.
- Look for a noise-reduction option that may appear under an audio/basic-style panel depending on version.
- Preview with headphones before exporting.
Desktop
- Select the clip with spoken audio.
- Open the audio inspector or audio settings area.
- Look for Reduce noise or a similar cleanup option under audio controls.
- Toggle it on, then A/B compare before and after.
Web
CapCut’s official cleanup resource shows the audio workflow in the editor, including using the Audio tab for cleanup tasks. CapCut also has a dedicated web-facing background-noise-removal page that describes one-click cleanup and adjustable strength/custom settings for that workflow. See Clean Up Audio and Remove Background Noise from Audio.
- Open your project or upload media in CapCut Web.
- Select the media with speech.
- Open the Audio panel.
- Apply the available background-noise cleanup controls and preview the result.
How to Check Your CapCut Version and Why Updating Matters
If noise reduction is missing or the menu looks different from a tutorial, version mismatch is one of the first things to rule out. CapCut has an official help page showing how to find your current version on desktop and mobile, plus a download/install help page for update and compatibility guidance.
- Open CapCut and go to the app’s settings, profile area, or about/version section.
- Confirm your current version using CapCut’s official steps here: Where can I find my current version?.
- If your build is old, update using CapCut’s official install/update guidance: Download & Install.
- On Android, checking the app listing can also help confirm that updates are actively published: Google Play: CapCut - Video Editor.
Why this matters: the research brief notes that feature placement and availability can vary by platform, version, and possible phased rollout. So if a tutorial shows a toggle you do not see, that does not automatically mean your project is broken.
When CapCut Is Usually Enough
CapCut is most likely to help when the problem is simple and steady, such as:
- Light fan noise
- Low room hiss
- Mild HVAC hum
- Soft constant background tone
In those cases, one-click reduction can be a fast convenience feature, especially if you want to stay inside the editor and finish quickly.
What CapCut Usually Does Poorly
This is the section many tutorials skip. If your recording has one of these problems, CapCut may not fail because you used it wrong. It may just be the wrong tool for the job:
- Strong wind gusts: Outdoor wind is irregular and often overlaps the voice itself.
- Multiple speakers at once: Background voices can sound too similar to the main speech.
- Heavy traffic bursts: Sudden honks, engines, and pass-bys are harder than steady hum.
- Room echo or reverb: Echo is not the same as simple noise reduction.
If your main issue is wind, start with our guide to the best app to remove wind noise from video. If the problem is roominess or slapback, see how to remove echo in Audacity for an honest look at what basic tools can and cannot fix.
Why CapCut Denoise Can Make Your Voice Sound Muffled
If CapCut noise reduction technically works but your voice sounds worse, the likely problem is over-processing. This commonly happens when users stack denoise with voice enhancement and other effects, then export without comparing versions.
Try this safer approach:
- Test Reduce noise alone first.
- Then test it with any voice enhancement you were using.
- Disable extra effects one by one and compare.
- Use headphones so subtle speech damage is easier to hear.
If the cleaned version removes a little background sound but makes consonants dull, sibilants splashy, or speech watery/robotic, you have gone too far. In practice, a slightly noisy but natural voice often performs better than an aggressively processed one.
How to Fix CapCut Noise Reduction Not Working: Step by Step
1) Confirm the clip actually has the audio you want to clean
Select the clip in the timeline and verify that it contains the spoken track. If the wrong item is selected, CapCut may not show the expected audio options.
2) Look in the audio controls for your platform
On Mobile, Desktop, or Web, the setting may appear in slightly different places. CapCut’s official web resource points users to the Audio panel for cleanup workflows.
3) Check your version
Use CapCut’s official version-check help page. If you are on an older build, update first.
4) Preview realistically
Do not judge denoise through phone speakers alone. Use headphones and compare before/after at matched volume.
5) Identify the noise type
If the noise is steady hum or hiss, CapCut may help. If it is wind, echo, or crowd bleed, do not expect miracles.
6) Remove stacked processing
If the voice sounds muffled, turn off extra voice effects and test again with a lighter chain.
7) Export and clean separately if needed
If CapCut still cannot rescue the audio, export the file and use a separate cleanup step. You can remove background noise from exported CapCut audio with SimpleClean, then re-import the cleaned track for final edit, captions, and delivery.
Best Fallback Workflow When CapCut Is Not Enough
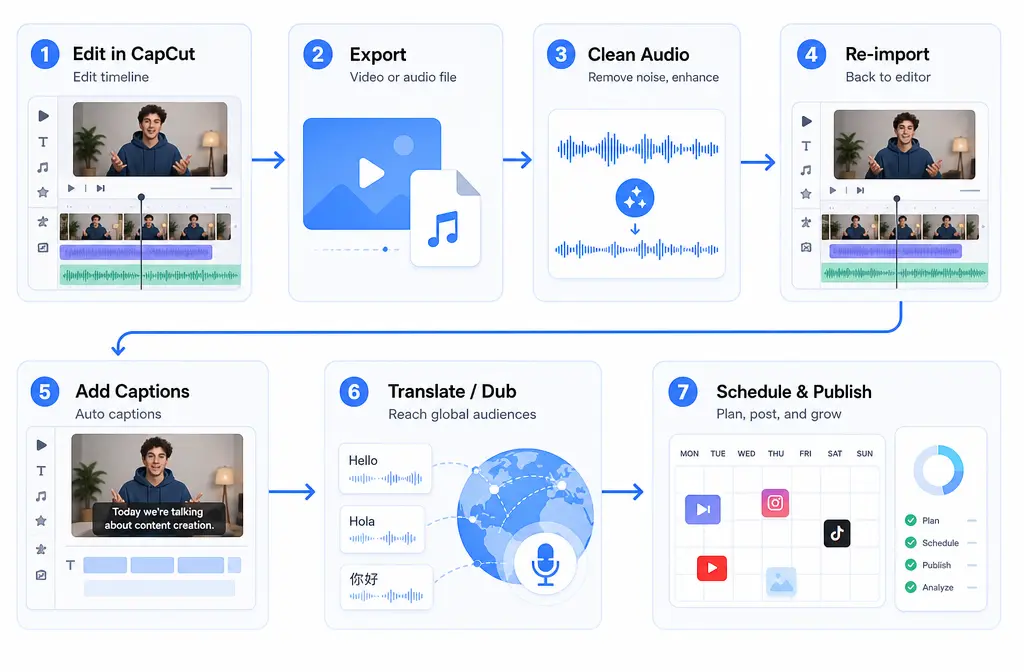
For many creators, the fastest rescue path is:
- Edit the video normally in CapCut.
- Export the rough cut or the section with the bad audio.
- Clean the spoken audio separately in SimpleClean.
- Re-import the cleaned track into CapCut.
- Add subtitles with Best AI Captions if you want a faster captioning pass after fixing the audio.
- If you need multilingual versions, use Translate Dub to translate, dub, and caption the cleaned video for wider distribution.
- Once the final version is ready, use Mallary.ai to schedule and publish it across multiple social platforms from one workflow.
This workflow is especially useful for short-form teams. Instead of burning time on impossible in-app audio repairs, you separate editing, cleanup, captioning, and distribution into the tools best suited for each step.
CapCut vs Separate Cleanup: Best for What?
| Situation | Best choice | Why |
|---|---|---|
| Light hum or hiss in a quick social edit | CapCut | Fast and convenient inside the editor |
| Missing toggle or inconsistent UI | Check version first | Feature placement varies by platform/version |
| Muffled voice after denoise | Reduce stacked processing | Speech damage often comes from over-processing |
| Outdoor wind, crowd, or echo | Separate cleanup workflow | These are harder problems than one-tap denoise |
| Need captions and multilingual repurposing after cleanup | Separate cleanup + caption/translation workflow | Keeps the voice cleaner before subtitles and dubbing |
FAQ
Why is CapCut noise reduction missing?
The most common reasons are that the wrong clip is selected, the clip has no usable audio, your platform’s UI differs, or your version needs updating. CapCut’s official help page on finding your current version is the first place to check.
Is CapCut noise reduction free or Pro?
The supplied sources confirm that CapCut offers background-noise reduction workflows, but they do not provide a stable universal pricing or plan claim for every platform and version. Because feature packaging can change, check your current CapCut interface directly rather than relying on old screenshots.
Why does CapCut noise reduction make my voice sound muffled?
Usually because the processing is too aggressive or combined with other voice effects. Test Reduce noise by itself, then add other enhancements only if they clearly improve speech.
Can CapCut remove wind noise from video?
It may reduce mild wind, but strong outdoor wind is one of the hardest noise types. If wind remains obvious, that is usually a limitation of the tool rather than a settings mistake. A separate cleanup workflow is often faster.
Can CapCut remove echo or reverb?
Basic noise reduction is not the same as true dereverb. If the room sound is the main problem, CapCut may not give a satisfying result.
Where is Reduce noise in CapCut desktop, mobile, and web?
It may appear under audio-related controls depending on platform and version. CapCut’s official web cleanup guide points to the Audio tab/workflow, while Mobile and Desktop layouts can differ.
Why does CapCut denoise do nothing on my clip?
Either the noise is too subtle to notice, the noise is the wrong kind for simple denoise, or you need to compare on headphones. CapCut tends to work best on steady, constant noise rather than complex changing sounds.
Bottom Line
If CapCut noise reduction is not working, do not treat every case like a bug. First diagnose the symptom: missing toggle, no audible change, muffled voice, or stubborn wind/echo. CapCut’s official docs confirm the feature exists and show that version checks and updates matter, but they also do not change the core limitation: basic denoise is best for mild, steady background noise, not every bad recording.
If your spoken audio still sounds rough after the basic checks, the time-saving move is often to export, clean the recording separately, then return to CapCut for the final edit. That is the cleanest path for creators who need to salvage a good take without re-recording.
Sources and further reading
- Google Play: CapCut - Video Editor - App listing useful for update freshness and mobile app context when discussing outdated Android builds.