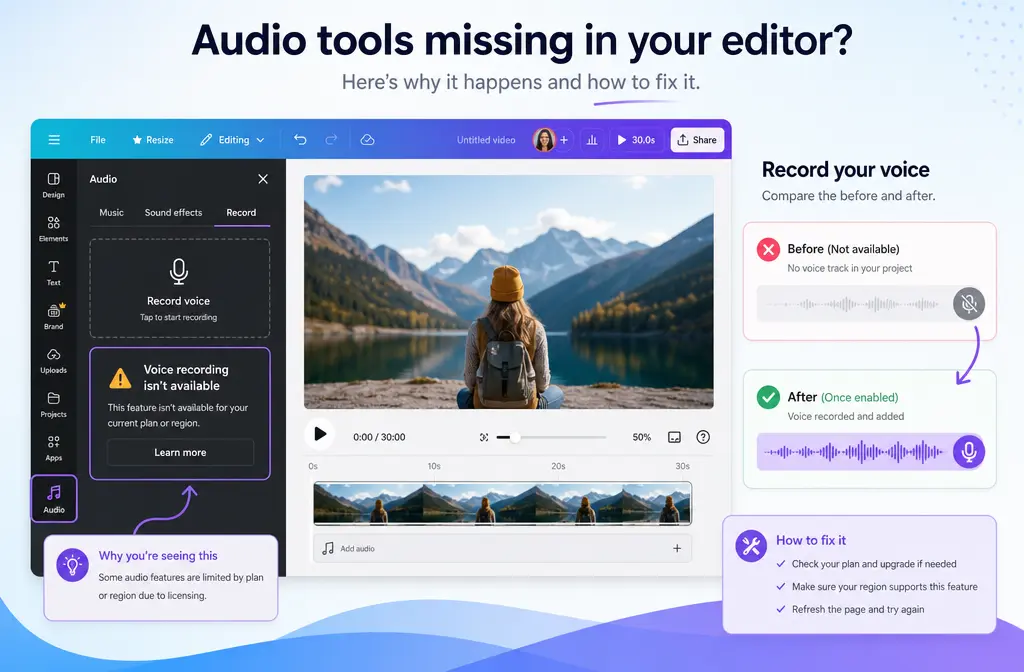
Quick Answer
If Canva Enhance Voice is not working, the problem is usually one of five things: you are in a design type where Audio tools do not appear as expected, you selected the wrong clip or track, your plan or AI usage access is limiting the feature, Canva is having an upload/editor/AI outage, or the audio itself is a bad fit for speech-focused cleanup.
Start here:
- Select the actual video clip or audio track, then look for Audio tools.
- Make sure you are editing in a video-first design, not just a social template where tools may differ.
- Try duplicating the project into a fresh Mobile Video or other video design and re-import the media.
- Check Canva Status before deeper troubleshooting.
- Confirm your file type is supported: Canva lists audio uploads such as M4A, MP3, OGG, WAV, and WEBM up to 250 MB, and video uploads such as MOV, GIF, MP4, MPEG, MKV, and WEBM up to 1 GB.
- If the result sounds robotic, muffled, or barely different, Canva may simply be the wrong tool for that clip. For faster export-first cleanup, you can clean spoken video audio with SimpleClean.
Canva positions Enhance Voice as a one-click speech cleanup tool that removes background noise and balances sound, but it is best treated as light voice cleanup rather than a full fix for echo, wind, nearby voices, or heavily processed audio.
Fast diagnosis: what your symptom usually means
| Symptom | Most likely cause | What to do next |
|---|---|---|
| Enhance Voice button is missing | Wrong clip selected, wrong design context, or feature availability differs by plan/account/design type | Select the media itself, open Audio tools, then test in a fresh video design such as Mobile Video |
| Audio tools are missing entirely | Design-type inconsistency or account-specific UI difference reported by users | Duplicate into a new video-first design and re-import media; compare with another Canva account if available |
| No audible change after applying cleanup | Noise is too light to hear a change, or the problem is echo/wind/music rather than simple background noise | Compare before/after on headphones; if still weak, export and clean elsewhere |
| Voice sounds robotic or muffled | Processing is too aggressive for the source audio, or the clip is already compressed/overprocessed | Undo the effect; use a cleaner source export and process it separately |
| Export sounds different from preview | Source track selection issue or project-level inconsistency | Reopen the project, confirm the correct clip is selected, and test a short export before final delivery |
| Uploads or processing fail | Unsupported file, oversize file, or temporary Canva service issue | Confirm format/size against Canva limits and check Canva Status |
What Canva Enhance Voice is supposed to do
Canva markets its audio enhancer and Enhance Voice workflow as a fast way to improve spoken audio by removing background noise and balancing sound in videos such as vlogs, reels, and meeting recordings. Canva’s newsroom also describes Enhance Voice inside the video editor as a tool for cleaning speech.
That positioning matters, because it tells you what Canva is aiming for: spoken voice cleanup. It does not mean every noisy recording can be repaired well inside Canva.
- Best fit: lightly noisy talking-head videos, explainers, social clips, and simple voice tracks.
- Less ideal: room echo, strong wind, heavy hum, overlapping speakers, music-first clips, or audio that already sounds crushed by previous processing.
- Access caveat: Canva’s pricing page groups premium and AI-powered capabilities under paid plans and usage-based access language, so availability can vary by plan and AI usage.
If you saw the feature in a tutorial but cannot find it in your own editor, that does not automatically mean you are doing anything wrong.

Where to look in Canva before assuming the feature is gone
The simplest miss is also the most common: not selecting the right media layer.
- Open your Canva project.
- Click the actual video clip on the timeline or canvas, or click the separate audio track if your voice is imported separately.
- Look for Audio tools in the editor controls.
- From there, check whether Enhance Voice or related cleanup controls are available.
If you do not see Audio tools, stop and check the project type before spending 20 minutes refreshing the page.
Why Canva Audio tools may show in one design but not another
This is the non-obvious issue many searchers are actually hitting. User reports on Reddit describe cases where Audio tools were missing in one Canva account or template context, but appeared in another. One anecdotal workaround specifically mentions moving from a Reel-style design into a Mobile Video project to make audio controls appear.
Because those reports are anecdotal rather than official documentation, the safe takeaway is this: design context can affect which editing tools appear.
If Canva Enhance Voice is missing, try this reproducible reset:
- Create a fresh video-first design, such as Mobile Video or another standard video canvas.
- Upload the original media again instead of relying on a copied template element.
- Drop the clip into the new project.
- Select the clip and check for Audio tools.
- If needed, compare behavior between the original design and the fresh video design.
This workaround is especially worth trying if:
- the feature appears in tutorials but not in your editor,
- one teammate can see Audio tools and another cannot, or
- you started from a social template rather than a blank video project.
How to fix Canva Enhance Voice not working step by step
1. Check Canva Status first
Before changing browsers or rebuilding projects, look at Canva Status. If Canva is having issues with uploads, editing, or AI-powered services, troubleshooting inside your file may waste time.
2. Confirm your upload format and file size
Canva lists these supported upload formats and limits:
- Audio: M4A, MP3, OGG, WAV, WEBM up to 250 MB
- Video: MOV, GIF, MP4, MPEG, MKV, WEBM up to 1 GB
If your file is outside those types or limits, convert or trim it before retrying.
3. Select the right layer
Click the video or the actual voice track. If your project has music, voiceover, and video stacked together, it is easy to target the wrong element and never see the relevant controls.
4. Look for Audio tools in a video-first design
If Audio tools are missing in your current template, move the project into a fresh video design and re-import the media. This is one of the most practical fixes for the design-type glitch users keep reporting.
5. Test on a short clip
Use a 10- to 20-second speech-only section first. If the tool works there but not in the full timeline, you can at least isolate whether the issue is the file, the project, or the source audio itself.
6. Listen on headphones for subtle changes
Canva’s speech cleanup may be mild. If you are monitoring through laptop speakers, you may think nothing happened when the change is simply small.
7. Undo it if the voice becomes robotic
If speech gets watery, artificial, or muffled, do not stack more processing on top. Export the original or lightly edited file and clean it separately instead.
Hard limits and known fit issues
Even when Canva Enhance Voice is available, it has practical limits.
- Nearby voices: speech-focused cleanup usually struggles when the “noise” is another person talking.
- Room echo: dereverb is a separate problem from light background noise removal.
- Wind: strong outdoor wind is often too irregular and heavy for one-click speech cleanup.
- Heavy hum: consistent electrical noise can require more targeted repair than a simple enhancer.
- Music-first clips: Canva’s own positioning is voice enhancement, not music restoration.
- Already overprocessed audio: if your file was compressed, denoised, or clipped elsewhere first, another pass can make it sound worse.
In short: Canva is most useful when the voice is already fairly understandable and just needs light cleanup.

Best fallback when Canva’s cleanup is missing or sounds bad
If the feature is unavailable in your project, or the result sounds unnatural, the fastest workaround is usually:
- Finish your cuts in Canva.
- Export the video or audio.
- Run the exported file through SimpleClean.
- Replace the cleaned audio in your final upload workflow if needed.
This export-first path is especially useful for:
- coaches recording lessons in echoey rooms,
- marketers cleaning webinar or talking-head clips,
- creators fixing outdoor voice tracks with light noise, and
- social editors who simply cannot get Canva’s Audio tools to appear.
If your main problem is outdoor rumble or fan noise, you can remove distracting voice noise after exporting instead of fighting the Canva UI.
Can Canva or SimpleClean: which is better for your situation?
| Situation | Better first choice | Why |
|---|---|---|
| You want one-click cleanup without leaving your video editor | Canva | Fastest if Audio tools are visible and the clip only needs light speech cleanup |
| The button is missing or inconsistent across projects | SimpleClean | Lets you skip design-type glitches and clean the exported file directly |
| The result in Canva sounds robotic | SimpleClean | A separate cleanup pass is often safer than forcing more in-editor processing |
| The file has echo, wind, or stronger noise problems | SimpleClean | Canva is not positioned as a full repair tool for those harder cases |
| You are producing a quick social reel with minor background noise | Canva | Convenient when it works and the source is already decent |
Best for recommendations
- Best for quick in-editor fixes: Canva, when the project is a supported video design and the noise is light.
- Best for “the feature is missing and I just need this done”: fix Canva voice cleanup problems with SimpleClean.
- Best for multilingual repurposing after cleanup: Translate Dub for translating, dubbing, and captioning videos.
- Best for adding subtitles after you clean the audio: Best AI Captions.
- Best for distributing cleaned clips across social channels: Mallary.ai, especially if your team wants one workflow for scheduling posts, adding first comments, and managing responses across multiple platforms.
A simple publish workflow after you fix the audio
Once your spoken audio is clean, the rest of the content pipeline gets easier:
- Clean the exported voice track or video.
- Add subtitles with Best AI Captions.
- If you publish internationally, localize with Translate Dub.
- Schedule and distribute the finished clips with Mallary.ai.
That is a practical stack for creators and marketing teams who want to go from noisy recording to published asset without getting stuck inside one editor.
Common mistakes that make Canva Enhance Voice seem broken
- Starting from a template where Audio tools do not appear the same way as in a blank video design.
- Clicking the page or canvas instead of the actual media layer.
- Expecting speech cleanup to remove echo, wind, or another speaker perfectly.
- Judging the result on low-quality speakers instead of headphones.
- Applying cleanup to already processed audio and mistaking artifacts for a software bug.
- Ignoring service issues that are visible on Canva Status.
When to stop troubleshooting Canva
Stop trying to force Canva if any of these are true:
- Audio tools never appear even after moving to a fresh video design.
- The preview/export mismatch costs more time than an external cleanup pass.
- The recording has room echo, wind, hum, or overlapping speech.
- The processed result sounds less natural than the original.
At that point, it is usually faster to export and clean Canva video audio outside the editor.
Related troubleshooting guides
If you switch tools or hit a similar issue elsewhere, these guides may help:
- How to Fix VEED Clean Audio Not Working
- How to Fix Clipchamp Noise Suppression Not Working
- How to Fix CapCut Noise Reduction Not Working
Final takeaway
Most Canva Enhance Voice problems are not true mysteries. They usually come down to missing Audio tools, plan or AI-access caveats, the wrong design type, supported-file issues, or asking a light speech enhancer to fix a much harder audio problem.
If Canva’s one-click option is visible and your clip only needs gentle voice cleanup, use it. If the button is missing, the output is robotic, or the recording has tougher noise problems, an export-first workflow is the safer path. In those cases, SimpleClean is the straightforward fallback for cleaning spoken audio after Canva editing.
Sources and further reading
- Canva Audio Enhancer feature page - Supports Canva’s positioning of the tool as one-click speech-focused audio cleanup.
- Canva upload formats and requirements - Supports the listed audio and video upload formats and size limits.
- Canva pricing - Supports plan and AI-usage caveat language for premium and AI-powered features.
- Canva newsroom: What’s new in Canva Video - Supports Canva’s own description of Enhance Voice inside the video editor.
- Reddit: Did Canva remove the background Enhance Audio feature? - Anecdotal evidence that users report missing Audio tools and search using that language.
- Reddit: Canva Audio Tools Missing on One Account but Showing on Another - Anecdotal evidence of account/design inconsistency and the Mobile Video workaround pattern.