How to Fix Filmora Noise Reduction Not Working: Missing Denoise Tools, Weak Cleanup, Wind/Echo Limits, and Better Fallbacks
If Filmora noise reduction is “not working,” the problem is usually one of four things: the denoise control is in a different place than an older tutorial shows, the wrong cleanup mode is being used for the actual noise, too many enhancement tools are stacked at once, or the recording has a type of damage Filmora is not well suited to fix.
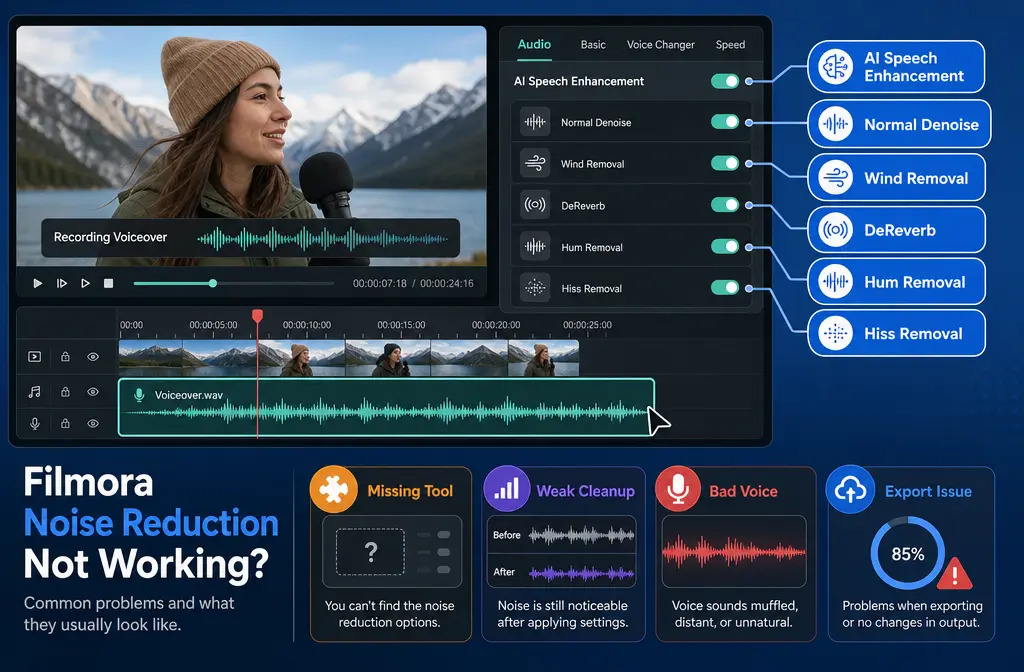
Quick answer: In current Filmora, denoise tools live in the clip’s Audio settings panel on the right side after you select the clip in the timeline. Depending on version and platform, you may see modes such as AI Speech Enhancement, Normal Denoise, Wind Removal, DeReverb, Hum Removal, and Hiss Removal. If nothing changes, the most common causes are: using the wrong tool for the noise, previewing a clip with very subtle noise, trying to clean already compressed or overprocessed audio, or expecting Filmora to remove background voices, heavy traffic, strong wind bursts, or severe room echo. If your voice starts sounding robotic or hollow, stop stacking every option and test one tool at a time.
For clips that are still messy after basic cleanup, it is often faster to clean noisy dialogue with SimpleClean after export instead of endlessly tweaking Filmora.
Fast diagnosis: what kind of “not working” problem do you have?
| Symptom | Most likely cause | What to try first |
|---|---|---|
| Denoise option seems missing | UI/version mismatch, wrong clip selected, following an old tutorial | Select the clip in the timeline, open the right-side Audio panel, and compare your version with current Filmora docs for Windows or Mac. |
| Wind Removal or another mode is missing | Different Filmora version, platform difference, or older tutorial terminology | Check your Filmora version and current official guide before assuming the feature is broken. |
| Noise reduction does almost nothing | Wrong tool for the noise, subtle preview difference, music or mixed audio, already compressed source | Match the mode to the noise type and preview a short section with obvious problem words. |
| Voice sounds robotic, hollow, lispy, or pumping | Too many tools stacked, overprocessing, trying to force cleanup on hard noise | Reset, duplicate the clip, and enable only one mode at a time. |
| Playback sounds okay but export sounds bad | Overprocessing becomes more obvious in the final render, or you changed too many audio settings before export | Compare exported audio against the original and simplify your cleanup chain. |
| Traffic, nearby voices, or room echo remain | These are difficult problems for simple in-editor denoise | Export the audio and use a dedicated cleanup workflow instead. |

Where is Denoise in Filmora right now?
According to Filmora’s current official guides, the basic workflow is to import media, add it to the timeline, select the clip, and then open the Audio controls in the right-side property panel. That is where Filmora exposes its denoise options on current Windows and Mac documentation.
- Windows: Filmora’s official Windows guide places AI Audio Denoise in the clip’s right-side audio controls.
- Mac: Filmora’s Mac guide shows the same general idea: select the clip, open audio settings, and apply the available denoise modes.
- Voice Enhancer: Wondershare also documents a separate AI Voice Enhancer workflow in its support article, which is related but not identical to every denoise mode.
If you are following a YouTube tutorial or an older blog post and the panel looks different, that does not automatically mean Filmora removed the feature. It often means the guide was recorded on an older release with older labels or a different layout.
Why older tutorials do not match your Filmora screen
This is one of the biggest reasons people search for “Filmora noise reduction not working.” Many older tutorials show different panel layouts or legacy denoise labels. Filmora itself documents that version matters, and Wondershare provides separate help pages for checking your Filmora version and for understanding whether you can open a project in another Filmora version.
That matters for troubleshooting because:
- A tutorial may refer to older denoise wording.
- One version may show a different control grouping than another.
- Moving between versions can change how a project behaves or which tools appear.
- Mac and Windows guides may use slightly different screenshots or workflows.
If a control seems absent, verify the version before assuming the feature is broken. Also make sure your system is supported by the Filmora release you installed by checking Wondershare’s supported operating systems page.
What each Filmora audio cleanup control is actually for
The most common mistake is using a tool name that sounds right instead of matching the noise you actually have.
AI Speech Enhancement
Best for voice-focused cleanup when the goal is to make speech clearer. This is the mode people often reach for first on dialogue or voiceover.
Usually helps with:
- General voice clarity
- Light background distraction around speech
- Modest spoken-word cleanup
Usually struggles with:
- Heavy background voices
- Strong traffic under speech
- Severe wind bursts
- Big room echo
Normal Denoise
Best for broad, lighter noise cleanup where you want less processing than a speech-specific enhancer.
Usually helps with:
- Steady low-level background noise
- Mild room tone
- Basic cleanup on recorded clips
Usually struggles with:
- Competing voices
- Aggressive wind
- Mixed music and dialogue
Wind Removal
Best for recordings affected by wind noise. If your version shows it, use it for actual wind problems, not for hum, hiss, or echo.
Important limit: strong gusts and bursty wind often leave damage that still sounds rough even after reduction.
DeReverb
Best for room echo or reverberation. This is the mode to try when audio was recorded in a reflective room and sounds distant or roomy.
Important limit: severe room echo is one of the hardest problems to repair cleanly.
Hum Removal
Best for a steady electrical hum. If the unwanted sound is a constant low buzz, this is a better match than a general speech enhancer.
Hiss Removal
Best for steady high-frequency hiss. Use it when the issue is a consistent hiss layer, not when the real problem is wind, people talking nearby, or reverb.
Why Filmora noise reduction seems to do nothing
If you can toggle denoise on and off and barely hear a difference, one of these is usually happening:
- You picked the wrong mode. Hum, hiss, wind, and room echo need different tools.
- The source is already compressed or overprocessed. Filmora cannot restore detail that is already gone.
- The clip is mostly music or a music-and-voice mix. Voice cleanup tools are less predictable when speech is not isolated.
- The noise is subtle. On light room tone, the change may be small unless you preview headphones-on and listen to quiet words and gaps.
- The real problem is background conversation or traffic. That is much harder than removing steady noise.
A good test is to loop a short section with obvious trouble spots:
- a word starting with “s,” “f,” or “t”
- a pause between sentences
- a section where wind, hiss, or echo is strongest
If you cannot hear a meaningful before/after change there, changing random settings usually will not solve it.
Why Filmora denoise makes your voice sound worse
Users often describe bad cleanup as robotic, hollow, underwater, pumping, or lispy. In practice, this usually happens when too many corrective tools are stacked or when the tool is being forced to remove noise it was never likely to remove cleanly.
Common causes of bad-sounding output:
- Enabling multiple denoise modes at once
- Using speech enhancement plus other cleanup tools too aggressively
- Trying to remove nearby voices or traffic buried under dialogue
- Trying to “fix” severe wind bursts
- Processing a clip that was already heavily compressed before editing
Safer rule: stop stacking everything. Use one tool at a time, compare before and after, and keep the version that solves the main problem without damaging consonants and tone.
Specific limits: what Filmora usually cannot fully fix
Filmora’s official denoise feature set is useful, but it is still important to set realistic expectations. Based on the feature descriptions in Wondershare’s own documentation, Filmora is better suited to steady hum, hiss, light room tone, and modest voice cleanup than to severe mixed-noise problems.
Usually reasonable cases for Filmora:
- Light background hiss
- Steady hum
- Mild room ambience
- Basic spoken-word cleanup
Usually difficult cases for Filmora:
- Background conversation behind the speaker
- Traffic sitting under speech the whole time
- Strong or bursty wind
- Heavy room echo
- Music already mixed with dialogue in one track
If your recording falls into the second list, you may get a slight improvement, but not a clean studio result. That is the point where exporting and cleaning the file separately is often faster than fighting the timeline.

Safer workflow inside Filmora
Before you assume the feature is broken, try this troubleshooting workflow:
- Duplicate the clip. Keep one untouched version for comparison.
- Select the duplicate clip and open the Audio panel. This makes it obvious whether your change is helping or hurting.
- Apply one cleanup mode only. Start with the mode that matches the real problem: hum, hiss, wind, reverb, or speech clarity.
- Preview the worst section. Listen to problem words, pauses, and noisy transitions.
- Compare before and after. If the voice loses clarity or consonants, undo it.
- Only add a second tool if the first clearly helped. Do not build a giant cleanup stack by default.
- Export a short test. If playback seems okay, render a sample before committing to the full project.
If you want an easier path for hard recordings, remove wind noise with SimpleClean or export the dialogue and clean it separately before final delivery.
Filmora vs dedicated cleanup: which is best for what?
| Best for | Use Filmora | Export and clean separately |
|---|---|---|
| Light hiss or hum | Yes | Only if Filmora leaves artifacts |
| Basic voice clarity improvement | Yes | Useful if Filmora sounds hollow |
| Mild room tone | Yes | Optional |
| Strong wind bursts | Maybe, but expectations should stay low | Often faster |
| Heavy room echo | Limited | Often better workflow |
| Traffic or nearby voices under speech | Limited | Usually better fallback |
| Already overprocessed audio | Risky | Try a separate cleanup pass carefully |
| Music mixed with dialogue | Limited | Often needed |
When to export and clean separately with SimpleClean
Export-first cleanup makes sense when:
- you already spent too long toggling Filmora settings
- the voice gets robotic every time denoise is enabled
- wind, echo, or mixed background chatter remains obvious
- the clip needs just one cleaned dialogue result, not complex in-timeline audio design
That is where SimpleClean fits naturally: clean the exported dialogue, then bring the improved file back into your edit. This is especially practical when Filmora’s timeline tools are close but not quite solving the problem.
After your audio is usable again, you can add subtitles with Best AI Captions, create multilingual versions with Translate Dub, and schedule distribution across social channels with Mallary.ai if you are republishing clips, trailers, tutorials, or short-form excerpts.
File, format, OS, and version basics to check
Sometimes a denoise complaint is really a project, compatibility, or platform issue.
- Check your Filmora version: Wondershare provides official steps for verifying the installed version.
- Check OS support: If your system is outside the supported environment for your Filmora release, missing or unstable behavior can be harder to diagnose.
- Check format support: If a file imports oddly, plays back strangely, or came from an unusual recorder or transcode, verify it against Filmora’s supported format documentation.
- Be careful with project downgrades or cross-version moves: Wondershare notes that project compatibility between versions matters.
Relevant official references:
- How to check the version of Filmora
- Operating systems supported by Filmora
- What formats Filmora supports
- Opening projects in another Filmora version
Do you need to detach audio first?
Usually, no. Filmora’s official audio adjustment workflow is clip-based, so denoise can be applied from the audio controls after selecting the clip in the timeline. Detaching audio may still be helpful if you want cleaner organization, separate timing edits, or easier A/B comparison, but it is not the core fix for denoise not appearing or sounding weak.
Best recommendation by situation
- Best for light hiss or hum: Stay in Filmora and use the matching mode.
- Best for mild voice cleanup: Try AI Speech Enhancement or the most appropriate denoise mode, one at a time.
- Best for confusing UI or “missing” tools: Check your version against the current official Windows or Mac guide.
- Best for robotic or hollow output: Reset and simplify the chain.
- Best for wind, heavy echo, traffic, or nearby speakers: Export the clip and use a dedicated cleanup workflow.
If you deal with this kind of issue in other editors too, you may also want our guides on Premiere Pro noise reduction not working, CapCut noise reduction not working, and DaVinci Resolve voice isolation not working.
Final takeaway
Filmora noise reduction is not always broken when it seems ineffective. More often, the wrong tool is being matched to the wrong noise, the tutorial is outdated, or the recording simply exceeds what lightweight in-editor cleanup can repair well. Start by confirming your version, finding the current Audio panel, and using only the one mode that matches your problem. If the voice gets worse or the remaining noise is wind, echo, traffic, or background speech, stop tweaking and switch workflows. In those cases, it is often faster to clean exported dialogue with SimpleClean and finish the edit with a cleaner source file.
Sources and further reading
- Wondershare Support: How to use Filmora’s AI Voice Enhancer feature - Official support doc for Voice Enhancer, useful for fact-checking terminology and UI wording.
- Filmora official: Adjust Audio - Current general audio panel instructions, including denoise description.