How to Remove Background Noise in ScreenFlow: Best Audio Settings, What Not to Stack, and When to Clean the Exported File Online
If you are editing spoken video in ScreenFlow, the fastest fix is usually to apply light background-noise reduction inside the app, then handle cuts, fades, and level fixes carefully. ScreenFlow includes a built-in Remove Background Noise control in the audio properties, but it works best on steady, low-level noise like hiss, fan noise, or AC noise. It is not a full repair tool for echoey rooms, loud keyboard sounds during speech, or overlapping voices.
Quick Answer
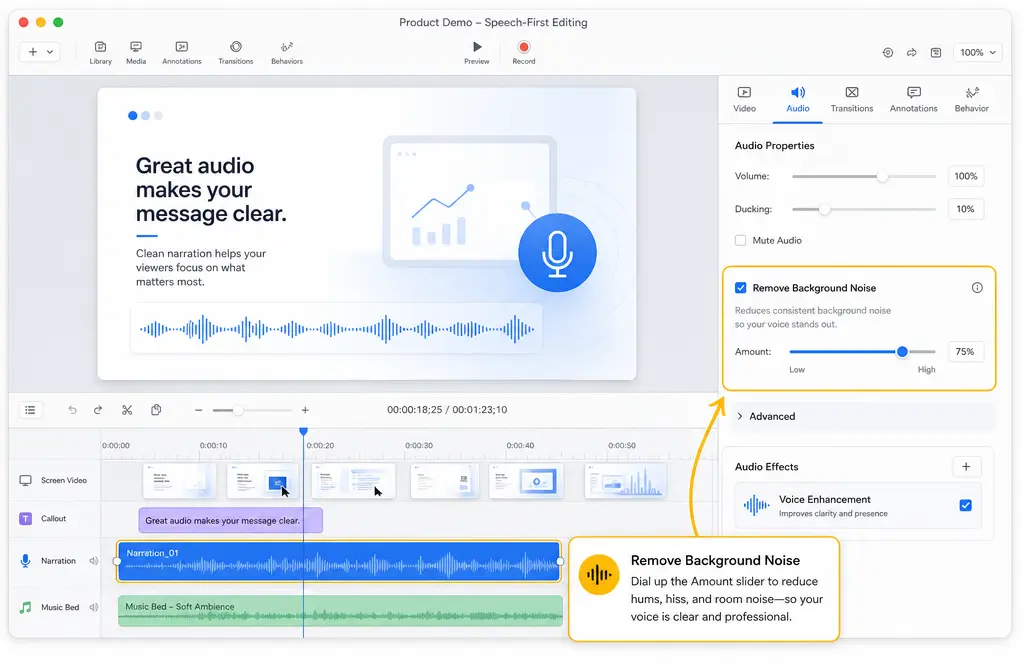
To remove background noise in ScreenFlow, select your narration clip, open the audio properties, enable Remove Background Noise, and start with a low amount while previewing the voice. If the voice starts sounding muffled or watery, back it off. Use Detach Audio when you need to cut coughs, clicks, or noisy gaps separately, and add short crossfades after cuts so the narration stays natural. Use manual volume fixes and watch the audio meter to avoid clipping. If noise remains under the voice for most of the recording, or the problem is room echo or severe hum, exporting the audio-only file or the full video for separate cleanup is usually the better workflow.
For creators who want a second cleanup pass after export, you can clean ScreenFlow audio online with SimpleClean without rebuilding your whole edit.
What ScreenFlow's Remove Background Noise Actually Does
According to the ScreenFlow User Guide, ScreenFlow includes a Remove Background Noise option with an Amount slider in its audio properties. That makes it a practical built-in tool for basic spoken-audio cleanup, especially when the problem is a fairly constant noise floor rather than a complicated recording issue.
In plain English, this means ScreenFlow is a good first stop for:
- Light hiss
- Steady fan noise
- Low AC noise
- General constant room noise behind narration
It is much less suited for:
- Heavy room echo or reverb
- Sharp keyboard noise during speech
- Clicks and coughs that need editing out
- Noise that changes constantly
- Two sounds competing at once, such as voice plus another speaker
A practitioner tutorial from Screencasting.com specifically warns to use ScreenFlow's noise reduction lightly because too much can make speech sound muffled. That matches real-world voice editing: denoise is often helpful, but overdoing it can hurt clarity faster than most editors expect.
Where Is Remove Background Noise in ScreenFlow?
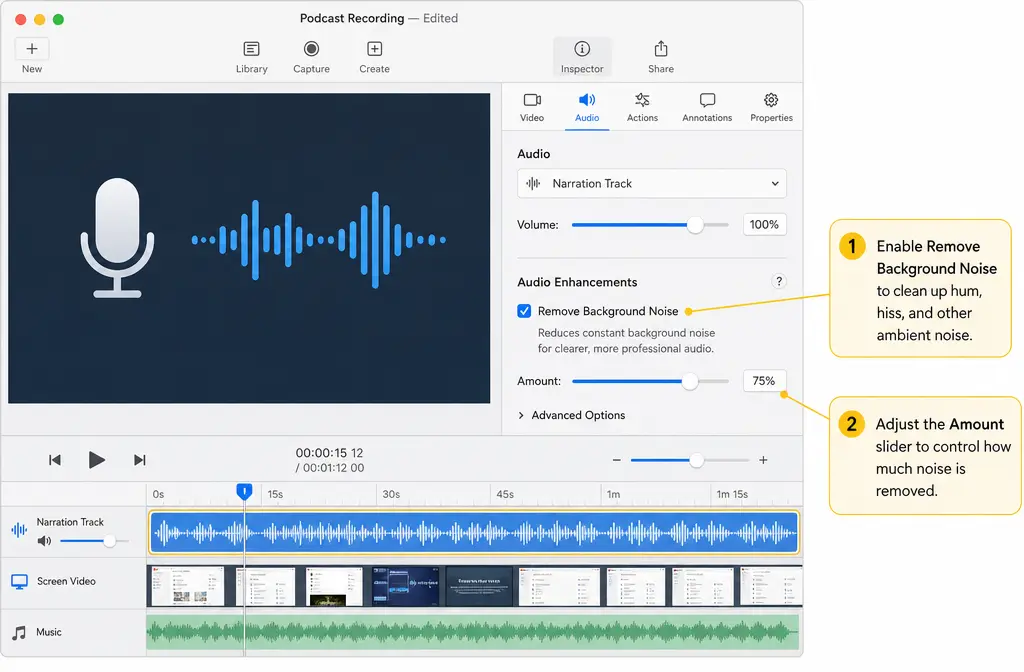
In ScreenFlow, select the clip that contains your narration, then open the clip's audio properties. The official user guide documents the Remove Background Noise checkbox and its Amount slider there.
If you recorded screen, camera, and mic together, ScreenFlow groups recorded media in the timeline, and Telestream's help documentation confirms those recorded audio and video sources can be detached later if needed.
The Best Workflow for Speech-First ScreenFlow Cleanup
If your main goal is clean spoken audio, this order is usually the safest:
- Start with the cleanest recording you already have. Lower fan noise, improve mic position, and record the right source when possible.
- Select the narration clip and apply light Remove Background Noise. Start low and preview.
- Detach audio if needed. Cut obvious coughs, clicks, and noisy pauses separately.
- Add crossfades after audio edits. This helps avoid clicks or abrupt transitions.
- Fix levels manually. Do not treat Smooth Volume Levels as a denoiser.
- Watch the meter while boosting quiet narration. Avoid clipping.
- Export for external cleanup when noise remains under the voice.
This order works because it separates three different problems:
- Noise floor: handled partly by Remove Background Noise
- Bad edits and noisy gaps: handled by cuts and crossfades
- Uneven loudness: handled by level work, not denoise
How Much Noise Reduction Should You Use?
The safest answer is: use as little as you can get away with. The Screencasting.com ScreenFlow tutorial suggests a light setting around 10 to 15 percent and warns that aggressive use can make the voice sound muffled. That is a practical starting point, not a rule.
Use preview listening to judge the tradeoff:
- If the fan or hiss drops and the voice still sounds natural, you are in a good range.
- If consonants lose crispness, the voice sounds underwater, or speech starts feeling dull, you have likely gone too far.
- If heavy noise is still obvious even after a light pass, ScreenFlow may not be the right final fix for that file.
What Not to Stack: Remove Background Noise vs Smooth Volume Levels
One of the biggest mistakes in ScreenFlow is trying to solve every audio issue by turning on multiple automated controls at once.
Remove Background Noise and Smooth Volume Levels do different jobs.
- Remove Background Noise is for reducing steady low-level noise.
- Smooth Volume Levels is for evening out level changes over time.
Smooth Volume Levels is not a denoiser. The Screencasting.com tutorial notes that it can create awkward level shifts, which matters even more in voice-heavy training videos. If your room noise is still present, smoothing levels can sometimes make the track feel more inconsistent rather than cleaner.
Best practice for spoken narration:
- Use noise reduction lightly first.
- Edit obvious bad sections manually.
- Then adjust volume with intention.
- Only use automatic level smoothing carefully, after listening for pumping or unnatural shifts.
When to Detach Audio First
Telestream's ScreenFlow help documents a Detach Audio command in the Edit menu, and this is one of the most useful troubleshooting steps for spoken content.
Detach audio first when:
- You want to cut coughs or mouth noises without touching the video timing more than necessary
- You have noisy pauses between sentences
- You need to trim out bumps, clicks, or breaths in isolated sections
- You want more precise control over audio fades
Once detached, you can edit the narration track as its own element instead of treating it as inseparable from the video clip.
How to Detach Audio in ScreenFlow
- Select the clip in the timeline.
- Use the Edit > Detach Audio command.
- Locate the separated audio clip beneath or alongside the video clip in the timeline.
- Cut out noisy gaps or bad sounds.
- Add short crossfades so edits do not click or feel abrupt.
This is especially helpful when noise is mostly between phrases rather than under the narration the whole time.
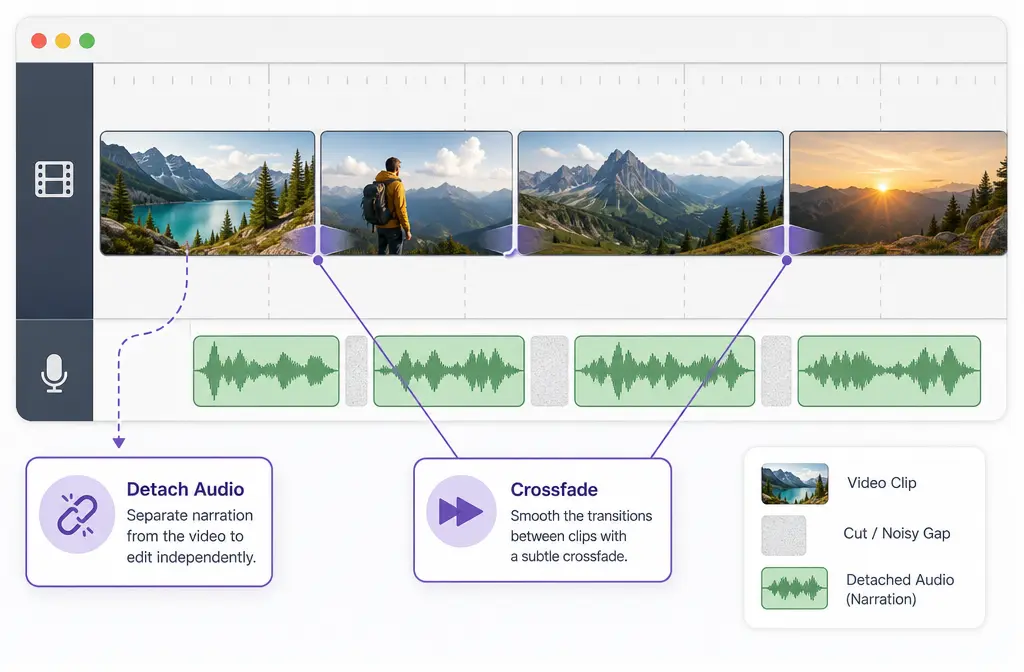
Why Crossfades Matter After Audio Cuts
The Screencasting.com tutorial recommends using crossfades after audio edits, and that advice is worth following. Hard cuts in speech can create tiny clicks, chopped breaths, or a jumpy tone floor. A short crossfade helps the narration move smoothly from one piece of audio to the next.
Use crossfades after:
- Removing coughs
- Deleting dead air with room noise
- Fixing stumbles from multiple takes
- Cutting around keyboard thumps or desk taps
How to Monitor Levels and Avoid Clipping
The ScreenFlow user guide documents audio metering, which matters any time you raise quiet narration. Noise cleanup often leads creators to turn the voice up afterward. That is fine, but watch the meter while doing it.
A simple rule: if the cleanup pass makes the voice seem quieter and you boost it, make sure you are not pushing the loudest words into clipping. Clean audio that clips is still bad audio.
When your narration feels too quiet:
- Raise levels gradually
- Preview louder phrases, not just calm ones
- Watch the meter during peaks
- Do not assume denoise equals proper loudness
Best-For Decision Table
| Problem | Best first move in ScreenFlow | When ScreenFlow is enough | When to export for separate cleanup |
|---|---|---|---|
| Steady hiss, fan, or AC noise | Apply light Remove Background Noise | When the voice stays natural and the noise floor drops enough | When noise remains under speech across most of the file |
| Noise only in pauses or gaps | Detach Audio, cut the bad parts, add crossfades | When the narration itself is mostly clean | Usually not necessary unless noise also sits under speech |
| Low hum | Try light cleanup, then reassess | Sometimes, if the hum is mild | If hum remains obvious or distracts during speech |
| Keyboard clicks during talking | Edit isolated sections if possible | Only when clicks are sparse and not overlapping every word | When the clicks sit under speech throughout |
| Echoey room audio | Limited help inside ScreenFlow | Rarely | Usually the better choice |
| Very low mic volume | Raise levels carefully and monitor the meter | Only if the recording is otherwise clean | If boosting reveals too much noise or artifacts |
Troubleshooting Common ScreenFlow Audio Problems
My voice sounds muffled after noise reduction
This usually means the setting is too aggressive. Reduce the Amount slider and preview again. The practitioner guidance in Screencasting.com specifically warns about this. ScreenFlow's background-noise reduction is most effective when used lightly.
There is still noise under my voice
If the noise continues during nearly every spoken word, manual cutting will not solve it. ScreenFlow may improve it somewhat, but a separate cleanup pass after export is often the smarter route.
Can ScreenFlow remove fan noise or AC hum?
It can help with steady low-level noise, which includes mild fan or AC noise. It is less reliable when the sound is strong, inconsistent, or layered with speech in a distracting way.
Can ScreenFlow remove echo or reverb from room audio?
ScreenFlow is not positioned in the provided Telestream documentation as an advanced echo or spectral repair tool. For strong room echo, you should expect limited results from the built-in background-noise control.
What about keyboard noise?
If keyboard hits happen mainly between phrases, detach the audio and cut those sections. If the clicks happen underneath the narration continuously, ScreenFlow may only partly improve the result.
My mic volume is too low
Increase it carefully while watching the meter. If raising the level also raises obvious noise, that is a sign the recording may need cleanup after export rather than more processing inside the timeline.
Should You Clean ScreenFlow Audio Before or After Export?
Before export is best when:
- The noise problem is mild
- The issue is mostly steady background noise
- You can solve most distractions with light denoise plus edits
- You want to stay entirely inside ScreenFlow
After export is best when:
- Noise stays under the voice the whole time
- The room sounds echoey
- You pushed ScreenFlow's denoise and the voice got dull
- You need a separate cleanup pass without reworking the edit
If you want that second-pass workflow, remove noise from exported ScreenFlow audio with SimpleClean after rendering your file.
How to Export Audio-Only or Video from ScreenFlow for Cleanup
Telestream's export help confirms ScreenFlow supports export options including audio-only output. That gives you two practical handoff paths:
Export audio-only when:
- Your narration is the main asset
- You want to clean just the spoken track
- You do not need to preserve a video container for the next step
Export the full video when:
- You want the cleaned file to stay in sync as one deliverable
- You are sending the final video into another cleanup or publishing workflow
- You plan to add captions, translation, or distribution next
After cleanup, you can continue the publishing workflow with tools that fit the rest of the job. For example, Best AI Captions can help add captions and subtitles to the cleaned video, Translate Dub can help translate and dub it for multilingual audiences, and Mallary.ai fits naturally on the distribution side if your team wants to schedule and publish the finished content across multiple social platforms.
Best Option by Creator Type
- Course creators and trainers: Stay in ScreenFlow first if the issue is mild and the voice is the priority.
- YouTubers and screencasters: Detach audio and clean gaps manually if your narration is mostly fine but your edit has coughs, pauses, or clicky joins.
- Support teams and consultants: Export audio-only when you need a fast speech cleanup pass for lots of tutorial recordings.
- Teams repurposing content: Export the full video if you plan to caption, translate, and distribute the same file across channels after cleanup.
Final Take
ScreenFlow is genuinely useful for light speech-first cleanup, especially when the problem is steady background noise and you want a fast fix without leaving your editor. The key is restraint: use Remove Background Noise lightly, do not rely on Smooth Volume Levels as a noise fix, detach audio when the real problem is bad gaps or isolated sounds, and add crossfades after cuts.
When the recording is still noisy under the voice after that, the better move is often to export and clean the file separately. That is where SimpleClean fits naturally into a ScreenFlow workflow.
If you edit in other apps too, you may also find our guides on removing background noise in iMovie, removing background noise in Camtasia, and removing background noise in Premiere Pro useful.
Sources and further reading
- Improving audio - Screenflow for Screencasters - Practitioner guidance for using noise reduction lightly, warning about muffled voice, and using crossfades.
- Edit Menu - ScreenFlow Help - Primary source for Detach Audio in ScreenFlow.
- Beginning Your Recording - ScreenFlow Help - Primary source confirming ScreenFlow records grouped media that can later be separated.
- Customizing Codec Settings - ScreenFlow Help - Primary source supporting audio-only export capability.
- Publishing Your Screencast - ScreenFlow Help - Primary source for export and publishing handoff workflows.
- Installing Telestream Audio - ScreenFlow Help - Relevant context for recording computer audio in screencast workflows.