How to Remove Background Noise in Camtasia: Best Noise Removal Settings, AI Noise Removal in 2025, and When to Clean the Exported File Online
Quick Answer
To remove background noise in Camtasia, select your clip, open Audio Effects, and apply Noise Removal. On Windows, Camtasia can Analyze the clip automatically; on Windows or Mac, you can also adjust the effect manually. This works best for steady noise like fan noise, hum, and static. It is much less reliable on irregular or overlapping sounds like traffic, door slams, construction, barking, or keyboard clicks. If Camtasia leaves your voice sounding metallic, watery, dull, or pumpy, the faster fix is often to export the audio or video and clean your Camtasia export with SimpleClean separately.
One important version note: TechSmith introduced AI Noise Removal in Camtasia 2025 on February 12, 2025, so older tutorials may show the classic Noise Removal workflow and different controls or results depending on your version.1
Camtasia noise removal in 2025: what changed?
If you are comparing tutorials and your screen does not match what you see online, the version difference may be the reason. TechSmith’s support and feature pages confirm that Camtasia now positions background noise cleanup as an AI-assisted feature, and the Camtasia 2025 version history confirms AI Noise Removal arrived on February 12, 2025.1 2
That means:
- Older Camtasia tutorials may show the classic Noise Removal effect only.
- Camtasia 2025 users may see newer AI-oriented messaging or tools.
- The practical advice still matters either way: preview closely and do not force aggressive reduction if speech starts sounding damaged.
For most creators, the workflow decision is simple: try the built-in Camtasia cleanup first for mild, steady noise. If the result is only partly fixed or starts sounding artificial, export and clean the actual file outside the editor.
What Camtasia removes well vs poorly
TechSmith’s own noise removal best-practices guidance is clear: Camtasia works best on steady, consistent background noise and struggles more with changing or sudden sounds.3
| Noise type | How Camtasia usually does | Best move |
|---|---|---|
| Fan noise | Usually good | Try Camtasia first |
| Low hum | Usually good | Try Camtasia first |
| Static / steady hiss | Often good if mild | Try Camtasia first, preview carefully |
| Traffic outside | Mixed to weak | Export and clean separately if distracting |
| Doors, bumps, sudden room sounds | Poor | Separate cleanup or manual editing |
| Construction noise | Poor | Export and clean separately |
| Keyboard clicks | Usually difficult | Separate cleanup often works better |
| Dog barking / transient distractions | Usually difficult | Do not expect a miracle fix |
| Echo / room reverb | Not the same as steady noise reduction | Separate cleanup is usually the better path |
In plain English:
- Best case: spoken voice with a constant fan, HVAC, electrical hum, or light static underneath.
- Hard case: speech covered by changing sounds, short spikes, or noises that overlap the same frequencies as your voice.
- Common mistake: pushing the effect harder and harder until the noise drops but the voice gets worse.
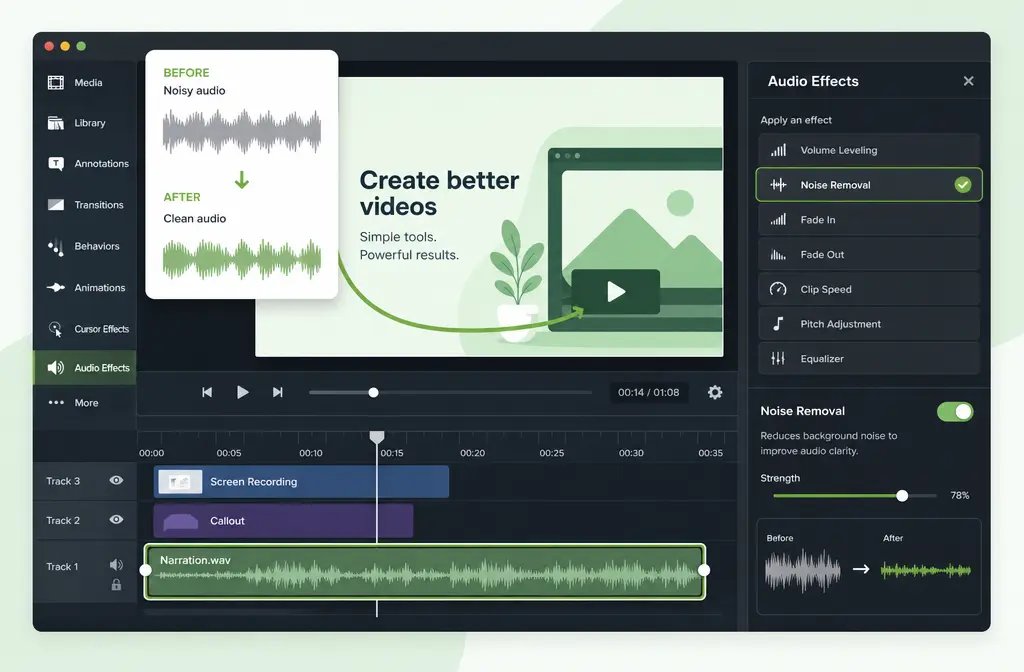
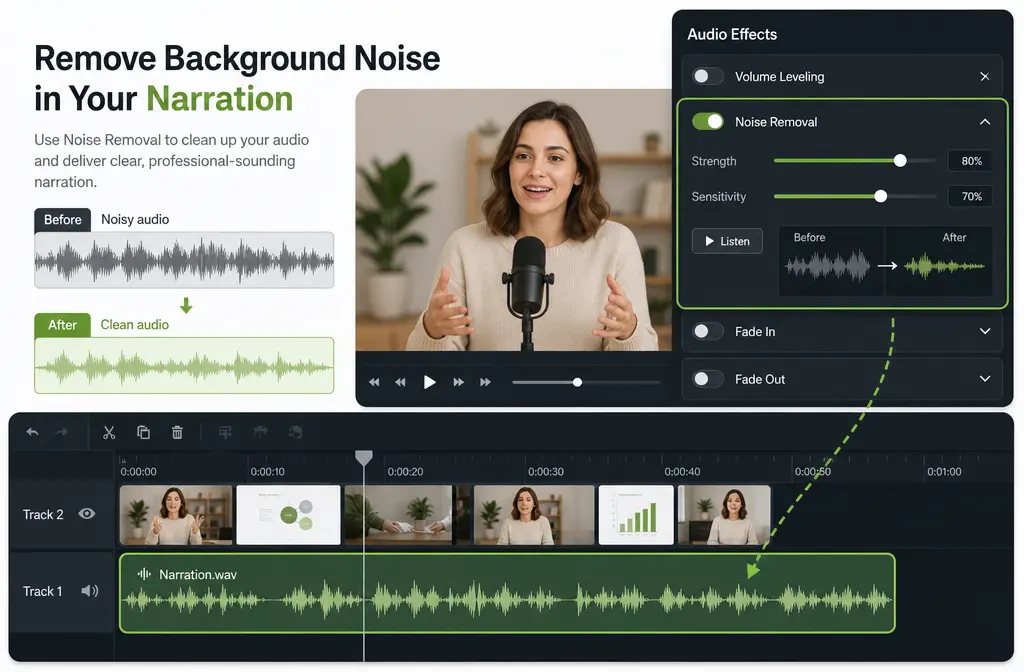
Exact Camtasia workflow: how to remove background noise
TechSmith’s support workflow is straightforward: select the clip, go to Audio Effects, drag Noise Removal onto the clip, then use the available controls to refine the result.4
Step-by-step
- Select the clip with the noisy voice audio.
If your timeline has multiple clips, make sure you are applying the effect to the correct one. - Open Audio Effects.
In Camtasia, find the Audio Effects panel. - Apply Noise Removal.
Drag Noise Removal onto the clip in the timeline. - Use Analyze on Windows if available.
TechSmith’s support documentation shows an Analyze option on Windows that can automate part of the process.4 - Preview speech before and after.
Listen to the same sentence several times, especially consonants like S, T, and K. - Adjust manually if needed.
If Analyze gets close but not all the way there, fine-tune by ear. On Mac, manual control is the normal path. - Stop when the voice starts degrading.
The goal is not silence at all costs. The goal is clearer speech.
Windows vs Mac differences
- Windows: TechSmith documents an Analyze workflow plus manual adjustment.4
- Mac: The practical workflow is still Noise Removal in the Audio Effects area, but older support guidance emphasizes manual adjustment rather than the Windows Analyze flow.4
If you searched specifically for how to remove background noise in Camtasia on Mac, that is the main difference to remember: the effect is still there, but Windows tutorials may show an Analyze step that your Mac setup does not match.
Best Camtasia noise removal settings by noise type
TechSmith does not publish a universal “best number” that fits every recording, so the safest advice is to treat Camtasia noise removal as a preview-driven tool, not a set-and-forget preset. The best setting is the lowest amount that clearly improves intelligibility without damaging the voice.
For fan noise or low hum
This is the most promising use case for Camtasia. Start with the default effect behavior, preview, and only increase processing gradually if the voice stays natural. If you are trying to find the best Camtasia noise removal setting for fan noise, the answer is usually: use just enough reduction to tame the fan, not enough to make the narration sound processed.
For static or light hiss
Mild hiss can improve well. Heavier hiss is where voices often start sounding brittle or dull after aggressive cleanup. If the hiss is still obvious after a moderate pass, exporting the file for separate cleanup is often faster than overprocessing inside the editor.
For keyboard noise, dog barking, traffic, or construction
These are weak cases for in-editor denoise because they are inconsistent or transient. Camtasia may reduce them a little, but do not expect a clean removal. If they are frequent or overlap speech, separate cleanup is the better bet.
How to tell when you are overprocessing
This is the part many tutorials skip. Even when the noise meter looks better, the audio can be worse for viewers. Stop and back off if you hear any of these:
- Metallic voice
- Watery or underwater artifacts
- Pumping, where the background shifts unnaturally between words
- Dull consonants, especially S, T, F, and K sounds
- Hollow or thinned-out narration
If those artifacts appear, Camtasia is telling you it has reached the limit of what it can do cleanly on that clip. That is usually the point where it makes more sense to export the media and run cleanup on the actual file instead of forcing stronger reduction inside the timeline.
If Camtasia gets close but not clean enough, you can remove noise from your exported Camtasia audio with SimpleClean and compare the result before re-uploading or publishing.
Use Camtasia only vs export and clean separately
| Situation | Best option | Why |
|---|---|---|
| Mild fan noise on voiceover | Camtasia only | Fast and often good enough |
| Light hum or steady static | Camtasia first | Good built-in use case |
| Noise plus echo / room reverb | Export and clean separately | Mixed problems are harder to fix in one in-editor pass |
| Keyboard clicks during tutorial narration | Export and clean separately | Transient sounds are tougher than steady noise |
| Traffic, construction, or changing outside noise | Export and clean separately | Inconsistent noise usually needs more targeted cleanup |
| Voice sounds metallic after denoise | Export and clean separately | Artifact control matters more than squeezing harder |
| You need the fastest decent fix inside an existing edit | Camtasia only | No round-trip required |
| You want the cleanest speech before captions, translation, or republishing | Export and clean separately | Cleaner source media helps downstream workflows |
This is the practical decision point most Camtasia users need. If the built-in tool gives you a clear improvement without obvious artifacts, stay in Camtasia. If it gets halfway there or hurts the narration, export and clean the file itself.
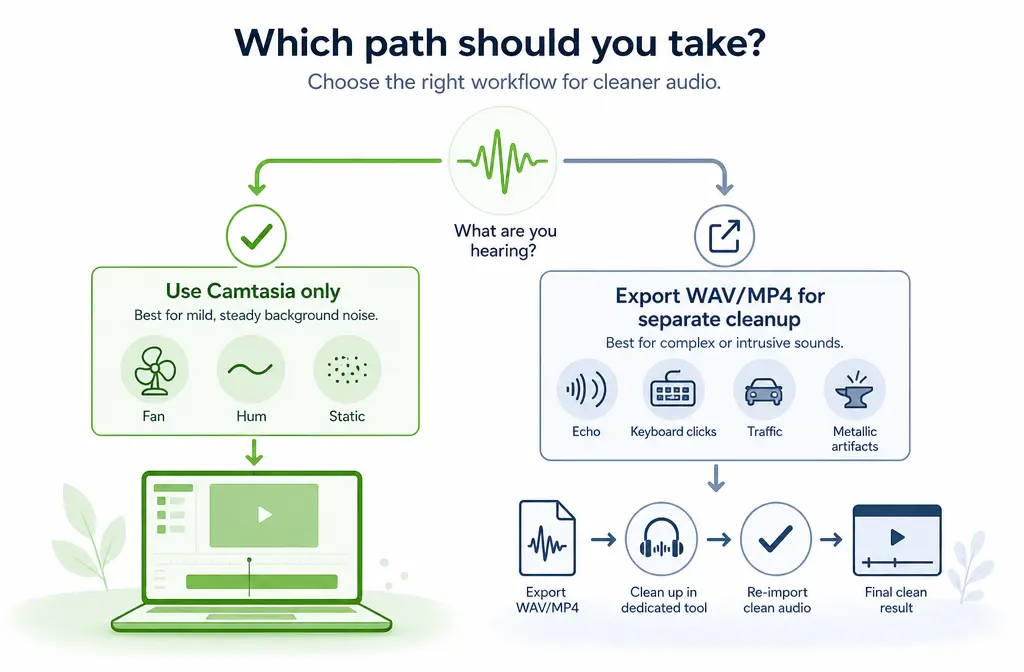
Best export path for separate cleanup
If you decide Camtasia is not enough, keep the handoff simple.
Best practice
- Keep a copy of your original project and source file.
- Prefer WAV when possible if you are cleaning audio by itself.
- Use MP4 if you want to keep the audio attached to the video for a simple round-trip.
- Export locally using Camtasia’s standard Local File workflow.5
TechSmith’s help content supports Local File export workflows for common outputs including MP4, and also references audio workflows such as M4A in the editor/export ecosystem.5 TechSmith also has a separate support article for exporting audio at higher bit rates, which is useful when you are handing off audio-only files for cleanup.6
Supported file types relevant to Camtasia users
TechSmith’s Windows supported-formats page confirms Camtasia works with common media types including MP4, MOV, M4A, MP3, and WAV.7 That makes the export-first cleanup workflow practical for most screen-recording creators.
If your main goal is speech clarity, WAV is the cleaner handoff choice for audio-only cleanup. If your workflow is video-first and you do not want to reconnect audio manually, MP4 is the easier handoff choice.
Troubleshooting Camtasia noise removal
Noise removal is not helping much
The most likely reasons are:
- The noise is not steady enough
- The sound overlaps too much with the voice
- The mic recording itself is weak, distant, or distorted
- You are trying to fix echo, barking, keyboard clicks, or construction as if they were simple hiss or hum
In these cases, separate cleanup usually makes more sense than increasing denoise intensity.
The voice sounds metallic after denoise
This is a classic sign of overprocessing. Reduce the amount, compare against the original, and decide whether a lighter pass is acceptable. If not, export and clean externally.
The wrong track is noisy
Sometimes the issue is not the narration track alone. If your recording includes microphone audio and system audio, identify which source contains the noise before applying cleanup. If the noise lives mostly in one source, target that source instead of denoising everything equally. Whether your exact recording setup captured them separately depends on how you recorded, but this is an important troubleshooting check before blaming the effect.
The export sounds distorted or choppy
If the problem appears after export, do not assume noise removal is the only cause. Keep a copy of the original clip and test a short export with and without the effect. For audio-only handoff, TechSmith’s higher-bit-rate export guidance can help preserve more quality in the exported file.6
Best workflow for course creators, YouTubers, and training teams
- Solo creators and course builders: Use Camtasia first for steady fan or hum because it is fast inside the edit.
- YouTubers and tutorial channels: If the denoise makes your voice brittle, export and clean the file before final upload.
- Internal training teams: Prioritize intelligibility over aggressive noise removal. Clean speech helps both viewers and transcript quality.
- Support and enablement teams: If you republish clips across channels, clean once, then caption, localize, and distribute from the improved master.
That downstream workflow matters. After cleanup, you can add subtitles with Best AI Captions, localize the video with Translate Dub, and schedule or distribute repurposed clips across social channels with Mallary.ai if your training or marketing team needs to publish cleaned content broadly.
For more export-first cleanup workflows, see how to clean screen recording audio online or how to remove hiss from audio online.
Should you use Audiate instead?
If you are already deep in a Camtasia editing workflow, starting with Camtasia’s own noise removal is the simplest first step. But if your problem is not mild background noise and instead involves stronger cleanup needs, the practical choice is often not “switch apps and learn a bigger workflow.” It is simply to export the file you already have and clean that file directly.
That is where SimpleClean fits naturally: not as a replacement for every Camtasia edit, but as the fallback when Camtasia is close and you need a cleaner result without spending more time fighting artifacts in the timeline.
FAQ
How do I remove background noise in Camtasia on Mac?
Select the clip, open Audio Effects, apply Noise Removal, and adjust by ear. TechSmith’s support guidance shows Windows-specific Analyze automation, while Mac users generally rely on manual adjustment.4
Does Camtasia 2025 have AI noise removal?
Yes. TechSmith’s Camtasia 2025 version history confirms AI Noise Removal was added on February 12, 2025.1
What is the best Camtasia noise removal setting for fan noise?
There is no official single best number for every recording. For fan noise, Camtasia is usually most effective when you apply the lowest amount that reduces the fan clearly without making speech sound metallic or dull.
Can Camtasia remove keyboard noise or dog barking?
Sometimes a little, but these are harder cases. TechSmith’s best-practices guidance emphasizes that steady noise is the ideal use case; transient or irregular sounds are much tougher.3
Can Camtasia remove wind?
Do not count on a perfect fix. Wind is often more complex than simple steady hiss or hum, and aggressive reduction can damage the voice. If wind is obvious, separate cleanup on the exported file is often the better path.
Can Camtasia remove echo?
Echo or room reverb is not the same problem as steady background noise. Camtasia’s noise removal may help slightly in some cases, but it is not the ideal tool for a strong echo problem.
Should I export WAV or MP4 from Camtasia for separate audio cleanup?
Export WAV when you are cleaning audio by itself and want the simplest audio-first handoff. Export MP4 when you want to keep the cleaned sound attached to the video. Camtasia supports common formats including MP4, MOV, M4A, MP3, and WAV in its workflow ecosystem.7 5
Why does Camtasia noise removal make my voice sound metallic?
Usually because the effect is being pushed beyond what the recording can handle cleanly. Back off the processing and compare again. If the noise remains too distracting, export the media and clean it separately instead of forcing more in-editor reduction.
Can Camtasia record microphone and system audio on separate tracks?
Your exact result depends on how the recording was made, but when troubleshooting, always check whether the noise is coming from the mic source, the system audio source, or both before applying broad cleanup to everything.
If your narration still has hiss, hum, or artifacty denoise after the Camtasia pass, try cleaning the exported WAV or MP4 with SimpleClean before you publish the final lesson, demo, or tutorial.