Quick Answer
Yes, you can remove background noise in DaVinci Resolve, but the best method depends on your edition and the type of noise.
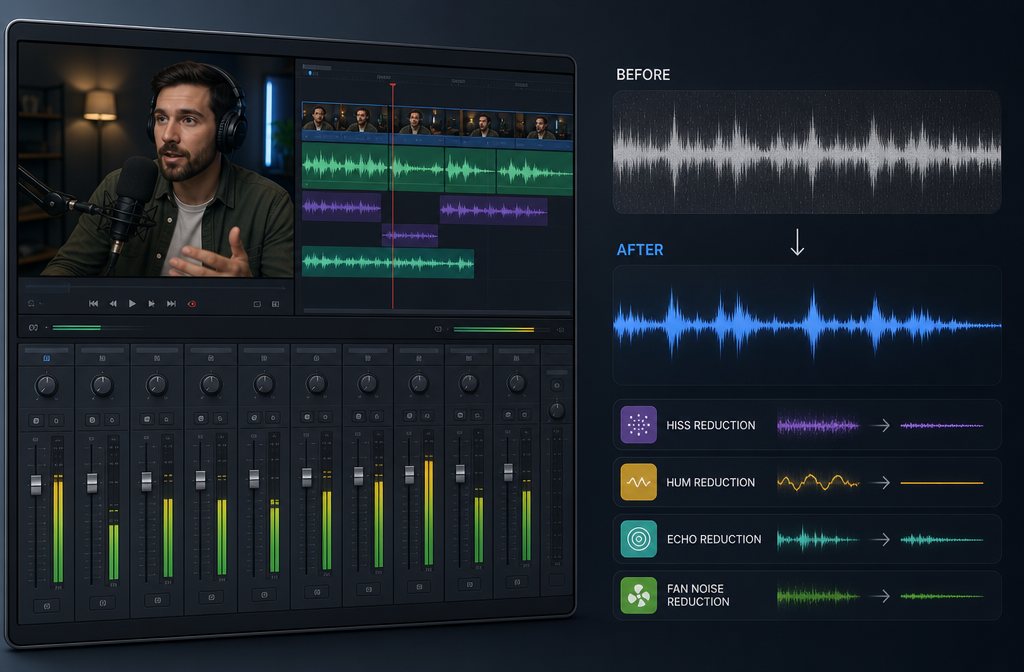
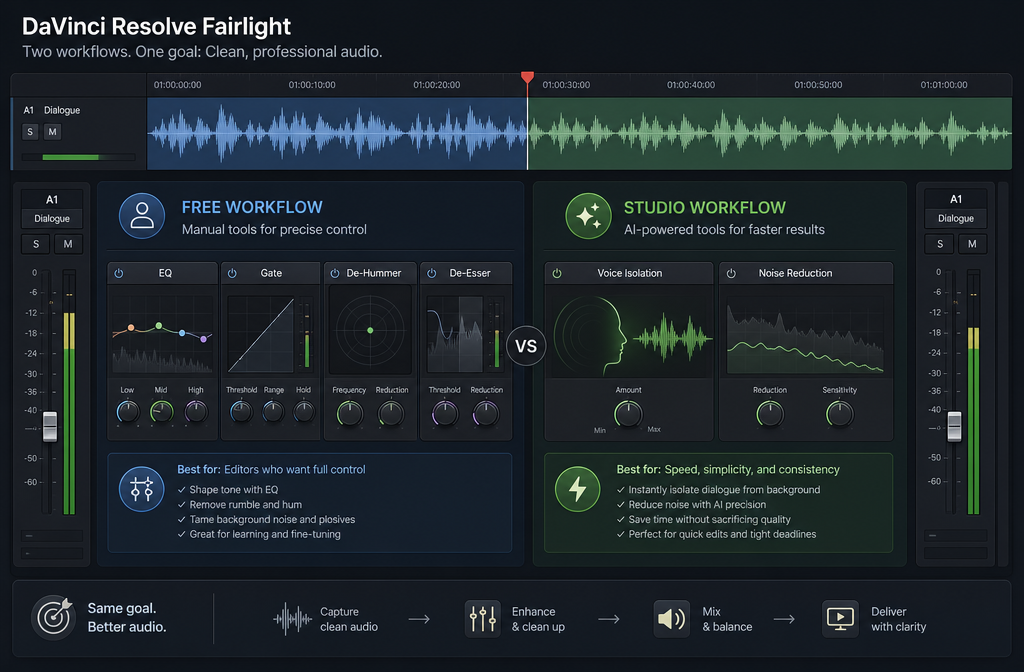
- DaVinci Resolve Free is usually enough for lighter cleanup: hum, low rumble, some hiss, and silent-gap noise control using Fairlight EQ, dynamics/gate, and repair tools such as de-hummer where available in your workflow.
- DaVinci Resolve Studio is faster and stronger for spoken-word cleanup because it includes AI Voice Isolation and broader Fairlight repair options powered by Blackmagic’s DaVinci AI Neural Engine.
- Stay inside Resolve when you need track-by-track control during the edit.
- Export a WAV or MP4 and clean it online when Fairlight starts sounding metallic, underwater, pumpy, or just too slow to dial in for a one-off delivery.
The practical rule: Resolve usually works well for steady noises like hiss, hum, fan, and rumble. It only partially improves harder problems like room echo, severe wind, and overlapping background speech. If you already have the finished file and mainly want cleaner dialog fast, SimpleClean is often the easier handoff.
Free vs Studio: what cleanup tools you actually get
| Version | Best for | Main noise-cleanup path | Big limitation |
|---|---|---|---|
| DaVinci Resolve Free | Basic dialog cleanup inside an edit | Fairlight EQ, gate/dynamics, de-hummer, selective repair workflows | Less forgiving on difficult speech cleanup; more manual tweaking |
| DaVinci Resolve Studio | Faster spoken-word cleanup | Voice Isolation plus Fairlight Noise Reduction and repair controls | Can still create artifacts if pushed too hard |
Blackmagic’s product page says DaVinci Resolve Studio includes the DaVinci AI Neural Engine, and the Fairlight product page lists AI effects including Voice Isolation. Blackmagic’s 18.1 release announcement specifically says AI-based Voice Isolation was added to DaVinci Resolve Studio 18.1. Blackmagic also currently presents Resolve 21 as the current version and lists Studio at $295. Blackmagic product page, 18.1 release note
That matters because many tutorials blur together Free and Studio workflows. If you are on Free, expect more manual shaping. If you are on Studio, start with Voice Isolation for dialog before you spend time stacking multiple fixes.
What DaVinci Resolve removes well vs what it only partly improves
Usually removes or reduces well
- Steady hiss
- Electrical hum
- HVAC or fan wash
- Low-frequency rumble
- Noise between phrases
Often only partially improves
- Room echo and reverb
- Wind buffeting
- Background chatter behind your voice
- Overlapping voices
- Already overprocessed or clipped dialog
Blackmagic’s Fairlight tools are designed to reduce noise and help dialog stand out, but even the official manuals frame some processes as reduction rather than perfect removal. Heavy reverb, severe wind, and competing voices are the classic cases where you can improve intelligibility without fully restoring studio sound. That is why it helps to decide early whether the job needs detailed post work or just fast cleanup on the exported file.
Best workflow by problem
| Problem | Try in Resolve first | When to stop and export |
|---|---|---|
| Hiss | Noise Reduction or gentle top-end EQ control | If consonants turn splashy or metallic |
| Hum | De-hummer, notch-style EQ approach, high-pass for rumble | If hum changes over time or voice gets thin |
| HVAC/fan | Voice Isolation in Studio, then light EQ cleanup | If fan remains obvious or speech gets watery |
| Low rumble | High-pass filtering and gentle dynamics cleanup | If voice loses body before rumble is controlled |
| Room echo | Voice Isolation first, very moderate additional reduction | If dialog becomes phasey, hollow, or robotic |
| Wind | Low-frequency cleanup and minimal reduction | If plosives and buffeting still dominate |
| Background chatter | Voice Isolation or selective reduction | If competing voices remain clearly intelligible |
Fastest workflow in DaVinci Resolve Free
If you are on Resolve Free, think in layers instead of one magic button.
- Start with clip-level cleanup if only one bad clip needs help.
- Use track-level cleanup if the whole interview track has the same problem.
- Cut low rumble first with EQ or a high-pass approach.
- Target hum with de-hummer or narrow EQ moves.
- Use a gate carefully to reduce noise in pauses, not during speech.
- Only then add broader noise reduction where available in your workflow.
Blackmagic’s Fairlight page says plug-ins can be dragged either to a clip or a mixer channel, which is the key distinction between fixing one problem clip and processing a whole track. It also lists noise reduction, de-hummer, and de-esser among the repair tools. Blackmagic Fairlight
Best use cases for Free:
- Podcast tracks with light HVAC noise
- YouTube talking-head clips with mild hiss
- Interview audio with a steady hum
- Screen recordings that only need a bit of polish
If your main issue is exported tutorial audio, you may also want our guide on cleaning screen recording audio online.
Fastest workflow in DaVinci Resolve Studio
Studio users should usually begin with Voice Isolation for spoken-word material. It was introduced by Blackmagic in Resolve Studio 18.1, and Blackmagic positions it as an AI dialog-cleanup tool inside Fairlight. For many YouTube, course, interview, and podcast edits, that makes it the fastest first pass.
- Apply Voice Isolation to the problem clip or dialog track.
- Listen before stacking tools; if the voice is already clean enough, stop there.
- Add Fairlight Noise Reduction only if you still hear hiss, fan wash, or residual room noise.
- Finish with light EQ to restore natural tone if needed.
This order matters. Many robotic results happen when editors pile multiple aggressive processors on the same voice before checking whether Voice Isolation already did enough.
Clip-level vs track-level cleanup
- Use clip-level cleanup when only one section is noisy, such as a cutaway shot, a remote guest segment, or a bad sentence.
- Use track-level cleanup when the same mic and room problem runs through the entire track.
- Use separate tracks for host, guest, music, and room tone when possible so you do not damage everything at once.
This is one of Resolve’s biggest strengths versus file-only tools: per-track control inside the mix. Use Resolve if you are still actively editing and need that precision. Use clean exported audio with SimpleClean if the edit is done and you mainly want a faster cleanup pass on the final file.
How to teach Resolve a noise print with Learn / Manual mode
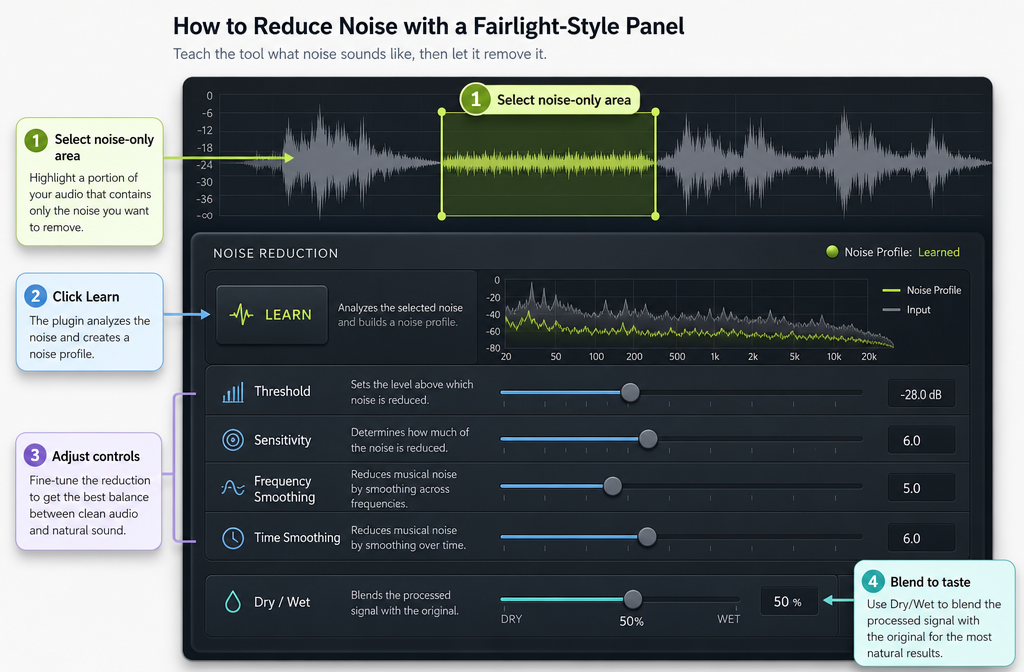
Blackmagic’s Fairlight documentation says the Noise Reduction plug-in can either auto-detect noise in a selection or be taught the noise by selecting a noise-only section and clicking Learn. The manuals also describe Auto Speech for dialog-focused use and Manual mode for learning the actual unwanted sound. Controls described in the official docs include Threshold, Attack, Sensitivity, Ratio, Frequency Smoothing, Time Smoothing, Dry/Wet, and Makeup Gain. Fairlight Audio Guide
Practical way to use Learn
- Find a short section with noise only: fan, hiss, room tone, or hum, but no voice.
- Select that area.
- Open the Noise Reduction effect in Manual mode and click Learn.
- Play a spoken section and raise reduction slowly.
- Adjust smoothing and Dry/Wet if speech starts to sound grainy.
Do not use Learn on mixed speech plus noise. If the sample includes dialog, the tool may treat part of the voice as noise and produce metallic artifacts.
How to avoid metallic, underwater, or pumping artifacts
- Use the least amount of reduction that solves the distraction.
- Prefer one strong primary tool over several aggressive tools stacked together.
- Learn from a clean noise-only region, not speech.
- Use a gate gently; over-gating sounds choppy and unnatural.
- Keep music and effects on separate tracks so dialog processing does not chew them up.
- Back off if S sounds, breaths, or room tails start sounding watery.
If your voice already sounds robotic, the fix is usually not “more reduction.” It is usually less.
When to stop tweaking in Resolve and export instead
Export the file and clean it elsewhere when:
- You are on Resolve Free and the noise is still obvious after sensible cleanup.
- Voice Isolation or Noise Reduction makes the voice metallic.
- You already have a finished MP4 and do not need full audio post.
- The job is mainly speech cleanup fast, not detailed mixing.
- You are cleaning many similar files and want a simpler repeatable workflow.
This is the gap most Resolve tutorials miss. If the edit is basically done, it can be faster to export once and run the actual file through remove background noise from your Resolve export with SimpleClean than to keep micro-tuning Fairlight settings.
Exact export handoff steps from Resolve to SimpleClean
Export WAV if:
- You want audio-only cleanup
- You are delivering a podcast, voiceover, or interview soundtrack
- You may re-import the cleaned audio back into Resolve
Keep MP4 if:
- You already finished the video
- You just want the final video’s audio cleaned without re-linking tracks
- You downloaded an existing MP4 and only need better sound
Step-by-step
- Finish your edit in Resolve as usual.
- On the Deliver page, export either a WAV for audio-only cleanup or an MP4 if you want to keep the whole video intact.
- Upload the file to SimpleClean.
- Review the cleaned result.
- If needed, bring the cleaned WAV back into Resolve or publish the cleaned MP4 directly.
After cleanup, you can add subtitles with Best AI Captions, localize the video with Translate Dub, and distribute clips or episodes across channels with Mallary.ai if your next step is publishing and social scheduling.
Troubleshooting
“I can’t hear any difference”
- Make sure the correct clip or track is selected.
- Confirm the effect is on the dialog track, not music or master by mistake.
- Bypass/on-off compare at matched volume.
“My voice sounds robotic”
- Reduce intensity.
- Check whether Learn captured speech instead of pure noise.
- Remove one processor from the chain and test again.
“The gate cuts off words”
- Lower the threshold.
- Adjust attack/release behavior more gently.
- Use a gate only for pauses, not as your main cleanup tool.
“Music is getting damaged too”
- Process speech and music on separate tracks.
- Avoid putting strong dialog cleanup on a full mix unless necessary.
“Background voices are still there”
That is normal for overlapping speech. Resolve can often reduce it, but not perfectly erase it. For that problem, also see our guide on removing background conversation from audio.
Use Resolve first or export the file? A simple decision rule
Use Resolve if:
- You need per-track control inside the edit
- You are mixing multiple speakers, music, and effects
- The problem is steady and moderate
Export and clean online if:
- You already have the final file
- You want faster dialog cleanup with less tweaking
- Resolve processing is creating artifacts
- You are mainly fixing hiss, fan, hum, echo, or general speech clarity on a finished deliverable
Related fixes: remove hiss, reduce HVAC noise, reduce echo, remove fan noise, and clean tutorial or screen-recording audio.
Final takeaway
DaVinci Resolve is absolutely worth trying first, especially when the noise is steady and you are still editing inside Fairlight. But not every audio problem deserves a long plugin chain. If Resolve Free is not enough, or if Studio tools start making the voice sound strange, exporting a WAV or MP4 and using clean your DaVinci Resolve export with SimpleClean is often the cleaner decision.
Sources and further reading
- Blackmagic Design — DaVinci Resolve 19 Beginner’s Guide PDF - Supports beginner-safe workflow language and official UI terminology around Fairlight audio cleanup.
- Blackmagic Design — DaVinci Resolve 20 New Features Guide PDF - Supports current-version-era workflow framing and official training context.
- Beginner’s Approach — DaVinci Resolve Remove Background Noise - Used only as SERP context for common user phrasing and practical tutorial terminology, not for unique factual claims.