If your video sounds fine except for a constant air conditioner hum, HVAC rumble, vent hiss, or fan-like whoosh, you can often improve it online without opening a full DAW. Steady background noise is usually easier to reduce than changing sounds like overlapping voices or TV audio, but the best results happen when the AC noise sits underneath speech instead of covering it up. If the recording is clipped, extremely echoey, or the air conditioner is as loud as the speaker, cleanup may only soften the problem rather than fully remove it.
A practical workflow is simple: diagnose the noise first, apply moderate denoise, listen for artifacts, then stop before the voice turns robotic. For a fast browser-based option, try SimpleClean, then do captions with Best AI Captions, multilingual versions with Translate Dub, and distribution or scheduled publishing with Mallary.ai.
Quick Answer
Yes, you can remove air conditioner noise from video online in many cases, especially when the noise is steady and the voice is still clearly present. AC and HVAC noise usually shows up as one or more of these problems:
- Low hum or rumble from an HVAC system
- Broad fan whoosh from a vent, mini split, or window unit
- Vent hiss or air movement noise
- Constant laptop-like fan bleed in an indoor room
Online AI cleanup works best when:
- The noise is consistent over time
- Speech is louder than the AC bed
- The recording is not clipped or badly distorted
- The room is not heavily echoey
It works less well when:
- The AC noise overlaps speech at nearly the same level
- The voice is distant and the room is reverberant
- The file contains TV, music, or other voices behind the speaker
- The original recording is distorted
According to the Audacity manual, noise reduction is based on identifying a noise profile, and lighter, steadier noise generally cleans up more naturally than severe contamination. Apple and Adobe also caution that stronger reduction can create artifacts, so moderate settings are usually safer than aggressive ones.
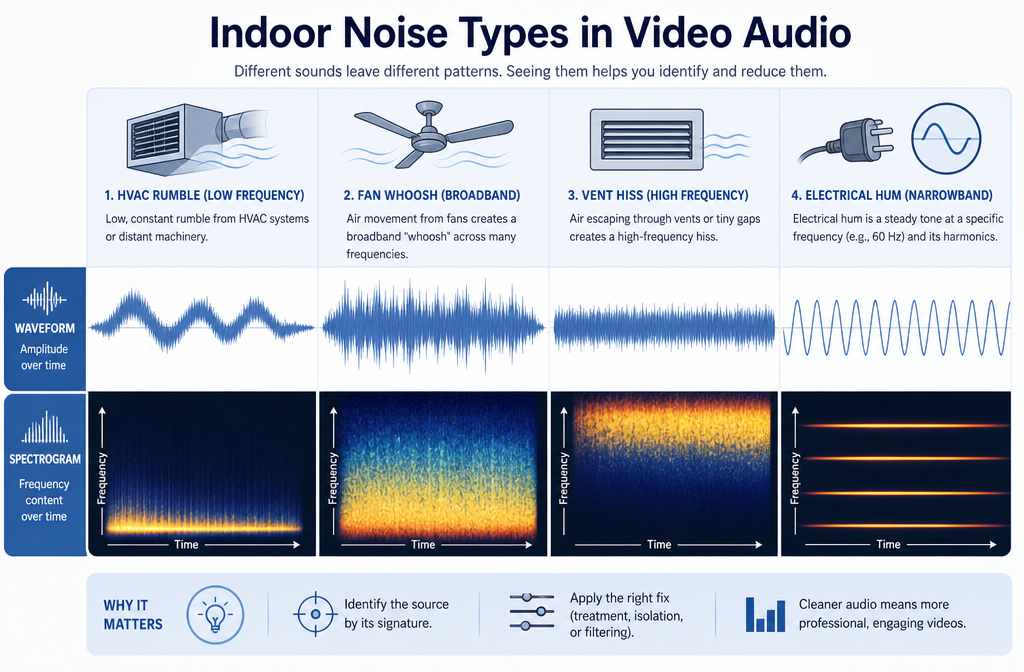
What counts as air conditioner noise in video audio?
People often call every indoor noise “hum,” but air conditioner noise is not always the same thing. That matters, because the best repair approach depends on what you are actually hearing.
| Noise type | What it sounds like | Best online AI result | When to use a related guide |
|---|---|---|---|
| AC hum / HVAC bed | Steady low tone or soft constant layer under speech | Often good to very good if speech stays clear | See hum removal if it sounds more tonal than airy |
| HVAC rumble | Low-frequency vibration or floor-shaking air movement | Usually improvable; may also benefit from gentle high-pass filtering | See hum removal for low-end buzz and rumble |
| Fan whir / whoosh | Broadband blowing or spinning noise | Often a good AI denoise target if it is steady | See fan noise removal for computer or appliance fan bleed |
| Vent hiss | Airy shhh sound from ducts or vents | Moderate improvement possible; too much reduction can dull consonants | See static and hiss cleanup if it sounds more like high-frequency hiss |
| Electrical hum | 50/60 Hz buzz, sometimes with harmonics | Needs hum-specific treatment more than generic denoise | Go to 50/60 Hz hum removal |
| Room echo / reverb | Voice sounds distant, roomy, reflective | Noise removal alone will not solve it | Use reverb removal |
| Clipping or distortion | Crunchy, broken, fuzzy speech peaks | Denoise may expose damage but not fix it | Use clipping repair |
The key distinction is this: air conditioner noise is often a steady background layer, while echo, clipping, and overlapping voices are different problems entirely.
Quick diagnosis: AC/HVAC noise vs electrical hum vs echo
Before you process anything, listen to a quiet section with no speech if you have one. Apple’s Final Cut Pro guidance specifically notes that a section containing only the unwanted sound is useful for noise reduction, and that the result should be checked carefully to avoid overprocessing.
It is probably AC or HVAC noise if:
- The sound is present continuously through the clip
- It resembles airflow, fan wash, or low mechanical room tone
- It stays fairly stable rather than changing every second
- Turning up headphones makes the room feel “occupied” by machinery or air movement
It is probably electrical hum if:
- You hear a distinct low buzz rather than a soft whoosh
- The tone feels pitched, often with higher harmonic overtones
- The problem sounds more like power interference than air movement
It is probably reverb if:
- The room sound trails after each word
- The speaker sounds far away even when noise is reduced
- Consonants remain smeared after denoise
It is probably a bigger restoration issue if:
- The audio crackles or breaks up on louder words
- There is TV, music, or other people speaking behind the subject
- The voice is quieter than the air conditioner
If your clip has more than one problem, fix the biggest one first. For example, a Zoom lesson with AC bed and room echo may need noise reduction plus dereverb; NVIDIA’s Maxine documentation distinguishes between denoising and denoise-plus-dereverb for that reason.
When online AI works best for air conditioner noise
Online cleanup is strongest when the unwanted sound is predictable. Audacity’s documentation on noise reduction and alternative techniques describes constant background sounds such as fans and hum as classic denoise targets. That is why indoor AC noise is often more repairable than chatter or passing sirens.
Best-for scenarios:
- Talking-head videos: home office clips with low AC bed behind a close mic voice
- Podcasts on camera: usable dialogue with steady vent hiss under it
- Lessons and courses: classroom or tutorial videos with constant HVAC rumble
- Webinars and Zoom recordings: consistent indoor fan noise around speech
- Phone video indoors: soft room AC noise, especially when the speaker is near the phone
- Real-estate walkthroughs: short speech sections with HVAC running in the background
Less ideal scenarios:
- Window AC or vent noise blasts directly into the mic
- The room is very live and reflective
- The speaker is far from the microphone
- The recording clipped during capture
- Music, TV, or side conversations overlap the same frequency range as speech
Fast online workflow for MP4 and MOV clips
If you have an interview, lesson, webinar, talking-head clip, or phone video, use this order:
- Upload the video or extract audio if needed.
- Apply moderate denoise aimed at the steady AC or fan layer.
- Check speech quality before pushing harder.
- Do any additional polish after denoise, not before.
- Add captions, translations, and publish only after the audio sounds natural.
This order matters. Adobe’s restoration documentation warns that aggressive reduction can create artifacts. In practice, that means you should remove the steady noise first, then do heavier compression, final loudness work, or export steps later. If you compress noisy audio first, the background bed can become more obvious.
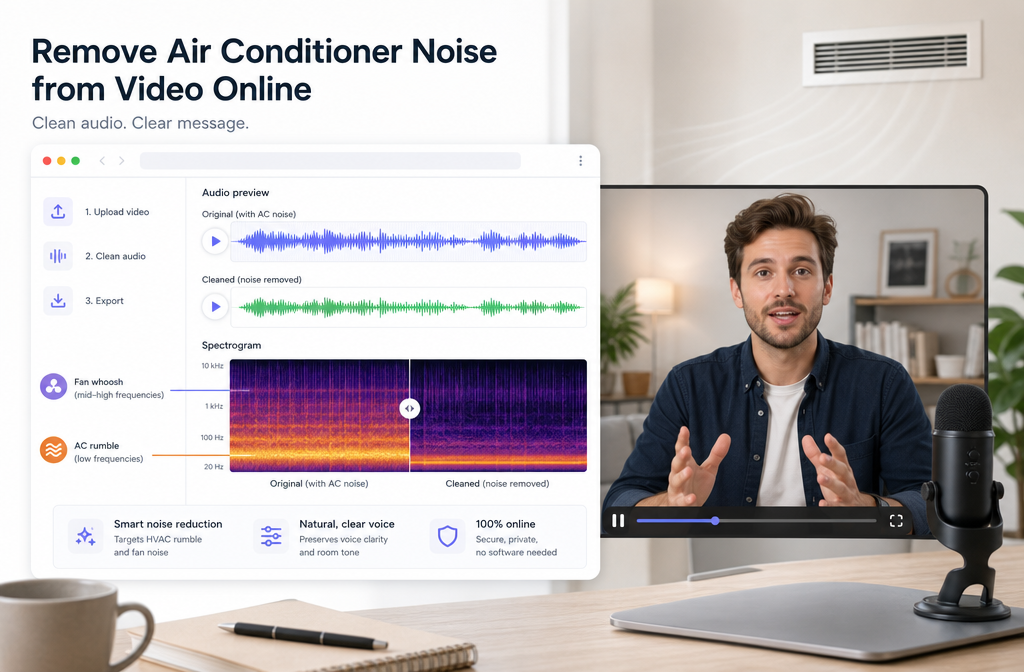
Simple 3-step cleanup workflow
- Identify the noise: Decide whether you are hearing rumble, hum, hiss, or fan-like whoosh. If it is mainly echo, use a reverb-focused workflow instead.
- Reduce, then compare: Run a light-to-moderate cleanup pass and compare before/after on headphones. Keep the version that improves clarity without hollowing out the voice.
- Finish the content pipeline: Once the speech is clean enough, add subtitles with Best AI Captions, create multilingual versions with Translate Dub, and schedule or repurpose your finished clips with Mallary.ai.
If you want a fast browser-based starting point, use Remove background noise with SimpleClean and keep your first pass conservative.
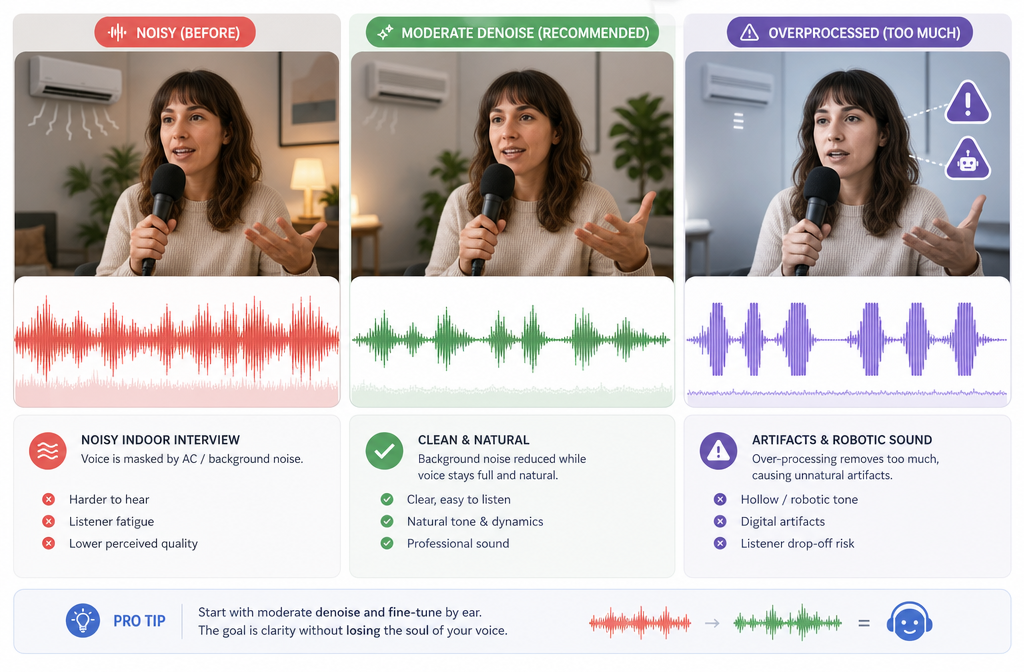
How much cleanup is too much?
The most common mistake is trying to erase every trace of the air conditioner. That usually sounds worse than leaving a faint room bed. Apple’s guidance for Denoiser in Final Cut Pro recommends finding a noise-only portion when possible and adjusting carefully, while Adobe also notes that overly aggressive restoration creates audible side effects.
Stop turning up noise reduction when you hear:
- Robotic or metallic speech
- Watery or swirling artifacts
- “Pumping,” where the noise floor rises and falls unnaturally
- Dulled consonants like S, F, T, or K
- Thin, hollow, or phasey dialogue
A good result is not always silence. A good result is speech that sounds clear and believable.
Should you use a high-pass filter for HVAC rumble?
Sometimes, yes. A gentle high-pass filter can help with low-end HVAC rumble because that energy often lives below the most important speech detail. But a high-pass filter is not the same thing as denoise:
- Use denoise for steady fan, vent, or air-bed noise across a wider frequency range.
- Use a gentle high-pass filter when the problem is mostly low rumble.
- Do not overdo it or the voice may lose weight and warmth.
If what you hear is a pitched buzz instead of low rumble, start with a hum-specific approach rather than general filtering. That is the better fit for mains-related 50/60 Hz problems.
Best processing order for indoor video cleanup
- First: diagnose the noise
- Second: reduce AC/HVAC noise
- Third: address echo or hum if still needed
- Fourth: apply EQ, compression, and final loudness
- Fifth: export, caption, translate, and publish
That order keeps later processing from exaggerating the noise you meant to remove.
Use-case examples
Home office videos
These are often the easiest wins. The speaker is usually near the mic, while the AC is a stable background layer. Moderate denoise often gets you to “good enough for YouTube, LinkedIn, course platforms, or client delivery.”
Classroom lessons
HVAC noise in schools is often constant, but many classroom recordings also have room reflections. If denoise helps but the voice still sounds far away, combine it with a reverb-focused pass.
Zoom and webinar recordings
Online meeting audio may already have platform processing on it. That means extra denoise can become obvious faster. Use a lighter touch than you would with a raw camera recording.
Real-estate walkthroughs
AC systems can dominate interior walkthrough footage. If you only speak in short bursts, cleanup can work well, but wide rooms and distant phone mics limit how natural the result can sound.
Interview footage
Interviews are often salvageable if lavs or a close shotgun captured the voice well. If the room was noisy and reflective and the subjects were under-miked, expect improvement rather than perfection.
When to rerecord instead of trying to repair
You should strongly consider rerecording, ADR, or a voiceover replacement when:
- The air conditioner is nearly as loud as the speaker
- The file is clipped or distorted
- The voice is distant and the room is echoey
- The clip includes TV, music, or competing voices
- The cleaned version sounds more distracting than the original
AI can reduce noise. It cannot fully recreate speech detail that was never captured cleanly.
Prevention checklist for your next shoot
The fastest fix is preventing the problem in the first place. RØDE’s guidance on background noise points to the basics: get the mic closer, control gain, and choose the right microphone type and pickup pattern for the space.
- Move the microphone closer to the mouth
- Increase distance between mic and AC vent, fan, or unit
- Lower gain if your recording chain is too hot
- Use a cardioid or dynamic mic when appropriate for noisy rooms
- Record a short room-tone sample before the take
- Turn off or reduce the AC briefly if the shoot allows it
- Avoid placing a laptop fan or window unit directly beside the mic
- Monitor on headphones before the full take
That short room-tone capture can be especially helpful because many denoise systems work better when the unwanted noise is clearly represented on its own.
Best-for recommendations
- Best for fast browser cleanup: steady AC hum, HVAC rumble, and fan whir under otherwise usable dialogue
- Best for creators publishing quickly: clean the audio first, then add subtitles with Best AI Captions
- Best for multilingual reuse: clean first, then localize with Translate Dub
- Best for teams distributing clips everywhere: clean and export, then schedule, auto-publish, and manage cross-platform posting with Mallary.ai
- Best for heavily echoey rooms: use a reverb-specific workflow, not just noise reduction
- Best for tonal power buzz: use a hum-specific workflow rather than AC-focused denoise alone
Related guides
- How to Remove Hum from Audio Online
- How to Remove Reverb from Video Online
- How to Remove Static from Audio Online
- How to Remove Fan Noise from Audio Online
Final takeaway
Air conditioner noise is one of the more repairable indoor video problems because it is often steady. That is the good news. The limit is that speech and AC noise can overlap, and aggressive cleanup can damage the voice faster than many creators expect. Diagnose first, reduce moderately, and stop when the dialogue sounds natural. If you need a quick in-browser starting point, try SimpleClean and aim for clearer speech rather than total silence.
Sources and further reading
- Audacity Manual — Noise Reduction - Supports the explanation of noise-profile reduction and why lighter, steadier noise is easier to reduce with fewer artifacts.
- Audacity Manual — Alternative Noise Reduction Techniques - Supports the point that constant background sounds such as fans and hum are classic denoise targets.
- Adobe Help — Applying noise reduction techniques and restoration effects - Supports restoration concepts and warnings about aggressive noise reduction causing artifacts.
- Apple Support — Reduce noise with Denoiser in Final Cut Pro for Mac - Supports finding a noise-only section and using careful denoise settings.
- Apple Support — Enhance audio in Final Cut Pro for Mac - Supports distinguishing background noise removal, hum removal, and voice-isolation style processing.
- NVIDIA Maxine Audio Effects SDK User Guide - Supports the distinction between denoise and denoise-plus-dereverb in speech-focused processing.
- RØDE Help — Why Does My Microphone Pick Up Background Noise and Keyboard Clicks? - Supports prevention advice on mic distance, gain, microphone choice, and reducing background pickup.