Quick Answer
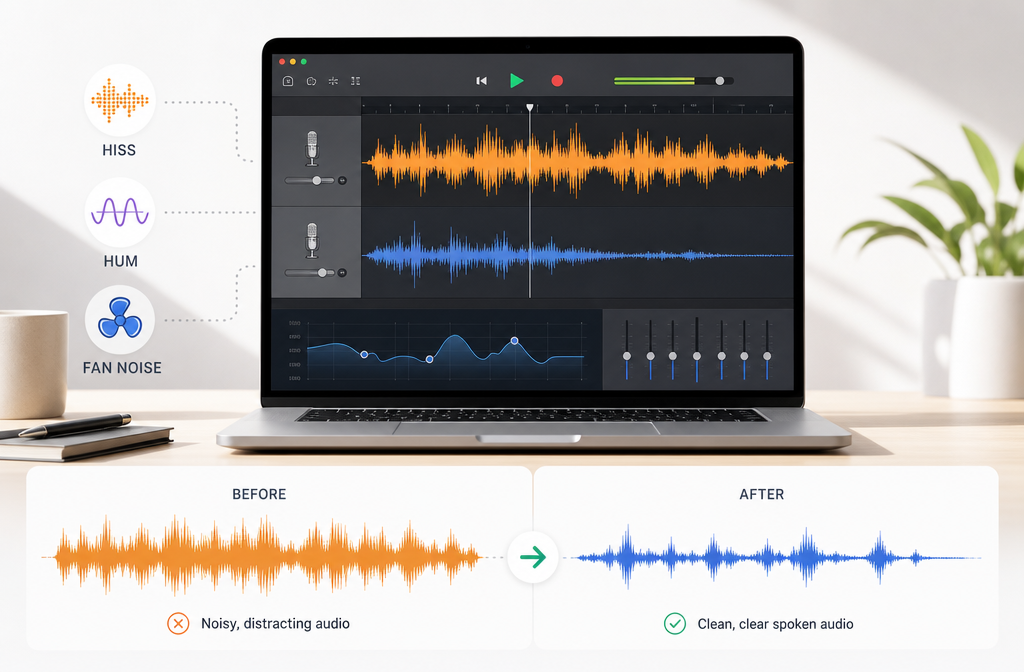
You can remove some background noise in GarageBand, but only up to a point. For spoken recordings, GarageBand is best for three things: reducing low-level noise in pauses with Noise Gate, trimming rumble or hiss with EQ, and manually cleaning obvious gaps or unwanted sounds. Apple’s own guidance describes the noise gate as a way to reduce unwanted low-level noise in silent passages, which is the key limitation: it does not truly remove fan noise, hiss, or hum that sits underneath your voice while you are speaking.
If your recording has light room tone between phrases, GarageBand is often enough. If the noise changes over time, sits under the voice, includes room echo, background conversation, or clipping, it is usually faster to export the audio file and clean GarageBand audio with SimpleClean instead of pushing the gate and EQ until the voice sounds chopped or hollow.
That is the practical rule:
- Use GarageBand for light steady noise, clean close-mic speech, and noise mostly in pauses.
- Export and clean separately for fan noise under speech, heavy hiss, echo, overlapping voices, or damaged recordings.
What GarageBand can and cannot do
GarageBand can help with noisy voice tracks, but it is not a full one-click speech restoration tool. Based on Apple’s documentation and current how-to patterns, your main built-in options are:
- Noise Gate to reduce low-level noise in quiet sections
- EQ or Visual EQ to cut some low rumble or soften top-end hiss
- Manual edits for breaths, bumps, and empty gaps
- Plug-ins where available in GarageBand’s effects workflow
What it does not reliably do on its own is remove complex noise from under active speech. That includes:
- Computer fan or HVAC noise that stays audible while you talk
- Strong electrical hum throughout the recording
- Room echo or reverb
- Background conversation overlapping your voice
- Clipping or distorted peaks
This is why many users feel like they are “almost there” in GarageBand, but not all the way. The tools can improve the recording, yet they often cannot fully restore it.
Quick diagnosis: match the noise to the right fix
| Problem | What it sounds like | Can GarageBand help? | Best first move |
|---|---|---|---|
| Hiss | Steady high-frequency shhhh | Partly | Try gentle EQ first; export if hiss stays under speech |
| HVAC or fan rumble | Low whoosh or whir | Partly | Cut low end with EQ; export if noise remains during speaking |
| Electrical hum | Buzz or low hum | Partly | Use conservative EQ cuts; export if the hum is obvious throughout |
| Mouth noise or breaths | Clicks, lip smacks, sharp breaths | Sometimes | Manual cleanup works better than gating |
| Reverb or echo | Hollow, distant room sound | Not really | Export and clean elsewhere |
| Background conversation | Other voices behind yours | Very limited | Export and clean elsewhere |
| Clipping | Crackly, broken, harsh peaks | No reliable built-in fix | Export and attempt repair elsewhere if possible |
The pattern is simple: if the noise is mostly between phrases, GarageBand is useful. If the noise is under the words themselves, GarageBand is often the wrong tool for the job.
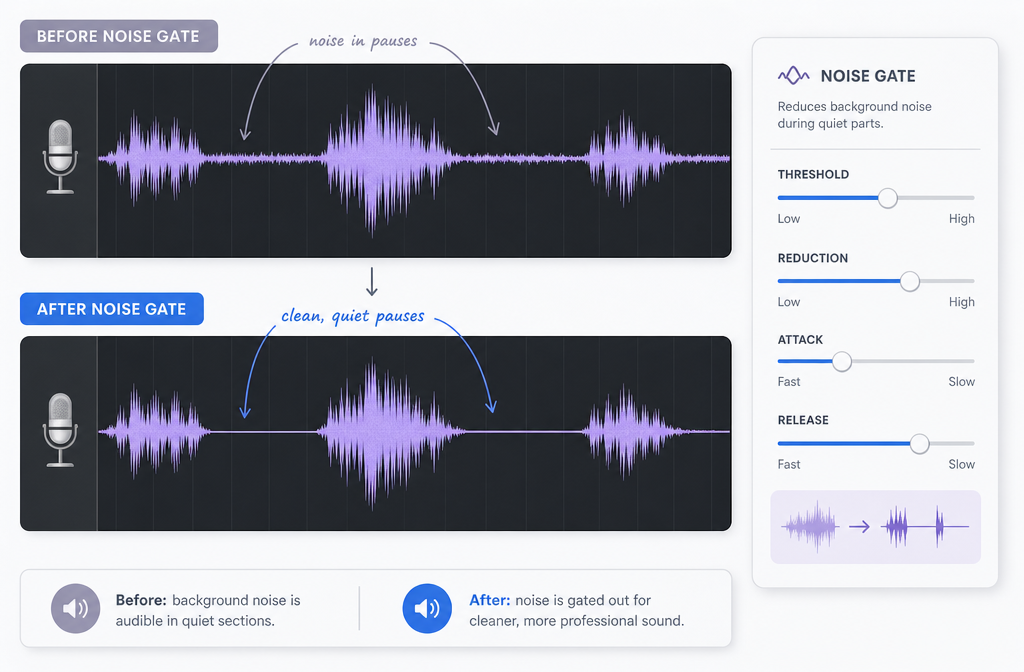
Method 1: Use Noise Gate for noise in pauses
Noise Gate is the first thing most people try, and that makes sense. It can make spoken audio sound cleaner by lowering low-level background noise in silent passages. Apple specifically frames the gate as a way to reduce unwanted low-level noise in silent parts of the recording.
That means it works best when:
- Your voice is clearly louder than the background noise
- The annoying noise is most noticeable before or after phrases
- You recorded fairly close to the mic
It works poorly when:
- The fan, hiss, or hum remains obvious while you are talking
- Your voice level is uneven
- The threshold is pushed so high that word endings get cut off
How to use Noise Gate without ruining the voice
- Select the voice track.
- Open the track controls or plug-in/effects area where GarageBand exposes the gate.
- Enable Noise Gate.
- Start with a low, conservative setting.
- Play a section with normal speech plus short pauses.
- Increase the gate only until background noise drops in the quiet gaps.
- Stop immediately if consonants, breathy endings, or soft words start disappearing.
Best practice: use the minimum amount of gating that makes pauses cleaner. A stronger gate may sound impressive in silence, but once speech starts, it can create a chopped, unnatural rhythm.
If your goal is podcast-style spoken audio, this single idea will save you time: set the gate for pauses, not for silence at all costs.
Method 2: Use EQ or Visual EQ to reduce rumble or soften hiss
GarageBand’s EQ tools are often more useful than people expect, especially for light steady noise. Apple’s iPhone and iPad documentation confirms access to plug-ins and Visual EQ, and on iPad Apple also documents an Analyzer view where available. For voice cleanup, the goal is not dramatic tone-shaping. It is gentle subtraction.
What EQ can realistically fix
- Low rumble: air conditioning, desk vibration, traffic-like low-end build-up
- Some hum: if the unwanted tone sits in a narrow low frequency area
- Light hiss: by gently reducing harsh top-end energy
What EQ cannot truly fix
- Echo or room reverb
- Changing fan noise under speech
- Background voices
- Distortion
Conservative EQ workflow for speech
- Select the spoken track.
- Open the plug-ins or EQ section.
- If Visual EQ is available, make small moves and listen after each change.
- For low rumble, try a gentle reduction on the low end rather than a dramatic cut.
- For hiss, slightly soften the top end instead of aggressively darkening the whole voice.
- If your device shows an Analyzer, use it only as a guide, not as a reason to over-edit.
The right EQ move should make the noise less distracting while keeping the voice natural. If the recording starts sounding thin, dull, or “telephone-like,” you have gone too far.
Method 3: Manual cleanup for gaps, breaths, and obvious noises
GarageBand can still be effective when the problem is not constant background noise, but a series of smaller distractions.
Manual cleanup is worth doing when you have:
- Loud breaths between lines
- Handling noise in empty spaces
- A chair squeak or desk bump between phrases
- Small sections where room tone suddenly gets louder
In those cases, simple edits can outperform heavy processing. You can shorten dead air, lower or cut isolated noise events, and clean transitions before reaching for stronger effects.
For spoken-word creators, a good order of operations is:
- Trim obvious junk first
- Apply a gentle gate second
- Use EQ third
- Listen through once more before deciding whether the file needs separate cleanup
When GarageBand is enough vs when to export and clean the file online
GarageBand is usually enough for:
- Light steady room tone
- Noise that is mostly audible in pauses
- Close-mic narration recorded at a healthy level
- Minor rumble or hiss that responds to gentle EQ
- Quick cleanup for intros, podcasts, and voiceovers that are already fairly clean
GarageBand is usually not enough for:
- Strong fan or HVAC noise under the voice
- Heavy hiss throughout the track
- Echoey or reverberant room sound
- Background TV, chatter, or other voices
- Recordings that clip or distort
- Cases where more gating and EQ keep hurting the voice
A useful decision test: if every new adjustment makes the voice worse faster than it makes the noise better, stop editing in GarageBand and switch workflows.
That is a good time to export a WAV or available audio file and remove background noise from GarageBand exports in a dedicated cleanup step. This is often the faster path when you are working on spoken content and want clarity, not deep DAW tweaking.
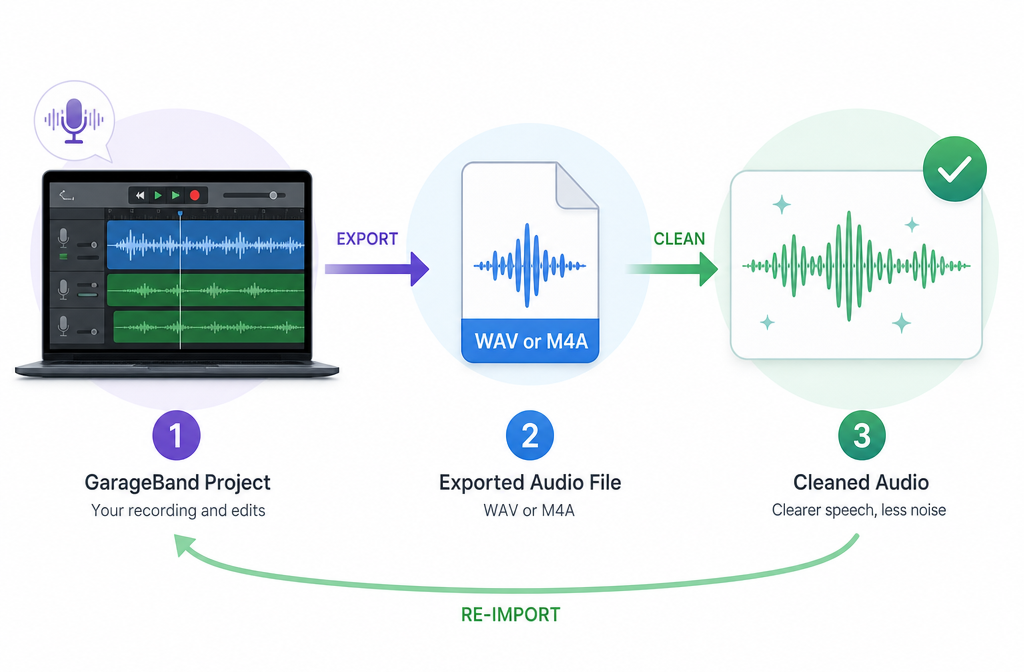
How to export from GarageBand, clean the file, and re-import if needed
Apple documents audio sharing/export options for GarageBand on iPhone and iPad. The exact screens vary by device, but the basic workflow is consistent: share the project as an audio file, then use that exported file for cleanup.
Recommended workflow
- Finish your basic edits in GarageBand first.
- Share or export the project as an audio file. If you have a choice, a WAV is a sensible option for cleanup. If your workflow gives you M4A, that can still be useful for many spoken-word cases.
- Upload the exported file to SimpleClean.
- Review the cleaned result and compare it to your GarageBand-only version.
- If you still need music, sound design, or final arrangement changes, import the cleaned file back into GarageBand.
This hybrid approach is especially good for podcasters, YouTubers, students, and anyone recording voice on a Mac, iPhone, or iPad who wants to stay in GarageBand for editing but not force GarageBand to do restoration work it was not built to handle.
Mac vs iPhone/iPad: keep expectations realistic
The interface differs across GarageBand versions, but the main advice stays the same:
- Mac: easier for detailed editing and broader production workflows
- iPhone/iPad: Apple documents plug-ins, Visual EQ, and audio sharing/export workflows, with Analyzer mentioned in iPad EQ documentation where available
What you should not assume is that mobile GarageBand suddenly becomes a one-tap speech denoiser. On all versions, the core limitation remains: gating and EQ can improve some recordings, but they do not replace dedicated cleanup for difficult speech audio.
Troubleshooting common GarageBand cleanup problems
“My voice sounds chopped.”
Your Noise Gate is probably too aggressive. Lower it until word endings and softer syllables return. Gates should clean pauses, not clamp down on natural speech.
“My voice sounds tinny or thin.”
You likely cut too much low end with EQ. Add some body back and make smaller moves. Removing rumble is good; stripping all warmth is not.
“My voice sounds hollow.”
This usually points to over-processing or untreated room echo. EQ cannot truly remove reverb, and more filtering often makes the hollowness feel worse.
“The noise pumps in and out.”
The gate is opening and closing too obviously. Reduce the amount of gating and rely more on manual cleanup for obvious gaps.
“It still sounds noisy after gating and EQ.”
That is the sign to stop tweaking. If the noise lives under active speech, export the audio and use a separate cleaner instead of stacking more edits.
Best-for recommendations
| If you are… | Best approach | Why |
|---|---|---|
| Editing a mostly clean podcast intro | GarageBand only | Gate + light EQ + manual trims are often enough |
| Fixing light hiss in close-mic narration | GarageBand first, then compare | EQ may be enough if the hiss is mild |
| Cleaning fan noise under YouTube voiceover | Export and clean separately | Noise under speech is where GarageBand struggles |
| Fixing echoey room audio | Export and clean separately | GarageBand is not a true de-reverb tool |
| Preparing audio for captions or transcription | Clean first, then caption | Clearer speech helps downstream captioning |
If you are turning that cleaned audio into a video, Best AI Captions can help add captions and subtitles after the audio is clearer. If you are publishing to multilingual audiences, Translate Dub fits naturally after cleanup by translating, dubbing, and captioning the finished video. And if you are repurposing the final clip across channels, Mallary.ai is a useful next step for scheduling and distributing content across social platforms from one workflow.
A fast practical workflow for spoken recordings
- Listen once and identify the main problem: hiss, hum, fan, echo, chatter, or clipping.
- Use Noise Gate only to clean pauses.
- Apply small EQ moves to reduce rumble or soften hiss.
- Manually trim obvious gaps, breaths, and isolated noises.
- Check whether the voice is getting worse before the noise is getting better.
- If yes, export the audio file and use a dedicated cleanup step online.
- Re-import only if you still need GarageBand for final edits.
Final takeaway
If you searched for how to remove background noise in GarageBand, the honest answer is: GarageBand can improve noisy voice recordings, but it cannot fully solve every noise problem. Noise Gate is useful for pauses. EQ can help with light rumble or hiss. Manual editing cleans up the rest. But for strong noise under speech, echo, overlapping voices, or clipped audio, exporting the file is usually the smarter move.
If your GarageBand edits are starting to damage the voice more than the noise, use GarageBand for what it does well, then clean spoken audio after GarageBand export with a simpler dedicated workflow.
Related reads: if you also work in other editors, see how to remove background noise in Audacity, how to remove background noise in DaVinci Resolve, and how to clean iPhone Voice Memos audio online.
Sources and further reading
- Apple Support — Preventing noise from effects in GarageBand - Primary source for the noise gate limitation: it reduces unwanted low-level noise in silent passages.
- Apple Support — Use effect plug-ins in GarageBand for iPad - Source for plug-ins, Visual EQ, and Analyzer availability on iPad.
- Apple Support — Use effect plug-ins in GarageBand for iPhone - Source for plug-ins and Visual EQ workflow on iPhone.
- Apple Support — Share songs with GarageBand for iPhone - Source for exporting or sharing an audio file from GarageBand on iPhone.
- Apple Support — Share songs with GarageBand for iPad - Source for exporting or sharing an audio file from GarageBand on iPad.
- Media.io — How to Reduce Background Noise in GarageBand: Guide & AI Alternative - SERP competitor used for benchmarking user intent and gaps.
- The Digital Side Hustle — How to Remove Background Noise in Garageband - SERP-style competitor used to identify common sections and opportunities to improve depth.