
Quick Answer
To remove background noise in Clipchamp, import your audio or video, place it on the timeline, detach the audio if you started with a video, select the audio track, then turn on noise suppression. This works well for simple spoken-word recordings with steady noise such as light fan sound, room tone, mild hiss, or office ambience.
But Clipchamp is usually not the best last step for every noisy recording. If your clip has strong wind, heavy echo, electrical hum, keyboard clicks, overlapping voices, or distortion, the built-in toggle may not clean it enough. In those cases, a better workflow is often to export the file first, then clean exported Clipchamp audio with SimpleClean and re-upload the improved file if needed.
That is the main decision: use Clipchamp first for light, constant noise; switch to exported-file cleanup for harder problems or artifact-prone voice tracks.
What Clipchamp Noise Suppression Actually Does
According to Microsoft and Clipchamp’s own documentation, noise suppression is a built-in audio cleanup feature you can apply to audio on the timeline. If your source is a video, you need to separate the audio from the video first before using it.
In practical terms, this feature is most useful when your main goal is making speech easier to hear without leaving the editor. It is a fast option for:
- Talking-head videos
- Screen recordings with narration
- Presentations
- Basic podcast-style spoken clips
- Short explainers and social videos
Where it usually helps most is steady background noise under a clear voice. Think of a constant fan, low room noise, mild hiss, or ordinary office ambience. Those are the kinds of cases where an in-editor suppression toggle can save time.
Where expectations should stay realistic is with more complex noise. Noise suppression can reduce distractions, but it does not mean every bad recording becomes studio-clean. If the noise overlaps heavily with the voice, changes constantly, or the original recording is already damaged, results may be limited.
| Noise type | Clipchamp likely result | Better to export for cleanup? |
|---|---|---|
| Light fan noise | Often a good fit | Usually not necessary |
| Room tone / mild office ambience | Often a good fit | Usually not necessary |
| Mild hiss | Can help | Sometimes, if voice gets thin |
| Mild echo | May improve slightly | Often yes if echo is obvious |
| Electrical hum | Unpredictable | Often yes |
| Keyboard clicks / mouse noise | May remain noticeable | Often yes |
| Wind noise | Usually a hard case | Yes |
| Background conversation | Usually limited | Yes |
| Heavy reverb / hollow room sound | Usually limited | Yes |
| Clipped or distorted voice | Not a true fix | Yes, though recovery may still be limited |
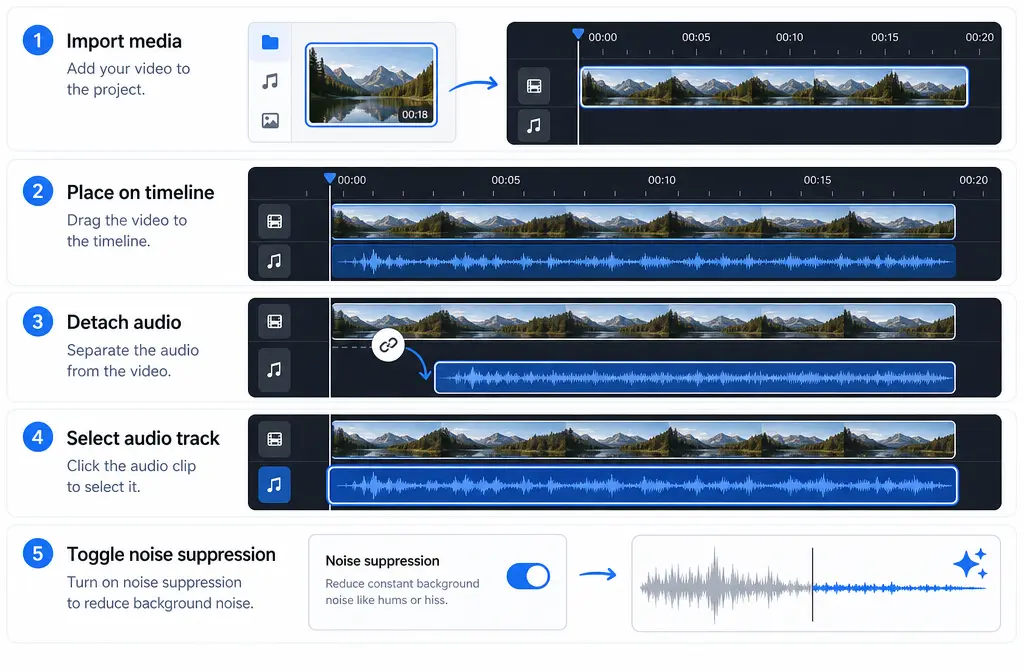
How to Remove Background Noise in Clipchamp Step by Step
Here is the exact built-in workflow based on Microsoft Support and Clipchamp’s official guide.
- Open Clipchamp and import your file.
You can bring in either an audio file or a video file. - Drag the file onto the timeline.
Noise suppression works on audio on the timeline. - If you imported a video, detach the audio first.
Microsoft notes that video audio must be separated before you can use noise suppression on it. - Select the audio track.
Make sure the actual audio element is highlighted, not just the video container. - Turn on noise suppression.
Use the audio controls in Clipchamp to enable the feature. - Preview the result carefully.
Listen with headphones if possible so you can hear artifacts. - Export your project.
Clipchamp exports finished videos as MP4.
For many creators, that is enough. If you are editing a webinar snippet, class lecture, short promo, or tutorial with mild background noise, this can be the fastest route.
Do You Need to Detach Audio Before Using Noise Suppression?
Yes, if your source is a video. Microsoft’s support documentation says noise suppression applies to audio on the timeline, and video audio needs to be detached first.
No, if your source is already an audio-only file. In that case, you can place the audio clip on the timeline and apply the feature directly.
This detail is one of the main reasons people think the feature is missing. They often click the video clip and expect audio cleanup controls to appear, but Clipchamp needs the audio selected as its own timeline item.
What File Types and Export Details Matter
If your file will not import, the first place to check is Clipchamp’s officially supported media formats. Microsoft maintains a support page specifically for supported video, audio, and image file formats in Clipchamp.
For finished exports, Microsoft states that Clipchamp saves exported videos as MP4. The provided Microsoft support and pricing references also indicate that the free personal tier includes core editing and up to 1080p export.
That matters for two reasons:
- If you just need a clean spoken-word video quickly, exporting an MP4 from Clipchamp may be enough.
- If you need stronger audio repair, exporting the project gives you a usable file to clean separately and then re-upload or publish elsewhere.
When Clipchamp Is Enough
Use Clipchamp’s built-in noise suppression first when your recording sounds basically usable already and you just want less distraction around the voice.
Best-fit situations:
- Light fan or HVAC sound in the background
- Low room tone
- Mild hiss
- Soft office ambience
- Simple speech with one speaker
- Basic edits where speed matters more than perfect restoration
Clipchamp is especially convenient if you are already finishing the edit there and do not want to add another step. For busy teams making explainers, internal training, course clips, or YouTube intros, a one-toggle improvement can be enough.
When Clipchamp Is Not Enough
This is where most frustrating results happen. If the recording problem is aggressive, irregular, or baked into the voice itself, noise suppression alone may not get you where you want to go.
More difficult cases include:
- Strong wind noise
- Heavy room echo or reverb
- Electrical hum
- Keyboard and mouse clicks
- Background conversation or overlapping voices
- Badly clipped or distorted speech
In those situations, you may get only partial improvement or trade one problem for another. A common outcome is that the background gets quieter but the voice becomes thinner, metallic, watery, or robotic.
If that sounds familiar, the smarter move is often to export the file and use a dedicated cleanup step. That is the point where SimpleClean fits naturally: if Clipchamp still leaves echo, hum, wind, or artifacts, you can remove echo and noise from the exported file instead of overprocessing the track inside the editor.
How to Judge the Result Before You Export
Do not just toggle noise suppression on and assume it is better. Preview carefully and listen for side effects.
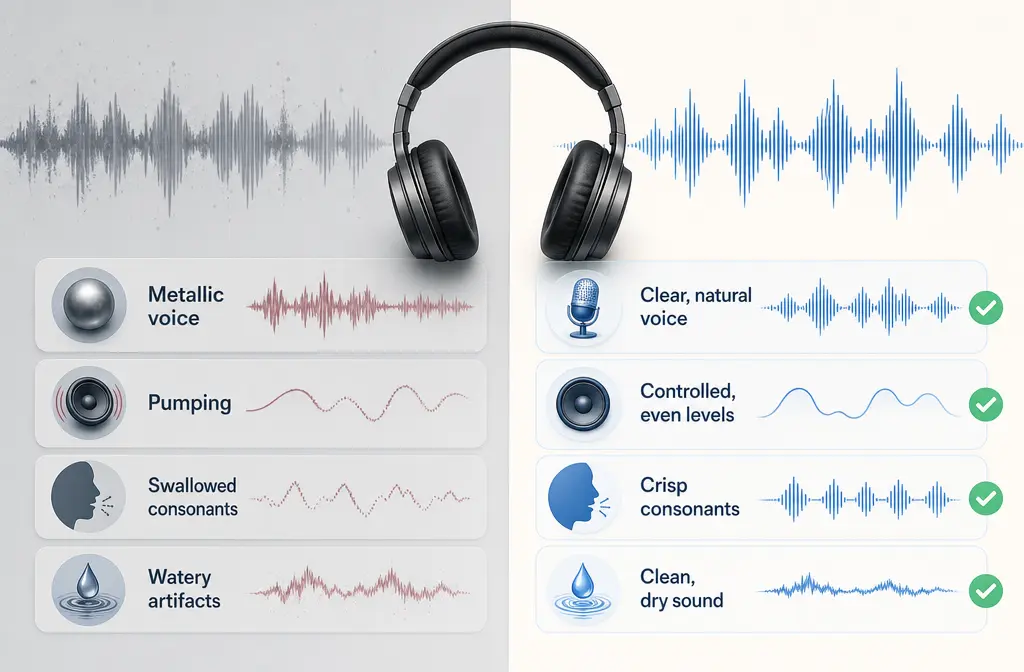
Good signs:
- The background is lower but the voice still sounds natural
- Consonants remain clear
- Speech feels easier to understand
- The room no longer distracts from the message
Warning signs:
- Metallic voice tone
- Pumping or fading background
- Swallowed consonants
- Watery or robotic artifacts
- Speech sounding hollow, papery, or overprocessed
If you hear those artifacts, it usually means the built-in cleanup is pushing too hard for that specific file. That is your cue to stop forcing the in-editor fix and switch workflows.
A Better Workflow for Hard Cases: Clean the Exported File Online
When the raw problem is bigger than Clipchamp’s built-in suppression can handle, this workflow is usually faster and safer:
- Finish your visual edit in Clipchamp.
- Export the project as MP4.
- Upload the exported file for dedicated cleanup.
- Listen for clarity, not just lower noise.
- Replace or re-upload the improved version if needed.
This approach is often better for spoken-word content where intelligibility matters more than staying inside one editor. It also makes sense when you need the cleaned file for multiple uses, such as:
- YouTube upload
- Client review copy
- Transcript generation
- Social cutdowns
- Course or support library publishing
After cleanup, you can add subtitles with Best AI Captions, create multilingual versions with Translate Dub, and schedule distribution across multiple channels with Mallary.ai if your team wants to publish cleaned clips to several social platforms from one workflow.
Troubleshooting Clipchamp Noise Suppression
The noise suppression toggle is not visible
- Make sure the audio track is selected.
- If you started with a video, detach the audio first.
- Confirm the media is actually on the timeline.
My file will not import
- Check Clipchamp’s supported file formats in Microsoft’s official format guide.
- If needed, convert the source to a more common supported format before importing.
The video is noisy but the audio is still attached
- Separate the audio from the video first.
- Then select the new audio track and apply noise suppression there.
The exported result still sounds bad
- Re-listen for metallic tone, pumping, or lost consonants.
- If those are present, the built-in cleanup may be too aggressive for your source.
- Export the file and use a dedicated cleanup step instead.
Can I fix echo, wind, or keyboard noise in Clipchamp?
Sometimes you may get partial reduction, but those are exactly the kinds of problems that often need stronger post-export cleanup. For related fixes, see our guides on removing echo from audio online, removing hiss from audio online, and cleaning screen recording audio online.
Best For: Built-In Clipchamp vs Exported-File Cleanup
| Option | Best for | Less ideal for |
|---|---|---|
| Clipchamp noise suppression | Fast cleanup of mild, constant background noise during editing | Severe noise, strong reverb, wind, hum, clicks, distortion |
| Exported-file cleanup online | Harder spoken-word repair after the edit is done | People who only need a tiny improvement and want zero extra steps |
Final Take
If you are trying to remove background noise in Clipchamp, start with the built-in tool. It is the right first move for steady, moderate noise and simple speech tracks.
But if the recording still sounds distracting after previewing, do not keep pushing the same toggle and hope for a miracle. For wind, hum, echo, keyboard noise, or artifact-heavy voice tracks, exporting and then using a dedicated cleanup step is often the more effective path. If that is your situation, clean noisy Clipchamp exports with SimpleClean before you publish.
Once the audio is clearer, you can make the content go further: add captions, create translated versions, and distribute the finished video more efficiently across your channels.
Sources and further reading
- How to use noise suppression | Microsoft Support - Official source for the exact workflow and the requirement to detach audio from video first.
- How to remove background noise from videos with AI | Clipchamp Blog - Official product walkthrough and examples of use cases for built-in noise suppression.
- Video file formats supported by Clipchamp | Microsoft Support - Official reference for supported media formats and import troubleshooting.
- Exporting and saving a video in Clipchamp | Microsoft Support - Official reference for Clipchamp export behavior and MP4 output.
- How to purchase and manage a Clipchamp personal subscription | Microsoft Support - Official support reference cited in the brief for free-tier and plan context.
- Compare free editing tools and premium access with Microsoft 365 | Clipchamp pricing - Official pricing page for current free-versus-premium framing, including up to 1080p export on the free plan per brief.