How to Remove Background Noise in Streamlabs Desktop: Noise Suppression, Filter Order, and When to Clean the Recording After Export
If you want to remove background noise in Streamlabs Desktop, the fastest path is usually to add mic filters in the right order, start with gentler noise suppression than the default, and monitor your voice while you adjust. Streamlabs Desktop can do a good job on mild steady noise like fan hum, AC, and hiss. It is much less reliable for room echo, loud environments, or keyboard clicks that happen at the same time you are speaking.
That last point matters. Live filters are great when you need cleaner audio right now for a stream or recording, but they are not magic. If your voice starts sounding robotic, choppy, or overprocessed, it is usually smarter to record first and then clean Streamlabs recordings with SimpleClean after export instead of stacking more live filters.
Quick Answer
Use this decision guide before you start tweaking:
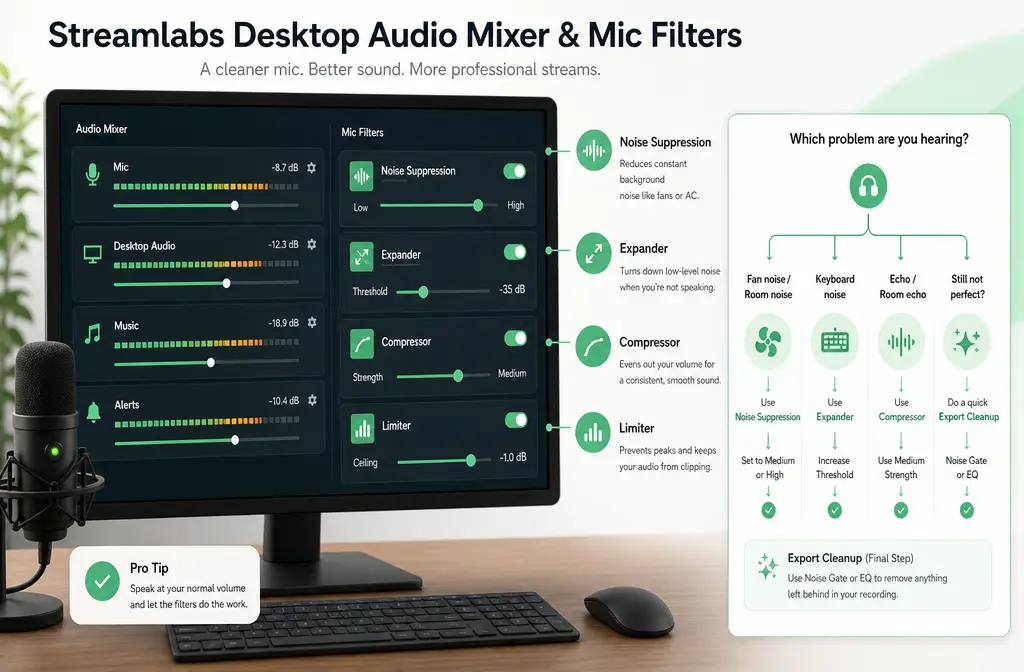
- Best for fan noise, AC, hiss, and light room tone: Noise Suppression on your mic source, adjusted gently.
- Best for silent-room cleanup between phrases: Expander or Noise Gate, with the expander usually being safer for speech because it sounds less abrupt.
- Best for evening out loud and quiet speech: Compressor, then a Limiter to catch peaks. These help level voice but do not remove noise.
- Only partial live fix for keyboard noise while talking: Light suppression plus careful gate/expander settings. Clicks under active speech are hard to fully remove live.
- Not a true fix in Streamlabs Desktop: Room echo or reverb. That is a different problem from steady background noise.
- Best time to stop adjusting live filters: If your voice gets robotic, syllables get chopped off, or noise is still obvious during speech, export the recording and clean the file after the fact.
| Problem | Best Streamlabs tool | What to expect | When post-cleanup is smarter |
|---|---|---|---|
| Fan noise / PC hum / hiss | Noise Suppression | Usually good if noise is mild | If stronger suppression hurts voice quality |
| Idle room noise between phrases | Expander or Noise Gate | Can make pauses cleaner | If words get clipped at the start or end |
| Keyboard noise while speaking | Light suppression + careful dynamics | Partial improvement only | If clicks remain under speech |
| Echo / reverb | No true dedicated fix | Limited improvement at best | Usually better to re-record or clean after export |
| Muffled game or capture-card audio | Routing/source fix, not mic denoise | Often caused by filters on the wrong source | Fix source assignment before recording again |
Where is Noise Suppression in Streamlabs Desktop?
In Streamlabs Desktop, go to Audio Mixer, click the gear icon next to your microphone source, then click Filters. That is the exact path most people need: Audio Mixer > gear icon > Filters.
Streamlabs support also recommends monitoring your mic while you adjust filters, which is important because a setting that looks good on paper can still make speech sound thin or distorted in practice.

Best live filter order for spoken voice in Streamlabs Desktop
If your goal is spoken voice, a safe starting order is:
- Noise Suppression
- Expander or Noise Gate
- Compressor
- Limiter
This order works because you first reduce steady background noise, then control what happens when you stop speaking, then level the voice, then catch peaks. Streamlabs’ own help articles explain what these filters do, but the practical improvement is using them in a speech-first sequence instead of treating them like a random checklist.
If you are brand new, start with just one or two filters. Adding everything at once makes troubleshooting harder.
Noise Suppression: what it fixes best and why aggressive settings hurt voice
Noise Suppression is your main tool for removing background noise in Streamlabs Desktop. Because Streamlabs Desktop is built on OBS, OBS documentation is useful context for how the underlying suppression methods behave. OBS explains that:
- RNNoise is the default high-quality suppression method.
- Speex uses a suppression slider and defaults to -30 dB.
- Stronger suppression can distort voice.
- Noise suppression works best for mild background noise rather than loud rooms.
That lines up with Streamlabs support guidance that the default suppression level can be too aggressive for some voices. In plain English: if you push suppression too hard, you may remove some noise, but your mic can start sounding robotic, underwater, phasey, or hollow.
Best for: fan noise, air conditioner noise, light hiss, gentle room tone.
Not ideal for: loud TV audio in the room, hard keyboard clicks during speech, barking dogs, room echo, or severe background noise.
A good rule is to go gentler than you think, then listen back.
Noise Gate vs Expander: which is safer for speech?
Both tools reduce what listeners hear when you are not talking, but they do it differently:
- Noise Gate: More on/off. It blocks audio below a threshold.
- Expander: More gradual. It reduces low-level audio instead of hard-cutting everything.
For most speech, the expander is safer. It tends to sound less abrupt and is less likely to chop off quiet syllables or breathy word endings.
Use a Noise Gate if you want a stronger mute effect during pauses and your mic level is already consistent. Use an Expander if you want cleaner pauses without making the mic sound like it is switching on and off.
If your stream audio keeps cutting off the first word in a sentence, the gate or expander threshold is probably too aggressive.
Compressor and Limiter: helpful, but not noise removal
Compressor and Limiter are often misunderstood in Streamlabs Desktop troubleshooting.
- Compressor: Reduces the difference between loud and quiet speech so your voice sounds more even.
- Limiter: Prevents peaks from getting too loud.
These can make your mic sound more polished, but they do not remove background noise. In fact, heavy compression can sometimes make room noise seem more noticeable if suppression and dynamics are not balanced well.
So use them for voice control, not as your main denoise strategy.
Safe starting workflow for fan noise, hiss, and light room noise
If you just want a clean spoken-voice starting point, do this:
- Open Audio Mixer > gear icon > Filters on your mic.
- Add Noise Suppression first.
- Start gently rather than pushing to a strong setting right away.
- Monitor your mic while speaking normally.
- If pauses still sound noisy, add an Expander next.
- If your overall voice level jumps around, add a Compressor.
- Add a Limiter last to catch peaks.
This is usually enough for mild PC fan noise and room tone without wrecking voice quality.
If your recording still sounds noisy after a reasonable setup, that is a sign the room or mic placement is the bigger issue, not that you need five more filters.
How to reduce keyboard noise without chopping off words
Keyboard noise is tricky because some clicks happen while you are speaking. A gate can help when you are silent, but it cannot fully remove keys that overlap with your voice.
Try this approach:
- Use light Noise Suppression first.
- Prefer an Expander over a hard gate if speech is getting clipped.
- Set your mic as close to your mouth as practical so your voice is stronger relative to the keyboard.
- Test while typing and talking at the same time, not just during silence.
If keyboard clicks are still obvious during speech, that is a good case for exporting your recording and using a dedicated cleanup step afterward. For recorded content, it is often better to remove background noise from Streamlabs exports with SimpleClean than to over-filter the live mic and damage the voice.
Why echo and reverb are a different problem
Many people search for background noise removal when the real issue is room echo. Echo and reverb are reflections of your own voice in the room, not just steady noise under the voice.
That means Streamlabs Desktop filters can only help a little, if at all. Noise suppression is aimed at background noise, not true dereverberation. A gate or expander may make silent moments cleaner, but they will not remove the roomy sound from your spoken words.
If your mic sounds distant, boxy, or like you are talking in a bare room, fix the room, move the mic closer, or clean the recording afterward with a tool designed for file-based repair. For related reading, see how to remove echo in Audacity, which explains why speech echo is a separate problem from basic noise reduction.

Why your game or capture-card audio can sound muffled in Streamlabs
If desktop audio, game audio, or capture-card sound suddenly seems muffled, do not assume Streamlabs noise suppression is broken. A common cause is that voice filters were applied to the wrong source.
Voice-focused filters belong on your microphone input, not on desktop audio, a capture card, or mixed program audio unless you intentionally want to process that source.
Check these points:
- Open the correct source from the Audio Mixer.
- Confirm the filters are on the mic source, not desktop or capture-card audio.
- Review your routing if you are using selective recording or multiple tracks.
- Use monitoring carefully so you are judging the right signal path.
Streamlabs’ routing and monitoring docs are especially helpful here if your live feed, recording, and monitored sound do not match.
How to monitor your mic while adjusting filters
Streamlabs support specifically recommends monitoring your mic while you adjust filters. That is one of the most valuable official tips because denoise settings can sound very different once you actually speak, pause, laugh, and type.
When testing:
- Speak at your normal streaming volume.
- Leave a few silent gaps to hear room noise behavior.
- Type on your keyboard while talking.
- Listen for robotic texture, pumping, clipped word starts, and lost consonants.
If you are producing clips after the stream, captions can also make audio issues more obvious. Once the recording is clean, Best AI Captions can help add captions and subtitles before you publish.
Troubleshooting common Streamlabs Desktop audio problems
Robotic voice
- Noise Suppression is probably too aggressive.
- Back off the suppression amount or switch to a less destructive setup.
- If you still need heavy cleanup, export and clean the file afterward.
Pumping or breathing sound
- Your expander, gate, or compressor may be working too hard.
- Softer dynamics settings usually sound more natural for speech.
Choppy audio
- Gate/expander threshold may be too high.
- Suppression may also be overprocessing the voice.
Cut-off syllables or missing word endings
- The gate is too aggressive or opening too late.
- Try an expander instead of a gate.
Lingering noise during speech
- This is normal when the noise overlaps with the voice.
- Live filters are best at mild steady noise, not every sound in the room.
- File-based cleanup is often the better solution.
When Streamlabs Desktop is enough vs when to clean the recording after export
Streamlabs Desktop is enough when:
- You are dealing with mild fan noise, hiss, or room tone.
- You mainly need the live stream to sound cleaner in real time.
- You can get a good result with gentle suppression and light dynamics.
Export first and clean afterward when:
- Your voice sounds worse every time you increase suppression.
- Keyboard noise remains under active speech.
- The room is echoey.
- You need the best possible audio for VODs, YouTube uploads, podcasts, or clips.
That is where SimpleClean fits naturally. Instead of forcing Streamlabs live filters to solve everything, you can record, export the WAV or MP4, and then clean the spoken audio afterward. That approach is often safer because you are not risking a permanently overprocessed live signal.
Best-for recommendations
- Best for live fan-noise cleanup: Streamlabs Noise Suppression with gentle settings.
- Best for cleaner pauses in speech: Expander before compressor.
- Best for strong real-time noise removal beyond stock filters: NVIDIA Broadcast setup in Streamlabs, if that fits your system and workflow.
- Best for polished recorded content after streaming: Export and clean Streamlabs audio after recording.
- Best for multilingual repurposing: After cleanup, use Translate Dub to translate, dub, and caption videos for more audiences.
- Best for publishing clips across channels: Once your audio is fixed, Mallary.ai can help schedule and distribute content across social platforms from one workflow.
How to remove background noise in Streamlabs Desktop step by step
- Open your mic filters: In Streamlabs Desktop, find the Audio Mixer, click the gear icon on your microphone, then click Filters.
- Add Noise Suppression: Start here for fan noise, AC, hiss, and steady room noise.
- Keep it gentle: If your voice starts sounding metallic or robotic, reduce the suppression.
- Add an Expander or Noise Gate: Use this only if pauses still sound noisy. Prefer the expander first for more natural speech.
- Add Compressor if needed: Use it to even out voice level, not to remove noise.
- Add Limiter last: Catch peaks so sudden louder moments do not clip.
- Monitor while testing: Speak normally, pause, and type on your keyboard while listening back.
- Stop if quality drops: If cleanup starts hurting clarity, export the file and finish the job with post-processing.
Final takeaway
The best way to remove background noise in Streamlabs Desktop is not to throw every filter at your mic. It is to identify the type of problem first.
- Steady noise: use Noise Suppression.
- Noisy pauses: add an Expander or Gate.
- Uneven voice level: use Compressor and Limiter.
- Keyboard noise during speech: expect only a partial live fix.
- Echo: treat it as a separate room problem.
And if you reach the point where live filters are making speech sound worse, that is not failure. It is your cue to record first and clean your Streamlabs recording after export instead.
Sources and further reading
- How to Improve Mic Quality in Streamlabs Desktop - Official source for where filters live, monitoring advice, the filter list, and the warning that default suppression can be too aggressive.
- How to Improve Live Stream Audio - Official Streamlabs overview of how the major audio filters are used in live streaming workflows.
- New Streamlabs Desktop Audio Settings Redesign - Supports updated UI wording and audio settings context.
- Selective Recording Audio Routing - Supports guidance on routing, multitrack, and source-specific troubleshooting.
- How to use the NVIDIA Broadcast App in Streamlabs Desktop - Official Streamlabs source for users who want stronger real-time noise removal than stock filters.
- Noise Suppression Filter | OBS - Authoritative explanation of RNNoise, Speex, the Speex default of -30 dB, and the warning that stronger suppression can distort voice and is best for mild noise.
- streamlabs/desktop GitHub repository - Supports the statement that Streamlabs Desktop is built on OBS, making OBS filter behavior documentation relevant background context.