How to Remove Background Noise in QuickTime Player: What QuickTime Can’t Fix, Mac Workarounds, and When to Clean the Exported File Online
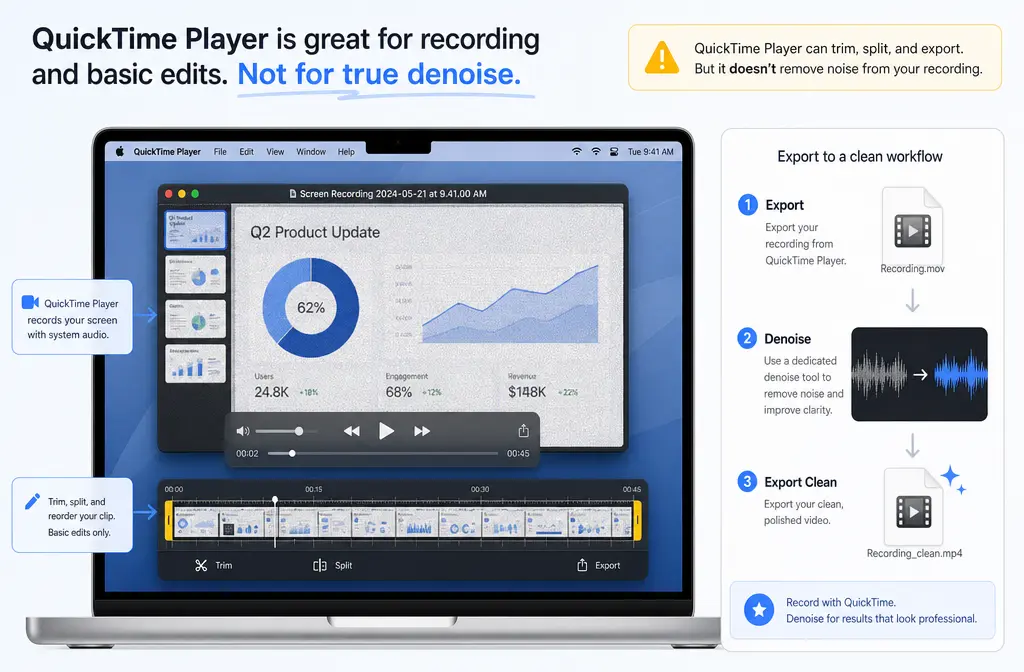
If you recorded a screen demo, lecture, voiceover, interview, or webcam clip in QuickTime Player and now hear hiss, fan noise, HVAC rumble, or general room tone, the key thing to know is this: QuickTime Player is great for recording and basic edits, but Apple’s current QuickTime documentation does not show a built-in post-recording background-noise reduction control. In practice, QuickTime is best for capture, trimming, splitting, and removing audio or video tracks—not selectively denoising speech after the file is already noisy.
Quick Answer
No, QuickTime Player is not a true background-noise removal editor for existing recordings. Based on Apple’s current QuickTime Player documentation as of June 9, 2026, QuickTime can:
- Record screen, movie, and audio
- Let you choose a microphone during recording
- Create audio-only recordings
- Trim and split clips
- Remove audio entirely
- Remove video to leave audio only
What Apple’s current docs do not surface is a built-in speech-focused denoise or background-noise reduction control inside QuickTime Player. So if you already have a noisy QuickTime recording, the fastest workable path is usually to export or isolate the audio, then clean a QuickTime recording with SimpleClean or another dedicated audio tool.
If you have not recorded yet, the best fix is prevention: in QuickTime’s screen-recording options, choose the correct microphone if you want narration, or choose no microphone if you want zero room noise captured at all.
What QuickTime Player can actually do
QuickTime is more useful than many people realize. It just solves a different part of the problem.
| Task | Can QuickTime do it? | Notes |
|---|---|---|
| Record screen with narration | Yes | You can choose a microphone in the recording options. |
| Record audio only | Yes | Apple documents audio-only recording in QuickTime Player. |
| Save higher-quality audio | Yes | Apple documents High quality as AAC and Maximum as uncompressed 24-bit AIFF-C for audio recordings. |
| Trim a recording | Yes | Useful for cutting dead air or mistakes. |
| Split a clip | Yes | Helpful for removing bad sections. |
| Remove audio from a movie | Yes | Useful if the mic track is unusable. |
| Remove video and keep audio only | Yes | Useful before separate audio cleanup. |
| Reduce background noise after recording | Not shown in current Apple docs | No built-in denoise control is surfaced in the supplied QuickTime documentation. |
This distinction matters because many searchers really mean one of three different things:
- Prevent mic noise before recording
- Extract audio from a QuickTime file
- Rescue an already-noisy export
Once you separate those intents, the right fix becomes much clearer.
Best fix by situation
- Best for preventing room noise: choose the right microphone before recording, or choose no microphone for screen capture when you do not need narration.
- Best for trimming mistakes: use QuickTime’s built-in trim and split tools.
- Best for removing a ruined mic track entirely: use QuickTime’s Remove Audio command.
- Best for cleaning hiss, hum, fan, or HVAC noise from an existing file: export or isolate the audio, then use a dedicated cleaner such as SimpleClean.
- Best for captions after cleanup: use Best AI Captions to add subtitles to the final video.
- Best for multilingual versions: use Translate Dub if you want to translate, dub, and caption the cleaned recording.
- Best for distributing the finished content: use Mallary.ai when you want to schedule clips, publish across multiple social platforms, or automate follow-up publishing around a cleaned tutorial or lecture.
Decision tree: prevent noise, clean noise, or capture system audio?
Before you dive into settings, identify which problem you actually have.
- I have not recorded yet and want a cleaner result.
Use QuickTime’s recording options correctly and reduce room noise before you start. - I already recorded and the file has background noise.
Use QuickTime only for trim/split/remove-audio/remove-video, then clean the exported file separately. - I need internal system audio, not just my microphone.
This is a routing issue, not a noise-removal issue. QuickTime’s native behavior is different from capturing system audio.
How to prevent background noise before recording in QuickTime
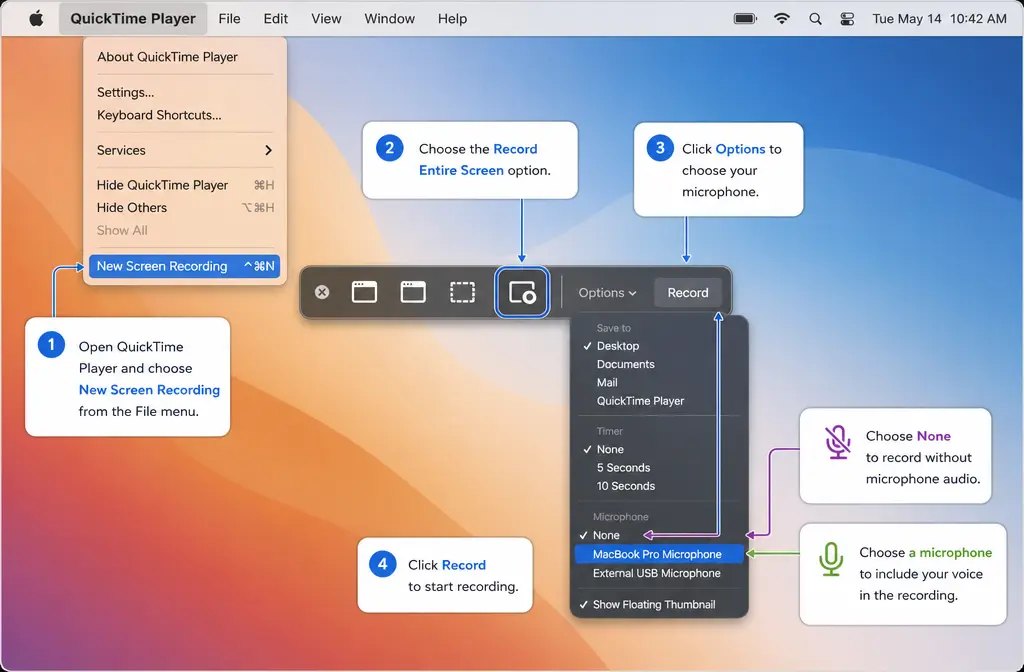
If you are about to record, this is the easiest win. Apple’s screen-recording help explicitly points users to the microphone option. If you do not need spoken narration, choosing no microphone prevents room noise from being recorded in the first place.
For screen recordings
- Open QuickTime Player.
- Choose File > New Screen Recording.
- QuickTime opens the Screenshot tools.
- Open the recording options.
- Under Microphone, choose the microphone you want for narration, or choose no microphone if you only want visuals.
- Record your screen.
This is the cleanest fix when your real goal is “record my screen without keyboard clicks, fan noise, or room tone.” If the mic is off, QuickTime will not capture that ambient room audio from your microphone.
For audio-only recordings
If you are recording voice only, QuickTime can create audio-only files. Apple’s documentation also notes that audio recordings can be saved at different quality levels, including High quality AAC and Maximum quality uncompressed 24-bit AIFF-C at 44.1 kHz. If you expect to clean the recording later, a higher-quality source file is usually the safer starting point.
Practical recording tips that matter more than software denoise
The UC Davis audio guide supports a few best practices that solve many “noise removal” problems before they happen:
- Record in a quiet room
- Use an external microphone when possible
- Make a short test recording first
- Listen back before recording the full session
Those steps will usually do more for voice clarity than any after-the-fact cleanup.
How to handle an already-noisy QuickTime recording
If your QuickTime file is already noisy, QuickTime is still useful—but mostly as a prep tool.
Workflow 1: Keep the video, clean the exported file
This is usually best when the noise is mild to moderate and you want to preserve the video exactly as it is.
- Open the MOV or other QuickTime-compatible file in QuickTime Player.
- Trim obvious dead air or mistakes if needed.
- Split the clip if you need to remove a bad section.
- Save or export the file.
- Upload the exported audio/video file to remove background noise from your QuickTime export.
This makes sense for screen demos, lesson videos, and webcam clips where you do not want to re-edit the visuals.
Workflow 2: Extract audio first, then clean it
If your main issue is the soundtrack, QuickTime can simplify the job by leaving you with audio only.
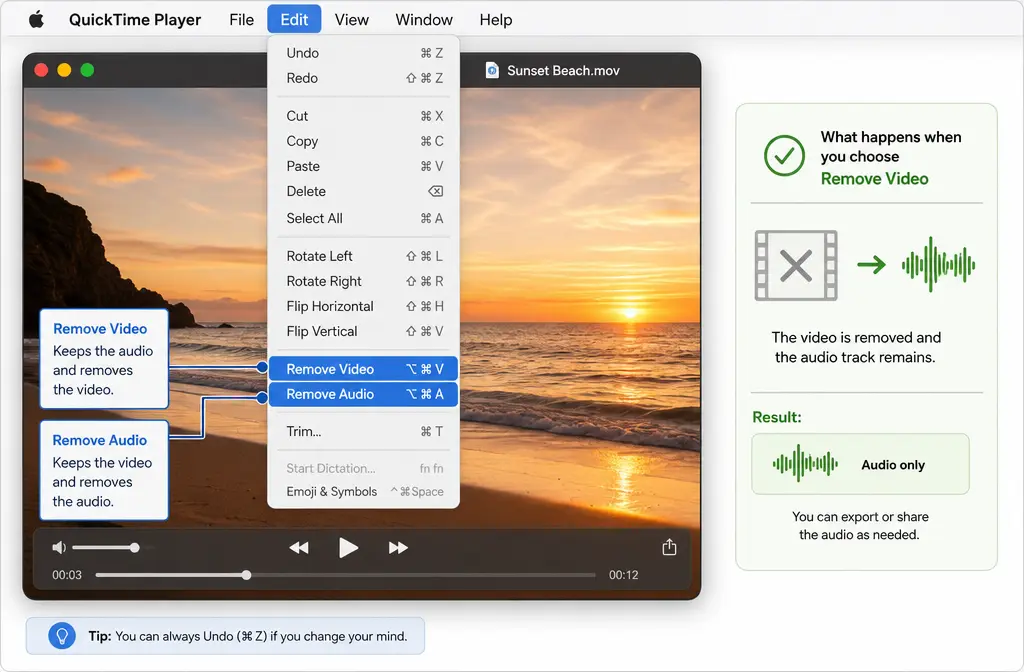
- Open the movie in QuickTime Player.
- Choose Edit > Remove Video.
- Save the resulting audio-only file.
- Clean that file separately.
Apple documents both Remove Audio and Remove Video. This is the clearest QuickTime-native path when the searcher really means, “How do I extract audio from a QuickTime video on Mac?”
Use this route if:
- You only need the speech track
- You plan to republish the audio elsewhere
- You want a smaller, simpler file for audio cleanup
Workflow 3: Remove the bad mic track entirely
If the microphone captured nothing useful except room noise, QuickTime can remove the audio track instead of trying to fix it.
- Open the movie in QuickTime Player.
- Choose Edit > Remove Audio.
- Save the silent video.
This is useful for screen recordings where the visuals matter but the live narration is unsalvageable.
What kinds of noise are worth cleaning, and what is harder to fix?
Set expectations honestly. Not all “background noise” is equally fixable.
Usually good candidates for separate cleanup
- Low steady hiss
- Fan noise
- HVAC rumble
- Light electrical hum
- General room tone
These are the kinds of issues where an exported QuickTime file often improves noticeably with a dedicated cleanup workflow.
Harder cases where results are more limited
- Strong room echo or reverb
- Clipped or distorted speech
- Very distant microphone placement
- Overlapping voices
- Extremely loud intermittent noises
These problems are harder because the voice itself is already damaged or masked. In those cases, re-recording may be smarter than aggressive cleanup.
Should you clean the MOV directly or extract audio first?
Both paths can work. The right choice depends on what you need.
| Option | Best for | Why choose it |
|---|---|---|
| Clean the MOV directly | Finished video you want to keep intact | Simpler if you just want better sound without managing separate assets. |
| Extract audio first | Voice-focused cleanup or audio reuse | Useful when the sound is the main problem or you need an audio-only version anyway. |
| Remove audio entirely | Silent screen demos or replacement narration | Best when the original mic track is not worth saving. |
If you are unsure, extracting audio first is often the cleaner troubleshooting path because it lets you focus on the speech track by itself.
System-audio confusion: this is a different problem
Many people searching for “remove background noise in QuickTime Player” are actually stuck on a separate QuickTime limitation: capturing internal system audio. That is not the same thing as removing hiss or fan noise from a microphone recording.
The Apple Community thread included in the research brief points out a common workaround: using virtual routing software such as BlackHole and a Multi-Output Device setup when you need internal audio capture. The BlackHole support documentation is the primary source for that routing approach.
So keep these separate:
- No system audio recorded = routing/capture setup issue
- Mic recorded fan noise or room tone = cleanup/editing issue
If your QuickTime file has your voice plus noise, routing software will not fix it after the fact.
How-to: the fastest rescue workflow for a noisy QuickTime file
- Open the file in QuickTime Player.
Check whether the audio is worth saving or whether it should be removed entirely. - Trim obvious mistakes.
Use QuickTime’s built-in trim tool to cut long silence, false starts, or accidental noise before the real content begins. - Decide whether to keep video or extract audio.
If the soundtrack is the main issue, use Edit > Remove Video to create an audio-only file. - Save the file.
Keep a copy of the original in case you want to retry. - Clean the exported file separately.
Use QuickTime audio cleanup with SimpleClean when you want a fast browser-based path for hiss, hum, fan noise, or room tone. - Add captions or localization if needed.
After cleanup, you can send the finished video to Best AI Captions for subtitles or to Translate Dub for translated voiceover and captions. - Publish and distribute the finished asset.
If the recording is part of a content workflow, Mallary.ai fits naturally once your audio is clean and the file is ready to schedule, publish, and repurpose across social channels.
Troubleshooting
My QuickTime recording has no sound
First, check whether the microphone was set correctly during recording. In screen recording, QuickTime opens the Screenshot tools, where microphone selection is part of the options. If no microphone was selected, narration will not be present.
It only recorded room noise
This usually means the wrong microphone was chosen, the mic was too far away, or the room itself was noisy. If the voice is weak and the noise is dominant, try extracting the audio and cleaning it. If the voice is badly buried, re-recording may be faster.
Can I export audio only from a QuickTime video?
Yes. Apple documents Edit > Remove Video, which leaves you with an audio-only file.
Can QuickTime remove background noise after recording?
Not in the way most people mean. The supplied Apple docs show recording and basic editing actions, but not a built-in post-recording denoise control in QuickTime Player.
Should I use MOV or extract audio first before cleaning?
If you need the whole video intact, clean the MOV. If the problem is mostly the soundtrack, extracting audio first is often the simpler workflow.
When should I re-record instead of cleaning?
Re-record if the file has severe echo, clipping, very distant speech, or multiple overlapping voices. Cleanup can help some problems, but it cannot fully rebuild badly damaged speech.
QuickTime vs other tools for this job
If you need true post-recording noise reduction, QuickTime is usually the wrong endpoint. It is the capture and prep step. The denoise step belongs in a tool built for audio cleanup, whether that is a fuller editor such as iMovie or Audacity, or a dedicated online cleaner.
If you want adjacent Mac-specific guides, these may help next:
- Remove background noise in iMovie
- Remove background noise in Audacity
- Clean screen recording audio online
- Remove echo from audio online
Bottom line
QuickTime Player is excellent for simple Mac recording workflows, but it is not the place to expect full post-recording background-noise removal. Use it to choose the right microphone before you record, trim the clip, split out bad sections, remove audio, or remove video to create an audio-only file. Then, if the exported QuickTime file still has hiss, hum, fan noise, or room tone, move that file into a dedicated cleaner.
That gives you the fastest realistic workflow: record or prep in QuickTime, then clean background noise from the exported QuickTime file once you are outside the app.
Sources and further reading
- Apple Support: How to record the screen on Mac - Supports current screen-recording flow and microphone-selection behavior.
- Apple Support: Record audio in QuickTime Player on Mac - Supports audio-only recording and documented quality options including AAC High and AIFF-C Maximum.
- Apple Support: Remove audio or video from a movie in QuickTime Player on Mac - Supports Remove Audio and Remove Video workflows.
- Apple Support: Trim a movie or clip in QuickTime Player on Mac - Supports QuickTime trimming capability.
- Apple Support: Record your screen in QuickTime Player on Mac - Supports QuickTime launching Screenshot tools for screen recording and basic recording controls.
- Apple Community: Removing background noise from QuickTime video - Supports real-world user intent and the distinction between ambient-noise cleanup and system-audio capture confusion.
- Existential Audio: BlackHole Support - Supports the virtual-routing workaround for system-audio capture.
- UC Davis: Guide to Producing an Audio File for Your Course - Supports practical recording best practices such as quiet room, external mic, and test recordings.