How to Remove Background Noise in Premiere Rush: Desktop Steps, Mobile Limits, and When to Clean the Exported File Online
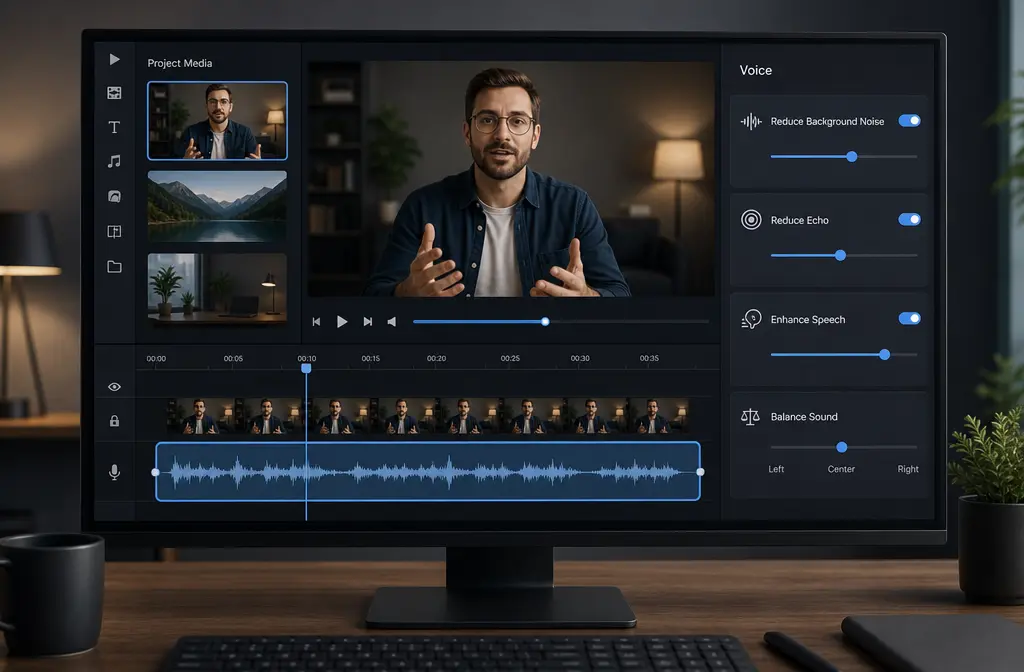
If you need to remove background noise in Premiere Rush, the honest answer is: yes, sometimes, but mainly on desktop and mainly for light voice cleanup. Rush gives you simple controls like Reduce Background Noise, Reduce Echo, and Enhance Speech for voice clips. Those can help with steady hiss, AC or fan noise, and mild room sound. But they are not full restoration tools, and Adobe community guidance says noise reduction is not available in the Premiere Rush mobile app.
Editor’s note: Adobe says Premiere Rush was removed from Adobe.com and app stores on September 30, 2025, and installed copies can continue working until the app is discontinued on September 30, 2026. This guide is for people who already have Rush installed and still need to clean speech audio inside existing projects.
Quick Answer
To remove background noise in Premiere Rush on desktop:
- Select your audio or video clip in the timeline.
- Open the Audio panel.
- Make sure the clip is classified as Voice.
- Turn on Reduce Background Noise and use it lightly for steady hiss, AC, or fan noise.
- If the room sounds boxy or reflective, add Reduce Echo.
- Use Enhance Speech only after basic cleanup, and keep it conservative if the voice starts sounding metallic.
- Check levels with Balance Sound or volume adjustments, then export.
If you are editing on phone or tablet and cannot find noise reduction, that is likely because the Rush mobile app does not offer that feature. In that case, your fastest fallback is to move the project to desktop Rush, try a speech-focused tool like Adobe Podcast, or clean exported video audio with SimpleClean after saving a local export.
Who This Guide Is For
This guide is for existing Premiere Rush users who already have the app installed and need a fast, practical way to improve spoken audio in:
- Talking-head videos
- Tutorials and screen recordings
- Reels and short social clips
- Interviews
- Webinars
- Quick creator edits
If your issue is light steady noise around a voice track, Rush may be enough. If your recording has clipping, heavy reverb, wind blasts, or multiple people talking over each other, Rush is usually the wrong place to keep pushing sliders.
Premiere Rush in 2026: What Still Works, What Changed
Adobe’s discontinuation FAQ matters here because many searchers are confused by older tutorials. Adobe says Premiere Rush was removed from Adobe.com and app stores on September 30, 2025. Adobe also says installed copies can continue to work until September 30, 2026, when the app is discontinued. So this article is still useful for current users, but it is not a recommendation to start a new long-term workflow in Rush if you do not already have it installed.
That also explains why documentation, community posts, and current app availability may not line up perfectly depending on your device.
Desktop vs Mobile: The Limitation Most Guides Bury
| Platform | Can you use Reduce Background Noise? | Best use case | Practical recommendation |
|---|---|---|---|
| Premiere Rush desktop | Yes, based on Adobe’s audio controls documentation | Light voice cleanup for hiss, fan, AC, mild room sound | Use Voice classification first, then denoise lightly |
| Premiere Rush mobile app | No, according to Adobe community guidance | Basic editing, trimming, quick social assembly | Export or move to desktop if you need actual noise reduction |
If you have been looking for Reduce Background Noise on your phone and cannot find it, you are not missing a hidden menu. Adobe community guidance says noise reduction is not available in the Rush mobile app. That is the biggest source of confusion for this topic.
For mobile-first creators, the realistic path is:
- Edit in Rush mobile if needed
- Export locally
- Clean the exported file elsewhere
- Then add captions with Best AI Captions or translate and dub the cleaned video with Translate Dub if you are republishing for multiple audiences

How to Remove Background Noise in Premiere Rush on Desktop
Adobe’s documented Rush audio workflow is simple, which is good for speed but also means you need restraint. Here is the safest speech-first process.
Step 1: Select the clip and open the Audio panel
Click your clip in the timeline, then open the Audio controls. Rush lets you refine audio for individual clips, including clips that contain spoken dialogue.
Step 2: Confirm the clip type is Voice
Rush can classify clips as Voice, Music, or Other. For spoken dialogue, use Voice. This matters because several voice-oriented controls become relevant from there.
Step 3: Use Reduce Background Noise first
This is the main control for steady-state noise such as:
- Air conditioner noise
- Computer fan noise
- Low constant hum
- Light hiss
Start lightly. If you push too hard, voice can become thin, watery, or metallic. Rush is designed for quick cleanup, not surgical restoration.
Step 4: Add Reduce Echo only if the room sounds boxy
Use Reduce Echo when the recording has room reflections or a hollow sound. Do not add it automatically to every clip. If the room already sounds dry enough, extra echo reduction may make speech less natural.
Step 5: Use Enhance Speech after cleanup
Enhance Speech is best treated as a finishing step, not the first fix. If you apply speech enhancement before basic denoising, you may end up emphasizing problems you wanted to reduce.
Step 6: Check levels and balance
If the voice level is uneven, use Balance Sound or volume adjustments. If there is background music under dialogue, Auto Duck can lower music automatically while the speaker talks.
Step 7: Export and review a short test
Before exporting the final project, test a short section with speech, silence, and any music overlap. Community posts show users reporting inconsistent results and export-related issues, so it is smart to validate the sound before you commit to the full render.
Best Order for Rush Audio Cleanup
This is an editorial recommendation based on Adobe’s available controls and common artifact avoidance, not an Adobe-published required order.
- Classify as Voice
- Reduce Background Noise lightly
- Reduce Echo if needed
- Enhance Speech conservatively
- Check loudness and balance
- Use Auto Duck for music under dialogue
- Export and review
Why this order helps: steady noise is usually the cleanest first target, echo reduction is more situational, and speech enhancement tends to work better after you have already reduced obvious distractions.
What Each Rush Audio Control Is Best For
| Control | Best for | Use it when | Be careful about |
|---|---|---|---|
| Voice clip type | Speech-focused workflow | Your clip is dialogue, narration, or voiceover | Using the wrong clip type can make the workflow less intuitive |
| Reduce Background Noise | Steady hiss, fan, AC, hum-like constant noise | The unwanted sound stays fairly constant under the voice | Pushing too far can make speech sound metallic |
| Reduce Echo | Mild room reflections | The voice sounds hollow, roomy, or boxy | Heavy use can sound unnatural |
| Enhance Speech | Polishing spoken voice after basic cleanup | You want a clearer speech presentation | Stacking too much processing |
| Balance Sound | Uneven levels | The voice volume jumps around | It is not a denoiser |
| Auto Duck | Music under dialogue | Background music competes with speaking | It will not remove noise from the voice track |
What Premiere Rush Can and Cannot Fix
Based on the toolset Adobe documents, Rush is best for simple repair, not deep restoration.
Rush can often help with
- Steady fan noise
- AC noise
- Light hiss
- Mild room echo
- Music competing with voice, via ducking
- Uneven dialogue level
Rush usually cannot truly fix
- Overlapping voices
- Severe wind bursts
- Clipping or distortion
- Very heavy reverb
- Badly damaged source recordings
If your voice gets worse each time you add another effect, that is the signal to stop. Export the file and clean it separately instead of stacking every available control.
If you want a dedicated cleanup fallback, SimpleClean makes more sense once Rush starts making the voice sound artificial.
Best For: When to Keep Working in Rush vs Export for Separate Cleanup
| Situation | Best option | Why |
|---|---|---|
| Light fan or AC noise on a desktop Rush project | Stay in Rush | Reduce Background Noise may be enough |
| Mild room sound plus steady hiss | Rush, then test export | A light combo of noise reduction and echo reduction may work |
| Phone edit where noise tools are missing | Export and clean elsewhere | Mobile Rush does not offer noise reduction |
| Metallic voice after slider adjustments | Export and clean elsewhere | You are likely overprocessing inside Rush |
| Clipping, wind blasts, or overlapping speakers | Export and use a different workflow | Rush does not provide surgical repair tools |
How to Export a Rush Project Before Cleaning Audio Separately
Adobe documents a local export path in Rush. If built-in cleanup is not enough, use this handoff workflow:
- Open your project in Premiere Rush.
- Choose Share.
- Select Local.
- Save the video file to your device.
- If you need audio-only cleanup, export the video first, then extract the audio afterward if needed.
That approach is especially useful if:
- You edited on mobile and need real denoise tools elsewhere
- Your Rush cleanup sounds unnatural after export
- You want to preserve your edit while improving only the audio

Troubleshooting: If Rush Cleanup Sounds Worse After Export
Some Adobe community posts show users reporting odd output behavior or unsatisfying results after using reduction tools. If your export sounds different from what you expected, try this checklist:
- Lower the effect intensity. Too much reduction is a common cause of metallic speech.
- Test a short section first. Pick a clip with both speech and pauses.
- Use fewer stacked fixes. If you used background noise reduction, echo reduction, and enhancement aggressively together, back off.
- Check whether the problem is noise or level. If the issue is uneven speech volume, Balance Sound may help more than denoise.
- Do not expect clipping repair. Distortion is a separate problem from background noise.
A good rule: if reducing the sliders by a little makes the voice noticeably more natural, you were probably overprocessing.
A Simple Decision Guide by Noise Type
- Steady fan or AC noise: Try Reduce Background Noise first.
- Boxy room sound: Add Reduce Echo after light denoise.
- Voice too quiet or uneven: Check Balance Sound or volume, not just denoise.
- Music under talking: Use Auto Duck.
- Wind bursts, clipping, or overlapping voices: Export and clean separately.
After Cleanup: Captions, Translation, and Publishing
Once your audio is clean, your next bottleneck is often packaging and distribution.
- For subtitles, Best AI Captions is a natural next step for adding captions and subtitles to the cleaned video.
- For multilingual versions, Translate Dub fits well if you want translated captions and dubbed versions for additional audiences.
- If you are pushing finished clips across multiple social platforms, Mallary.ai is the most relevant follow-up for scheduling, publishing, first comments, and social response workflows.
That sequence is practical for creators repurposing a webinar, tutorial, or short-form clip: clean the voice first, caption it, localize it if needed, then distribute it.
Related SimpleClean Guides
- Remove background noise in iMovie if you also edit on Apple devices
- Remove background noise in Clipchamp if you need a browser-based workflow
- Remove background noise in DaVinci Resolve if you are moving to a more advanced editor
- Remove background noise in Adobe Audition if you want Adobe’s deeper audio repair option
Conclusion
If you already have Premiere Rush installed, it can still do useful voice cleanup on desktop. The best workflow is simple: set the clip to Voice, use Reduce Background Noise lightly, add Reduce Echo only when needed, and apply Enhance Speech conservatively at the end.
The big caveat is mobile: if you cannot find noise reduction there, that is a real limitation, not user error. And if Rush starts making the voice sound metallic, the smarter move is usually to export locally and remove background noise from the exported file with SimpleClean instead of forcing more processing inside Rush.
Sources and further reading
- Adobe: Add and refine audio in Adobe Premiere Rush - Primary source for clip classification, Reduce Background Noise, Reduce Echo, Enhance Speech, Balance Sound, and Auto Duck controls in Rush.
- Adobe: Premiere Rush Discontinuation FAQ - Source for September 30, 2025 removal from Adobe.com and app stores, and September 30, 2026 discontinuation timing for installed copies.
- Adobe: Save, share, or export your video - Source for the Share > Local export workflow.
- Adobe: Premiere Rush system requirements - Supporting source for platform context and phasing-out status.
- Adobe Community: Noise reduction in Premiere Rush app - Source for the key mobile limitation that noise reduction is not available in the Rush mobile app.
- Macquarie University Adobe Portal: Adobe Premiere Rush – A Concise Guide - Practical example workflow using Balance Sound, Reduce Background Noise, and Reduce Echo on voice clips.
- UCLA HumTech: Video Editing- Acrobat Rush - Secondary corroboration of available audio controls and interface terminology in Rush.