How to Remove Background Noise in Kdenlive: Arndn vs Noise Suppressor for Voice, Version Limits, and When to Clean the Exported File Online
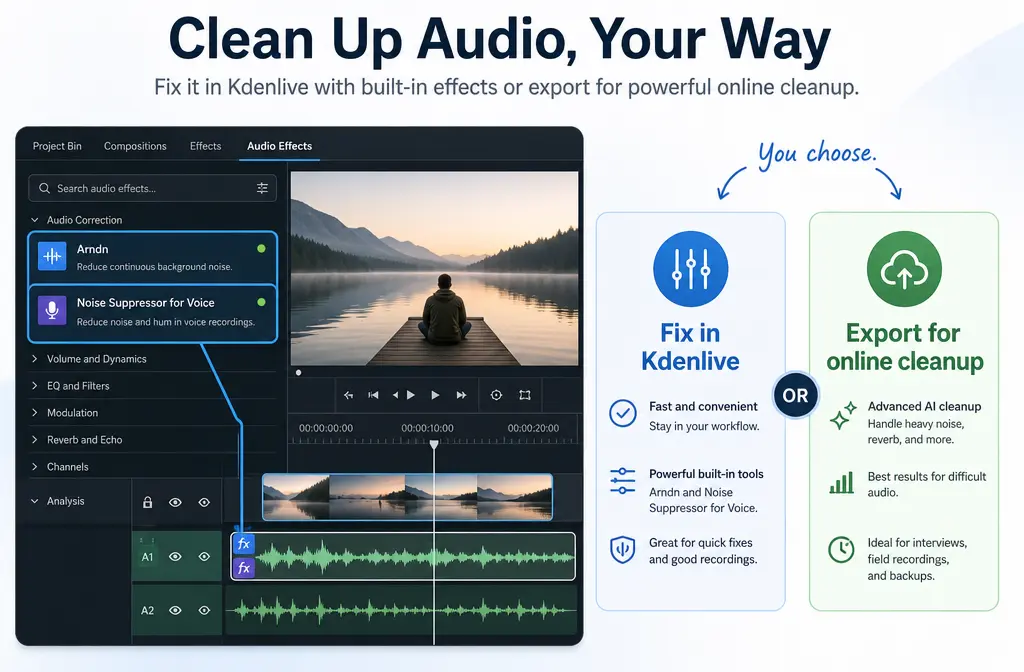
If you already have noisy speech inside Kdenlive, the good news is that current Kdenlive documentation lists real audio cleanup tools, including Arndn, Noise Suppressor for Voice, Normalize, EQ, band-pass, and band-reject filters. The bad news is that older forum advice still floating around the web says Kdenlive cannot really do noise reduction at all, and that is only partly useful now. Today, Kdenlive can help with steady low-level speech noise, but effect availability can still vary by version, build, and plugin packaging, and aggressive settings can easily make voices sound metallic, watery, or thin.
Quick Answer
Yes, Kdenlive can remove some background noise now, especially steady hiss, fan noise, or light room noise behind a clear voice. For most speech edits, the fastest workable path is:
- Duplicate your clip or project first.
- Try Arndn lightly for general speech denoise.
- If your build includes it, try Noise Suppressor for Voice for mic-style background noise.
- Use EQ or filtering next for leftover low rumble, hum, or harsh highs.
- Finish with Normalize or Normalize (2 Pass) so speech is easier to hear.
If Kdenlive adds artifacts, leaves obvious noise between phrases, or your problem is echo, keyboard clicks, clipping, or inconsistent background noise, it is usually faster to export the audio or video and clean exported Kdenlive audio with SimpleClean instead of over-tweaking built-in effects.
Does Kdenlive have noise reduction?
In current documentation, yes. The Kdenlive audio effects list includes Arndn, described as reducing noise from speech using recurrent neural networks, and Noise Suppressor for Voice, described as a microphone background noise removal filter. The manual also lists supporting tools such as Normalize, Normalize (2 Pass), Equalizer, Band Pass, and Band Reject. That means older forum threads saying “extract audio and use another program” reflect older limitations, not the full current picture.
Still, there is an important reality check: effect availability may depend on your Kdenlive version and package build. So if you do not see a specific effect, that does not automatically mean you are using it wrong.
Arndn vs Noise Suppressor for Voice: which should you try first?
| Effect | Best for | Try it first when | Main risk |
|---|---|---|---|
| Arndn | General speech denoise | You have fan noise, hiss, or steady room noise behind spoken voice | Can sound watery or artificial if pushed too hard |
| Noise Suppressor for Voice | Microphone-style background noise | You want a speech-focused filter and your build includes it | Some users report clicks and pops or startup artifacts |
| EQ / high-pass / band filtering | Rumble, hum, harsh frequency problems | The denoise helped but low-end rumble or specific tonal noise remains | Can make the voice thin if overdone |
| Normalize / Normalize (2 Pass) | Final loudness cleanup | The noise is reduced and speech needs a clearer playback level | Does not remove noise by itself |
Best starting point for most editors: try Arndn first, gently. It is specifically documented as speech noise reduction using a neural-network-based filter, which makes it the most obvious first test for spoken dialogue. Then use filtering or EQ for cleanup around the edges.
Best alternative: try Noise Suppressor for Voice if it is available in your build and the noise is more like constant microphone background noise than broader room problems. But if you hear clicks, pops, or odd processing at the start of clips, switch away quickly instead of forcing it.
What Arndn is in Kdenlive
Arndn in Kdenlive comes from the MLT/FFmpeg filter chain and is documented by MLT as the arnndn filter. In plain English, it is a speech-oriented denoise effect built around recurrent neural networks. That is why it often works better on spoken voice than simple blunt filtering. It is not magic, though. It works best on relatively steady background noise under intelligible speech, not on everything that makes audio bad.
Use it lightly. If you keep increasing reduction until all noise disappears, the voice often starts to sound underwater, metallic, or phasey.
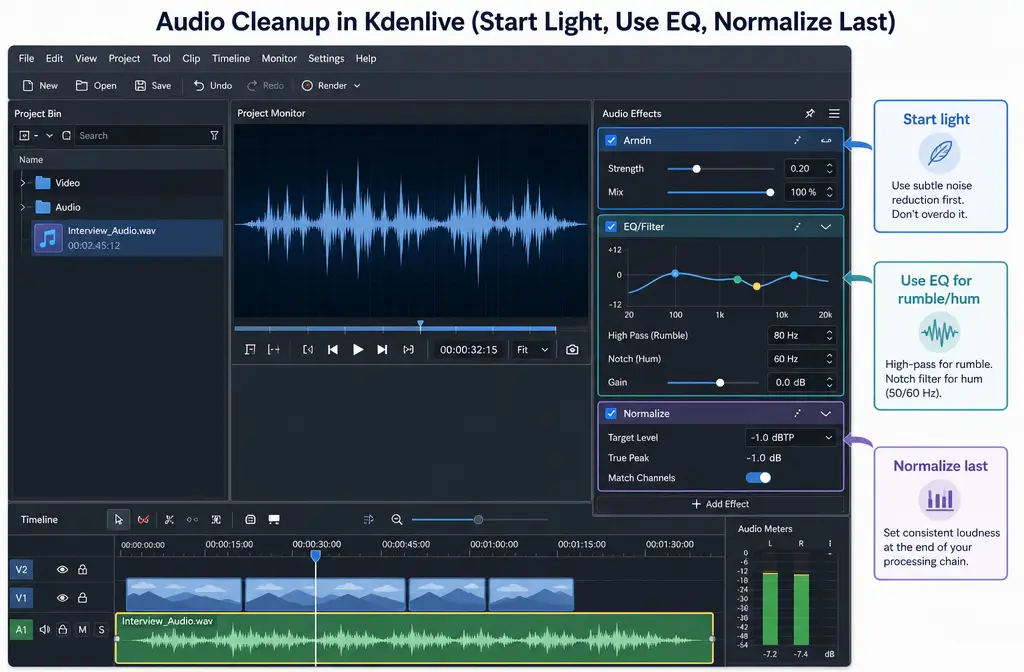
Fast Kdenlive workflow for speech cleanup
If your goal is clearer tutorials, YouTube voiceovers, interviews, or screen recordings without moving into a full DAW, use this order:
1) Duplicate before you denoise
Create a safety copy of the clip or duplicate the project. Denoise settings are easy to overdo, and A/B comparison matters.
2) Apply one denoise effect lightly
Start with Arndn. If your build includes Noise Suppressor for Voice, compare both on a short noisy section before committing.
- Pick a section with actual speech plus the unwanted noise.
- Increase reduction gradually, not all at once.
- Stop as soon as the voice starts sounding synthetic.
Do not stack aggressive denoise effects unless you have tested carefully. One light pass usually beats two heavy ones.
3) Fix leftover rumble or tonal noise with filters
After denoising, use EQ or filters to shape what remains:
- High-pass style cleanup: useful when traffic rumble, HVAC, or desk thumps live in the low end.
- Band Reject: useful when a narrow hum remains.
- General EQ: useful when the voice is muddy or harsh after denoise.
If the voice becomes too thin, back off the filtering first. Over-filtering is one of the most common reasons speech sounds weak after “cleanup.”
4) Normalize last
Once the noise is reduced and the tonal balance is acceptable, use Normalize or Normalize (2 Pass) to improve playback level consistency. Normalization is a finishing step, not a denoise tool.
5) Render a short test before the full export
If the timeline preview sounds acceptable, render a short sample and listen outside Kdenlive. Some users notice render differences only after export, so this quick test can save time.
Noise-by-noise: what Kdenlive is actually good at
| Noise problem | Kdenlive usually enough? | Best first move | Better to export and clean online? |
|---|---|---|---|
| Light hiss | Often yes | Arndn, then light EQ | If artifacts appear |
| Fan / HVAC | Often yes if steady | Arndn, then high-pass or EQ | If noise changes over time |
| Electrical hum | Sometimes | Band Reject or EQ after light denoise | If hum is strong or layered |
| General room noise | Sometimes | Arndn or Noise Suppressor for Voice | If the room sound is inconsistent |
| Keyboard clicks | Usually limited | Try light denoise only | Usually yes |
| Echo / reverb | Usually no | Avoid over-processing | Yes |
| Clipping / distortion | No real fix with these tools | Do not normalize first | Yes |
Best use case for Kdenlive: a clear spoken voice with steady low-level fan, hiss, or background room noise.
Best use case for external cleanup: echo, harsh hum, keyboard clicks, overlapping speakers, changing noise, or artifacts caused by Kdenlive’s built-in filters.
Version and plugin reality: why older advice conflicts with current advice
Older KDE forum threads recommended extracting audio and cleaning it in another editor because Kdenlive lacked stronger built-in background-noise reduction options. That older advice is historically understandable. But current Kdenlive documentation now lists denoise and filtering tools that did not make those older threads feel practical.
At the same time, some of the old “it depends” advice still matters because not every build ships identically. Linux package format, plugin packaging, and version differences can affect whether you see an effect like Noise Suppressor for Voice. So the most accurate answer is:
- Current Kdenlive can do some speech denoise.
- Older “Kdenlive can’t do this” advice is partly outdated.
- Missing effects can still happen because of build or packaging differences.
Troubleshooting Kdenlive noise reduction
Noise Suppressor for Voice is missing
If you do not see the effect, the safest explanation is version/build/plugin availability, not user error. The Ivon tutorial also discusses plugin install and packaging context, especially on Linux/Flatpak-style setups. If the effect is unavailable, use Arndn first, then EQ/filter cleanup, or export for separate cleanup.
Noise suppression adds clicks or pops
This is not just theoretical. A KDE Discuss thread documents users hearing clicks and pops in the first seconds of clips when using Noise Suppressor for Voice. If that happens:
- Test Arndn instead.
- Reduce the strength of the effect.
- Render a short sample to confirm whether the artifact is in the export.
- If the artifact remains, stop tweaking and export the file for external cleanup.
Noise remains between phrases
That usually means the noise is too strong, too inconsistent, or not the kind of problem a single speech denoiser removes well. Try a lighter denoise plus filtering for specific low-end or tonal problems. If the background changes over time, remove background noise from the exported Kdenlive file with SimpleClean instead of chasing perfect settings inside the editor.
The voice becomes thin
This usually comes from too much denoise, too much filtering, or both. Back off the EQ/filter stage first, especially low-cut style processing. A little residual noise is often less distracting than a hollow voice.
Render sounds different from the timeline
Do a short test export before final delivery. If the rendered file sounds worse, compare the export rather than trusting the timeline alone. This is another point where exporting a WAV copy for separate cleanup can be faster.
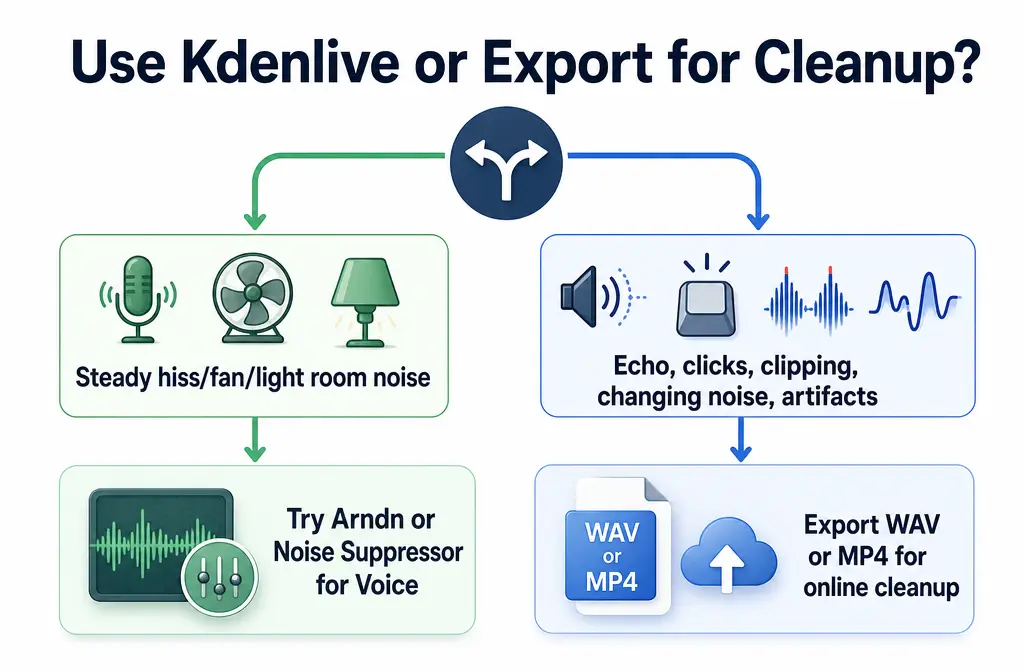
When Kdenlive is enough vs when to export and clean online
Kdenlive is usually enough when:
- The voice is already understandable
- The noise is steady and low-level
- The problem is mostly hiss, fan, or mild room noise
- One light denoise pass plus EQ gets you 80 to 90 percent of the way there
Export and clean the file online when:
- You hear echo or room reverb
- Keyboard clicks keep cutting through
- The hum is harsh or layered
- The background noise changes throughout the clip
- Built-in filters create metallic voice, clicks, or pumping
- You have overlapping speakers or messy interview audio
In those cases, the faster workflow is often to render a clean audio copy to WAV when possible, or export the video and clean the full file afterward. That keeps your edit intact while giving you a better cleanup pass on the actual delivered media.
How to export audio from Kdenlive for separate cleanup
- Finish your edit first. Cut out obvious mistakes and dead space before cleanup.
- Render a WAV if you can. A clean audio-only export is usually the easiest file to process separately.
- If you need the full video, export MP4 instead. This is the better choice when you want to preserve the current edit exactly as viewers will hear it.
- Upload the exported file to SimpleClean. Use this route when Kdenlive leaves noise behind or starts damaging the voice.
- Replace or publish the cleaned result. After cleanup, you can add subtitles with Best AI Captions, create multilingual versions with Translate Dub, and schedule distribution across channels with Mallary.ai if you are repurposing tutorials, social clips, or interview highlights.
If your project is specifically a screen recording, our guide on cleaning screen recording audio online goes deeper on keyboard noise, echo, and thin narration. If your audio problem is mostly room sound rather than hiss, see how to remove echo from audio online. And if you want a more DAW-style external workflow, compare this with removing background noise in Audacity.
Best-for recommendations
- Best for quick speech cleanup inside Kdenlive: Arndn with a light touch.
- Best for mic-style constant background noise if available: Noise Suppressor for Voice.
- Best for leftover low rumble or hum: EQ, Band Reject, or related filtering after denoise.
- Best final polish: Normalize after the noise work is done.
- Best when Kdenlive starts sounding worse, not better: export WAV or MP4 and clean the delivered file separately.
Bottom line
Kdenlive is no longer in the old “no real noise reduction” era reflected by legacy forum answers. Current versions document useful tools, especially Arndn and Noise Suppressor for Voice, and they can absolutely help when your problem is steady background noise behind speech. But Kdenlive is still not the fastest answer for every audio mess. If your voice turns metallic, your denoiser is missing, or the problem is echo, clicks, or inconsistent noise, the practical move is to export the file and clean Kdenlive voice audio online instead of forcing one more filter stack.
Sources and further reading
- Kdenlive Audio Effects manual - Primary source for which current Kdenlive audio effects exist, including Arndn, Noise Suppressor for Voice, Normalize, EQ, and band filters.
- Kdenlive manual home - Supports the article’s version-aware framing by referencing the current manual context.
- MLT plugin docs for arnndn - Technical source for what Arndn is and that it is the arnndn speech denoise filter.
- Ivon Blog Kdenlive noise suppression tutorial - Practical source showing real-world use and install/package context for Noise Suppressor for Voice.
- KDE Discuss bug thread on Noise Suppressor for Voice - Evidence for troubleshooting clicks and pops caused by Noise Suppressor for Voice.
- KDE forum thread: Background noise reduction - Shows older external-editor advice that is historically useful but outdated for current versions.
- KDE forum thread: filter hiss background audio - Supports the section on older limitations and hiss/hum cleanup expectations.