When you need to remove background noise from audio free, you're basically looking at two main paths: a fast, one-click AI tool online, or free desktop software like Audacity that gives you manual control. The best option really just boils down to your specific project and, frankly, how much time you've got on your hands.
Your Quickest Path to Clean Audio
Every creator knows the feeling. You wrap up what you think is a fantastic recording—an interview, a voiceover, a quick video clip—only to hear that dreaded background hum from an air conditioner, the rumble of distant traffic, or a persistent hiss. It used to be a choice between living with bad audio or diving deep into complicated software for hours.
Thankfully, things are a lot easier now, even if you're working with a zero-dollar budget.
The decision isn't just about which tool to use; it's about picking the right workflow. Are you in a rush and need a quick fix, or do you need to be surgical to preserve the fine details of your audio?
- AI-Powered Web Tools: These are your go-to for speed and simplicity. You just upload your file, and an algorithm does the heavy lifting, automatically separating the voice from all the unwanted noise. This is perfect for podcasters, YouTubers, and anyone on a deadline who needs to clean up dialogue quickly.
- Manual Desktop Software: On the other hand, programs like Audacity give you granular control. Here, you'll manually select a "noise profile"—a small, isolated sample of just the background sound—and then tell the software to subtract that specific noise from the rest of the track. It takes a bit more effort, but it's ideal for more delicate audio where an aggressive AI might introduce weird sounds or artifacts.
This decision tree lays out the two main workflows you can follow.

As the chart shows, your choice really comes down to what you value more for a given project: time or control. The growing popularity of web-based tools shows just how much creators are looking for efficiency. In fact, the online audio noise reduction market is expected to hit around USD 961 million by 2032, pushed by creators who need automated ways to fix common problems like wind and electrical hum.
For a deeper dive into getting pristine sound, this guide on how to remove background noise from audio for clear results is an excellent resource.
Free Noise Reduction Methods At a Glance
To make the choice even clearer, here’s a quick rundown of the most common free methods. This table breaks down their strengths and what they're best suited for.
| Method | Best For | Speed | Ease of Use | Typical Noise |
|---|---|---|---|---|
| AI Web Tools | Quick clean-up of spoken word (podcasts, vlogs) | Very Fast | Very Easy | Consistent hums, fan noise, traffic |
| Audacity | Precise control over specific, consistent noises | Moderate | Moderate | Hiss, buzz, static, AC hum |
| FFmpeg | Automated batch processing via command line | Fast | Difficult | Any noise, with the right filters |
| Video Editors | Basic noise reduction for video projects | Moderate | Easy | General background ambience, light hum |
Each tool has its place. AI is fantastic for speed, but when you need to carefully preserve the original audio's character, nothing beats the hands-on control of a tool like Audacity.
The Easiest Fix: Cleaning Audio with AI Web Tools
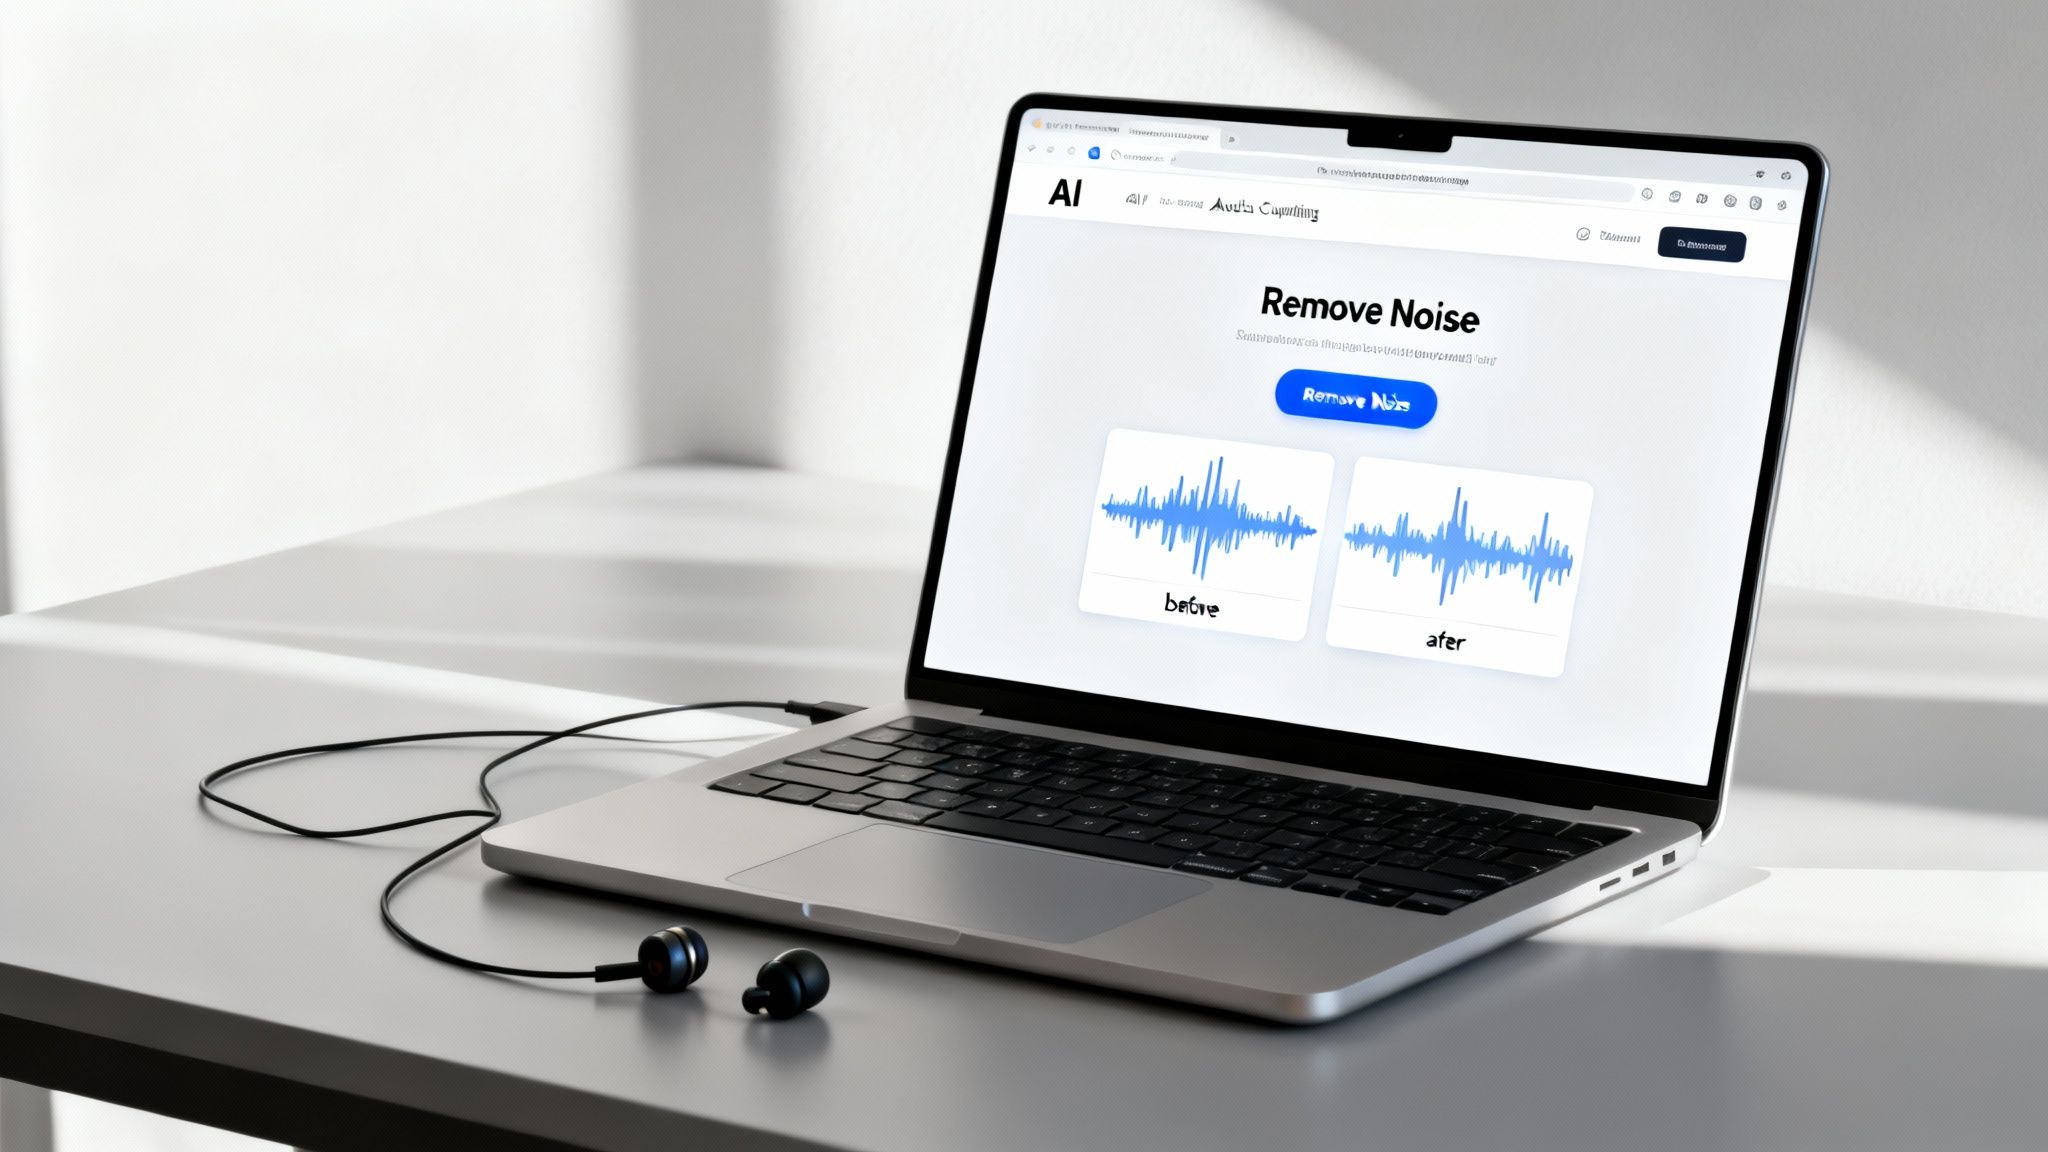
What if you could remove background noise from your audio for free in just a couple of minutes? That's the promise of modern, browser-based AI tools. They're built for people who need clean audio now, without getting tangled up in complicated software.
These web apps run on powerful AI models that have been trained on countless hours of audio. When you upload a file, whether it's an MP3 of a podcast interview or an MP4 video from a noisy conference, the AI immediately starts listening. It's smart enough to distinguish the frequencies of a human voice from background chatter, traffic, wind, or that annoying air conditioner hum.
A Workflow You Can Master in Seconds
The best part is how simple the process is. There’s no software to install and no learning curve. You just drag your file into the browser, and the tool does the rest. You don't have to mess with confusing sliders or understand technical audio terms.
Take a look at the typical interface for one of these tools. It’s often just a single upload button.
This minimalist design is intentional. It lets you focus on creating your content, not on becoming an audio engineer. You upload the file, the AI works its magic on its servers, and you get a clean version ready to download.
How AI Actually Separates the Sound
What's going on under the hood is a process called sound separation. The AI isn't just applying a simple filter; it's actively identifying and isolating the voice from everything else. This is a massive improvement over older noise reduction plugins that often made audio sound thin, watery, or robotic. Today’s AI tools are much better at keeping the natural warmth and character of the speaker's voice intact.
The real game-changer with AI is how it handles unpredictable noise. Traditional tools are great for steady hums but fall apart with a random dog bark or a passing siren. An AI can identify and remove those inconsistent sounds as they happen, making it a lifesaver for recordings made out in the real world.
This technology is a huge help for anyone creating content outside of a perfect studio setting. If you're curious about the nitty-gritty of how this works, our guide on software noise cancellation dives deeper into the technology.
Of course, another way to get perfect audio is to skip the recording process entirely. For projects like marketing videos or explainers, using one of the top AI voiceover tools can generate a flawless track from just a script. It’s a different approach, but one that guarantees clean audio from the very start.
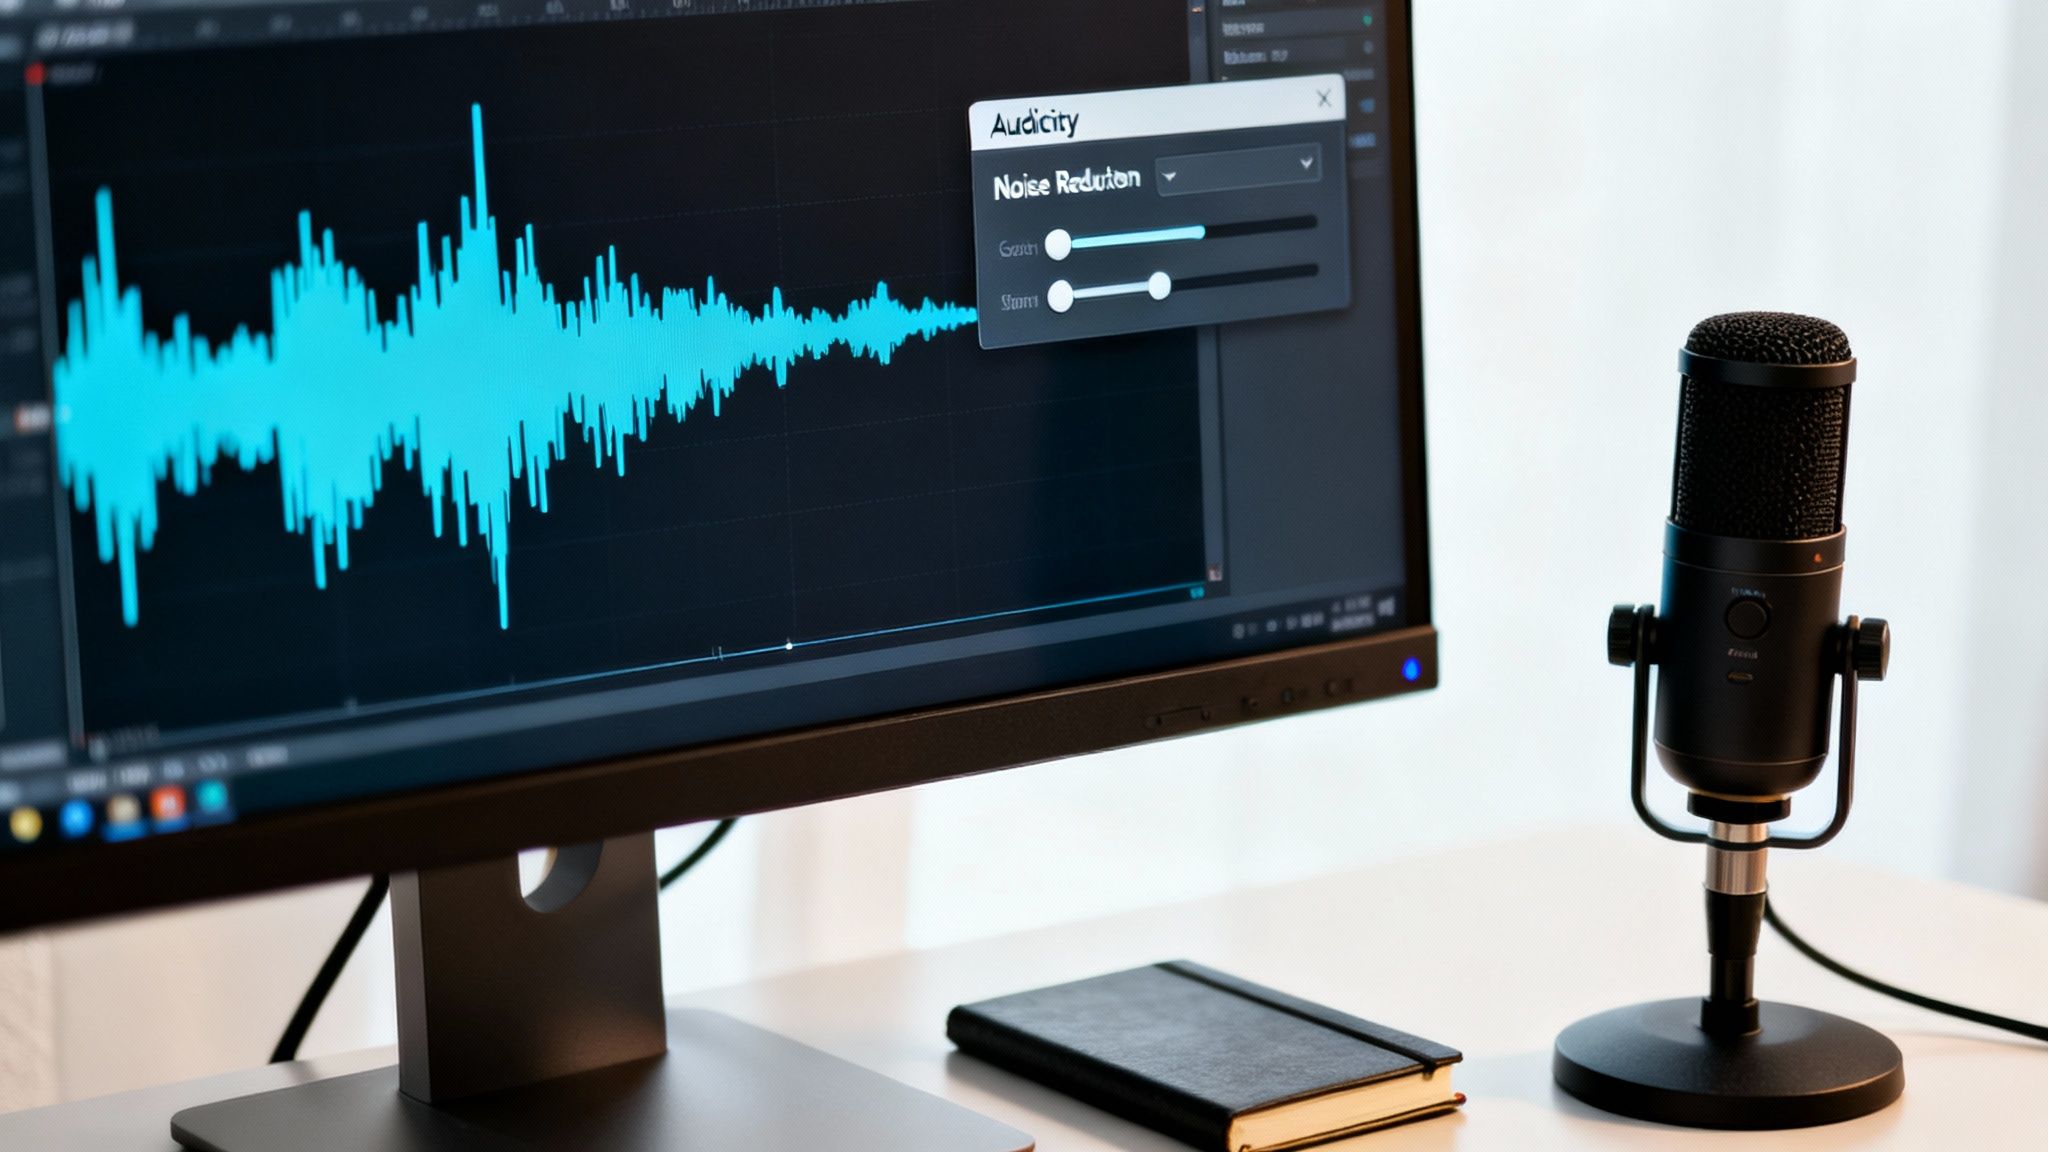
Using Audacity for Manual Noise Reduction
If you're someone who needs absolute control over your audio, learning how to remove background noise from audio for free with Audacity is an essential skill. While AI tools are fantastic for their speed, Audacity offers the kind of surgical precision you need to deal with tricky, consistent background noise—like a stubborn air conditioner hum or a computer fan—without degrading the actual audio you want to keep.
Think of it this way: AI is a smart bomb, but Audacity is a scalpel.
The whole process relies on a clever concept called a noise profile. Audacity can’t just guess what you consider "noise." You have to show it. By feeding it a pure sample of the sound you want to get rid of, you're essentially giving it a sonic fingerprint to hunt down and remove from your entire recording.
Step 1: Capturing a Clean Noise Profile
This is, without a doubt, the most critical part of the process. If you nail this, the rest is easy. My advice? Always let your recorder run for 5 to 10 seconds before you start talking to capture the "room tone." That’s your gold.
- Find Your Sample: Open your audio file in Audacity and look for a section that has only the background noise. No talking, no bumps, just the hum or hiss.
- Select It: Click and drag your cursor to highlight a few seconds of that pure noise. A longer, cleaner sample gives Audacity more data to work with, which means a better result.
- Teach Audacity: Go up to the menu and select
Effect > Noise Removal and Repair > Noise Reduction. A new window will pop up. Just click the button that says Get Noise Profile.
That's it. The window will close, and you’ve just taught Audacity exactly what to listen for. It's now primed and ready for the main event.
Step 2: Applying the Noise Reduction
Now that Audacity has its marching orders, it's time to apply the effect. Select your entire audio track (a quick Ctrl+A or Cmd+A will do the trick) and open that same Noise Reduction tool again (Effect > Noise Removal and Repair > Noise Reduction).
This time, you'll be working with the settings under Step 2 in the dialog box. You’ll see three main sliders that control how aggressively Audacity cleans your audio.
This is where the real magic happens. Getting comfortable with these three sliders is the key to getting crisp, clean audio that still sounds natural. Here are my go-to starting points:
- Noise Reduction (dB): This slider sets how much you want to turn down the noise. I've found that a setting around 12 dB is the sweet spot. If you crank this too high, you'll get that weird, watery, robotic sound known as an "artifact," which is often worse than the original noise.
- Sensitivity: This tells Audacity how closely a sound has to match the noise profile to be targeted. A good starting point is 6.00. Be careful here; too high and it might start eating into your actual voice.
- Frequency Smoothing (bands): This helps smooth over the sonic holes left behind after the noise is removed, preventing the audio from sounding thin or tinny. Leaving this at 3 usually works perfectly.
My Biggest Tip: Use the "Preview" button religiously. Before you commit to applying the effect to the entire file, listen to a few seconds. The goal isn't total silence—it's to reduce the noise so it’s no longer distracting. It’s always a balancing act between noise reduction and preserving the quality of your voice.
For most projects, Audacity's tool is more than enough to get the job done. But if you find yourself constantly battling complex audio problems, you might want to look into dedicated audio restoration software, which offers even more powerful features.
Advanced Free Techniques for Batch Processing
Cleaning up one audio file in Audacity is one thing, but what if you're staring down a folder with 50 voice memos, an entire semester of lectures, or a backlog of podcast episodes? That’s when manual editing becomes a serious time-sink.
This is where command-line tools become your secret weapon to remove background noise from audio for free—and at scale.
We're going to talk about FFmpeg, the open-source powerhouse that audio and video pros swear by. Don't let the lack of a fancy interface fool you; its real strength is automation. With just a few lines of code, you can set up a repeatable process to clean dozens or even hundreds of files without ever opening an editor.
If you value efficiency and handle a high volume of audio, this approach is a game-changer. You build the script once, and it just works.
Harnessing the Power of the FFmpeg Denoise Filter
The magic here is FFmpeg's built-in afftdn filter, which stands for Audio Fast Fourier Transform Denoise. In simple terms, it analyzes the audio's frequency spectrum to pinpoint and suppress consistent background noise—think of it as Audacity's noise reduction tool, but one you can control with a script.
You don't need to be a coding wizard to make this work. The idea is to write a single command telling FFmpeg to take an input file, apply the afftdn filter with your chosen settings, and save a clean new version.
Here’s a basic, copy-paste-ready command to get you started:
ffmpeg -i input.wav -af "afftdn=nr=15:nf=-25" output_clean.wav
This command takes your original file (input.wav) and applies a moderate level of noise reduction. Let's quickly break down what those numbers mean so you can tailor them to your audio.
nr(Noise Reduction): This sets the maximum noise reduction in decibels (dB). I've found that a good starting range is between 12 and 20. If you push this value too high, you'll start hearing those weird, watery artifacts that scream "over-processed."nf(Noise Floor): This tells the filter how to distinguish between the noise you want to remove and the actual audio you want to keep. A value around -25 is usually a solid choice for typical background hum or hiss.
The key to a great FFmpeg workflow is to experiment. Run the script on a single test file, tweak the
nrandnfvalues, and listen to the result. Once you find the sweet spot for your specific type of noise, you can confidently apply those settings to everything else.
Creating a Simple Batch Processing Script
Now for the real time-saver. By wrapping that FFmpeg command in a simple loop, you can process an entire folder of audio files in one go. This example uses a for loop, a standard tool in command-line environments on macOS (using Terminal) and Windows (using PowerShell or WSL).
Let's say you have a folder full of .wav files. Just navigate to that folder in your terminal and run this script:
mkdir cleaned_files
for f in .wav; do ffmpeg -i "$f" -af "afftdn=nr=15:nf=-25" "cleaned_files/${f%.}-clean.wav"; done
This little two-line script does a ton of work. First, it creates a new directory called cleaned_files to keep things tidy. Then, it loops through every single .wav file in the current folder, applies your noise reduction settings, and saves a fresh, clean version into the new directory.
Just like that, you've automated a task that could have taken hours of tedious, manual clicking.
How to Prevent Noise at the Source
Honestly, the best way to remove background noise from audio for free is to keep it out of your recording in the first place. It's a simple truth that often gets overlooked. While software is great for cleanup, nothing beats a clean source recording. It not only sounds better but saves you a world of hurt in post-production.
Think of it this way: editing should be about polishing your audio, not performing emergency surgery. The good news is that you don’t need a fancy studio to get great results. It’s all about being smart with what you have.
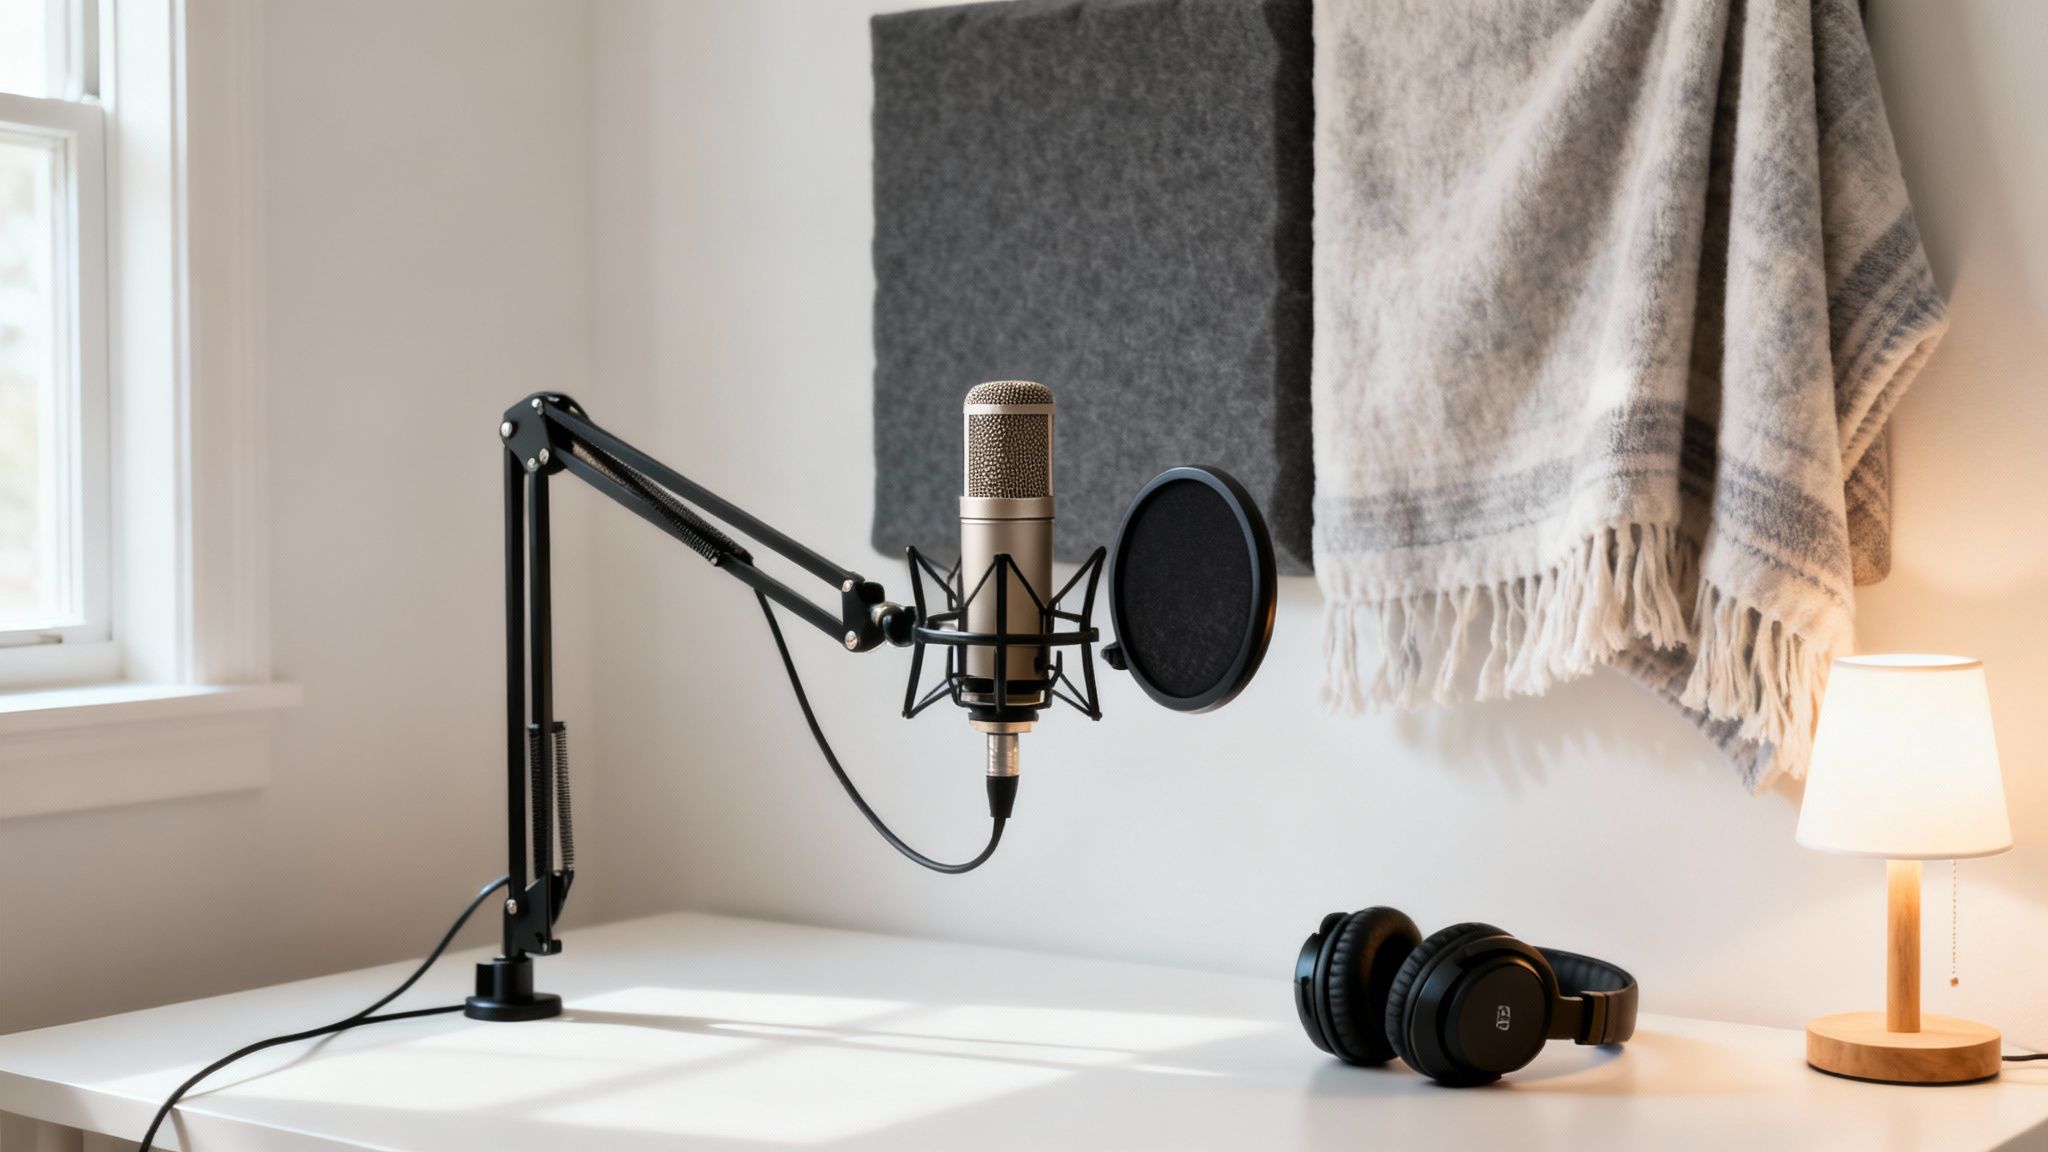
Taming Your Recording Environment
Your room is probably your biggest adversary. Hard surfaces—think walls, wood floors, and ceilings—are echo machines. They bounce sound waves all over the place, creating a muddy reverb that buries your voice. The trick is to create a "dead" space that absorbs those reflections, so your mic only hears you.
You can pull this off without spending a dime on professional acoustic panels.
- Soften Your Surfaces: Got a spare comforter or a few heavy blankets? Throw them on the floor. If you have a particularly bouncy wall behind you, hanging a blanket can make a massive difference.
- The Closet Trick: A walk-in closet packed with clothes is a fantastic makeshift vocal booth. All that fabric is a natural sound absorber, giving you a surprisingly clean and focused recording.
- Kill the Hum: Shut down anything that makes a low-level hum. We're talking about air conditioners, refrigerators, and even noisy computer fans. You might tune them out in daily life, but your microphone will pick them up loud and clear.
A classic rookie mistake is recording in the middle of a big, empty room—it's often the most echo-prone spot. Try moving closer to a wall, especially one you've softened up with a blanket. This simple change in position can dramatically cut down on unwanted room noise.
Before you start fixing audio problems, you need to know what you're up against. Different noises require different approaches. Here's a quick guide to identifying common issues and the best free tools to tackle them.
Common Audio Problems and Their Free Fixes
| Noise Type | Description | Primary Free Solution | Secondary Tip |
|---|---|---|---|
| Hiss/Static | A constant, high-frequency "shhh" sound, often from microphone preamps. | Audacity's Noise Reduction effect (using a noise profile). | Lower your recording gain to avoid boosting the noise floor. Aim for peaks between -12dB and -6dB. |
| Hum/Buzz | A low-frequency drone, usually 50Hz or 60Hz, from electrical interference. | Use Audacity's Notch Filter to surgically remove the specific problem frequency. | Unplug nearby electronics or use a different outlet to find the source of the ground loop. |
| Echo/Reverb | Reflections of your voice caused by hard surfaces in the room. | The best fix is prevention—record in a smaller, softer space (like a closet). | AI tools like SimpleClean are surprisingly good at reducing existing reverb. |
| Clicks & Pops | Sharp, sudden sounds, often from mouth noises or digital glitches. | Manually edit them out in Audacity's waveform view or use the "Click Removal" tool. | Use a pop filter on your microphone and stay hydrated to reduce mouth clicks. |
| Wind/Plosives | Bursts of air hitting the mic, creating a "thump" on 'P' and 'B' sounds. | A physical pop filter or foam windscreen is the only real solution here. | If the damage is done, a high-pass filter in Audacity can sometimes lessen the low-frequency impact. |
This table isn't exhaustive, but it covers the vast majority of issues you'll run into. By learning to recognize these sounds, you can jump straight to the right tool for the job instead of guessing.
Mastering Your Microphone
How you use your mic matters just as much as where you use it. Getting a handle on a couple of key concepts will instantly improve your audio quality.
First up is the polar pattern, which is just a fancy term for the microphone's direction of hearing. Most mics designed for voice have a cardioid pattern, meaning they hear best what's directly in front of them while rejecting sounds from the sides and back. For a deeper dive, our guide on how to reduce background noise in your microphone breaks down polar patterns and placement in more detail.
Finally, watch your recording levels (or gain). Set it too low, and you'll have to crank the volume later, which also cranks up any background hiss. Set it too high, and you get nasty digital distortion called clipping. The sweet spot is having your voice peak somewhere between -12dB and -6dB. This gives you a strong, clean signal with plenty of breathing room.
Still Have Questions? Let's Clear Things Up
As you start cleaning up your own audio, you'll probably run into a few common head-scratchers. I know I did. Getting these sorted out early will save you a ton of frustration and help you pick the right approach for your project. Let's dig into some of the questions I hear most often.
Can I Really Get Rid of Background Noise from a Video for Free?
Yes, absolutely. This is a huge deal for anyone creating video content, especially if you're not shooting in a soundproof studio. The good news is that most modern AI web tools are built to handle video formats like MP4 and MOV right out of the box.
You just upload the entire video file. The tool is smart enough to find the audio track, clean it up, and then stick it back onto your original video. The visuals are never touched, and you get a downloadable file with the clean audio perfectly synced.
If you prefer a more hands-on method, you can do it yourself. You’d first need to pull the audio out of your video using a free tool. From there, you can clean up the audio file in a program like Audacity and then re-combine the clean audio with your video using a free video editor.
What’s the Difference Between “Noise Reduction” and a “Noise Gate”?
This one trips a lot of people up. Both tools get rid of unwanted sound, but they attack the problem in completely different ways. Knowing when to use which is a game-changer.
- Noise Reduction: Think of this as a deep clean. It analyzes a consistent background sound—like the hum of an air conditioner, a fan, or tape hiss—and removes it from the entire track. It's smart enough to work even when someone is talking, cleaning up the audio underneath their voice.
- A Noise Gate: This is more like an automated "mute" switch. It shuts off the audio completely whenever the sound level drops below a certain point you set. It's fantastic for killing noise in the silent gaps between words, but it does nothing for noise that happens while someone is speaking.
So, noise reduction cleans the whole room. A noise gate just closes the door when nobody is talking.
Why Does My Audio Sound Watery or Robotic After I Clean It?
Ah, the dreaded "underwater" effect. This is the single most common mistake in audio cleanup, and it even has a technical name: artifacting. It happens when you get too aggressive with your noise reduction settings. The software gets confused and starts removing frequencies that are actually part of the speaker's voice.
If you’re using a tool like Audacity, the fix is to dial back the Noise Reduction (dB) setting. The goal isn't perfect silence—it's a balance. You want to lower the distracting noise just enough so it's not noticeable, without mangling the actual voice.
A little bit of clean room tone is almost always better than a robotic, over-processed voice. Your audience will tune out a distorted voice far faster than they will a tiny, imperceptible hum.
Are Free Online AI Audio Cleaners Safe to Use?
For the most part, yes, but it's always smart to be mindful of what you're uploading. Before you drop any sensitive material into a web tool, take a minute to check its privacy policy.
Look for services that clearly state they automatically delete user files after a short period, usually within 24 hours to a few days. This is a good sign they aren't hoarding your data. If you’re working on something highly confidential, your safest bet is always offline desktop software like Audacity or FFmpeg, where your files never leave your computer.
Ready to skip the complex settings and get crystal-clear audio in seconds? SimpleClean uses powerful AI to remove background noise from any audio or video file with just one click. Try it for free and hear the difference.