The quickest and most effective way to deal with background noise is to stop it at the source. That means finding a quiet place to record and using your microphone correctly. But let's be realistic—sometimes unwanted sound still sneaks in. For those situations, post-production tools like AI-powered software or the built-in features in your editor can be lifesavers for cleaning up hums, hiss, and other ambient distractions.
Why Clean Audio Is Your Most Important Asset
Let’s be honest—nothing makes a listener hit "stop" faster than bad audio. Creators often obsess over getting that perfect 4K video resolution or slick graphics, but it's usually the subtle, persistent hum of an air conditioner or the muffled sound of distant traffic that truly kills the experience.
These distracting sounds do more than just annoy; they actively undermine your credibility.
When your audience has to strain to hear you over background chatter, their focus shifts from your message to the poor quality of your recording. This creates something called cognitive load, forcing their brain to work overtime just to process what you're saying. The result is almost always the same: they tune out, assume your work is unprofessional, and start to doubt your expertise.
The Connection Between Sound and Credibility
Every minute you spend cleaning up your audio is a direct investment in your authority. Just put yourself in the listener's shoes for a moment:
- A podcast with a low-frequency hum just feels amateur, no matter how brilliant the content is. It sends a subconscious signal that you lack polish and don't care about the details.
- A tutorial video with echo and street sounds makes the instructions harder to follow. This can frustrate viewers and make your teaching seem less valuable.
- A corporate webinar with keyboard clicks and feedback completely distracts from the presentation, chipping away at the professional image you're trying to build.
Poor audio quality is the digital equivalent of showing up to a business meeting in a wrinkled shirt. It tells your audience you don't pay attention to the details, which makes them question the quality of your core message.
This isn’t about needing a million-dollar studio. It’s about recognizing that clear audio is the bedrock of effective communication.
The Growing Demand for Noise Reduction
The need for cleaner audio has fueled an absolute explosion in technology designed to solve this exact problem. The global market for background noise reduction software was valued at around $2.31 billion in 2025 and is projected to skyrocket to an incredible $45.02 billion by 2034.
This massive demand is driven by creators and professionals who understand that clear sound is no longer a luxury—it’s an absolute expectation. You can get more insights into the background noise reduction software market from this detailed report.
Setting the Stage for a Noise-Free Recording
The absolute best way to reduce background noise is to stop it from ever getting into your microphone in the first place. Post-production tools are fantastic, but they can't work miracles. Nothing beats a clean, crisp recording right from the start.
Think of it this way: it’s much easier to cook a great meal with fresh ingredients than to try and save a dish that was made with spoiled ones. Your recording space is your key ingredient.
Conduct a Pre-Flight Sound Audit
Before you even dream of hitting that record button, take five minutes to do a quick "sound audit." This is a deceptively simple trick I’ve used for years. Just sit down in your recording space, close your eyes, and just listen for a full minute.
What do you hear? You’ll probably be surprised by the symphony of sounds your brain usually filters out.
- The low, persistent hum from the refrigerator or an air conditioner.
- That high-pitched whine from a computer fan working overtime.
- The almost unnoticeable buzz from fluorescent or dimmer lights.
- Distant traffic, a neighbor's lawnmower, or muffled conversations from another room.
Every one of these is a potential audio contaminant. By identifying them now, you can deal with them before they become a problem. That might mean unplugging a mini-fridge for 30 minutes, turning off the AC, or moving that noisy external hard drive further away from your mic.
Understanding Soundproofing vs. Acoustic Treatment
This is a big one. So many people use these terms interchangeably, but they solve completely different audio problems. Getting this right is crucial for improving your recordings, especially if you're on a budget.
Soundproofing is all about blocking external noise from getting in (or your sound from getting out). It’s about building a fortress against sound. This usually involves heavy, dense materials like extra drywall, solid-core doors, and special windows to stop street noise or a barking dog. It can be incredibly effective, but it’s also often expensive and structural.
Acoustic treatment, however, is about controlling the sound inside your room. The goal here is to tame reflections—that pesky echo and reverb that can make your voice sound hollow and distant. This is where most of us can make a huge impact without a construction crew.
You're not trying to build a perfectly silent, anechoic chamber like you'd see in a science lab. The real goal is to create a controlled space where your voice is the star, free from distracting echoes and background hum. This is one of the most powerful ways you can improve your audio quality online before software ever enters the picture.
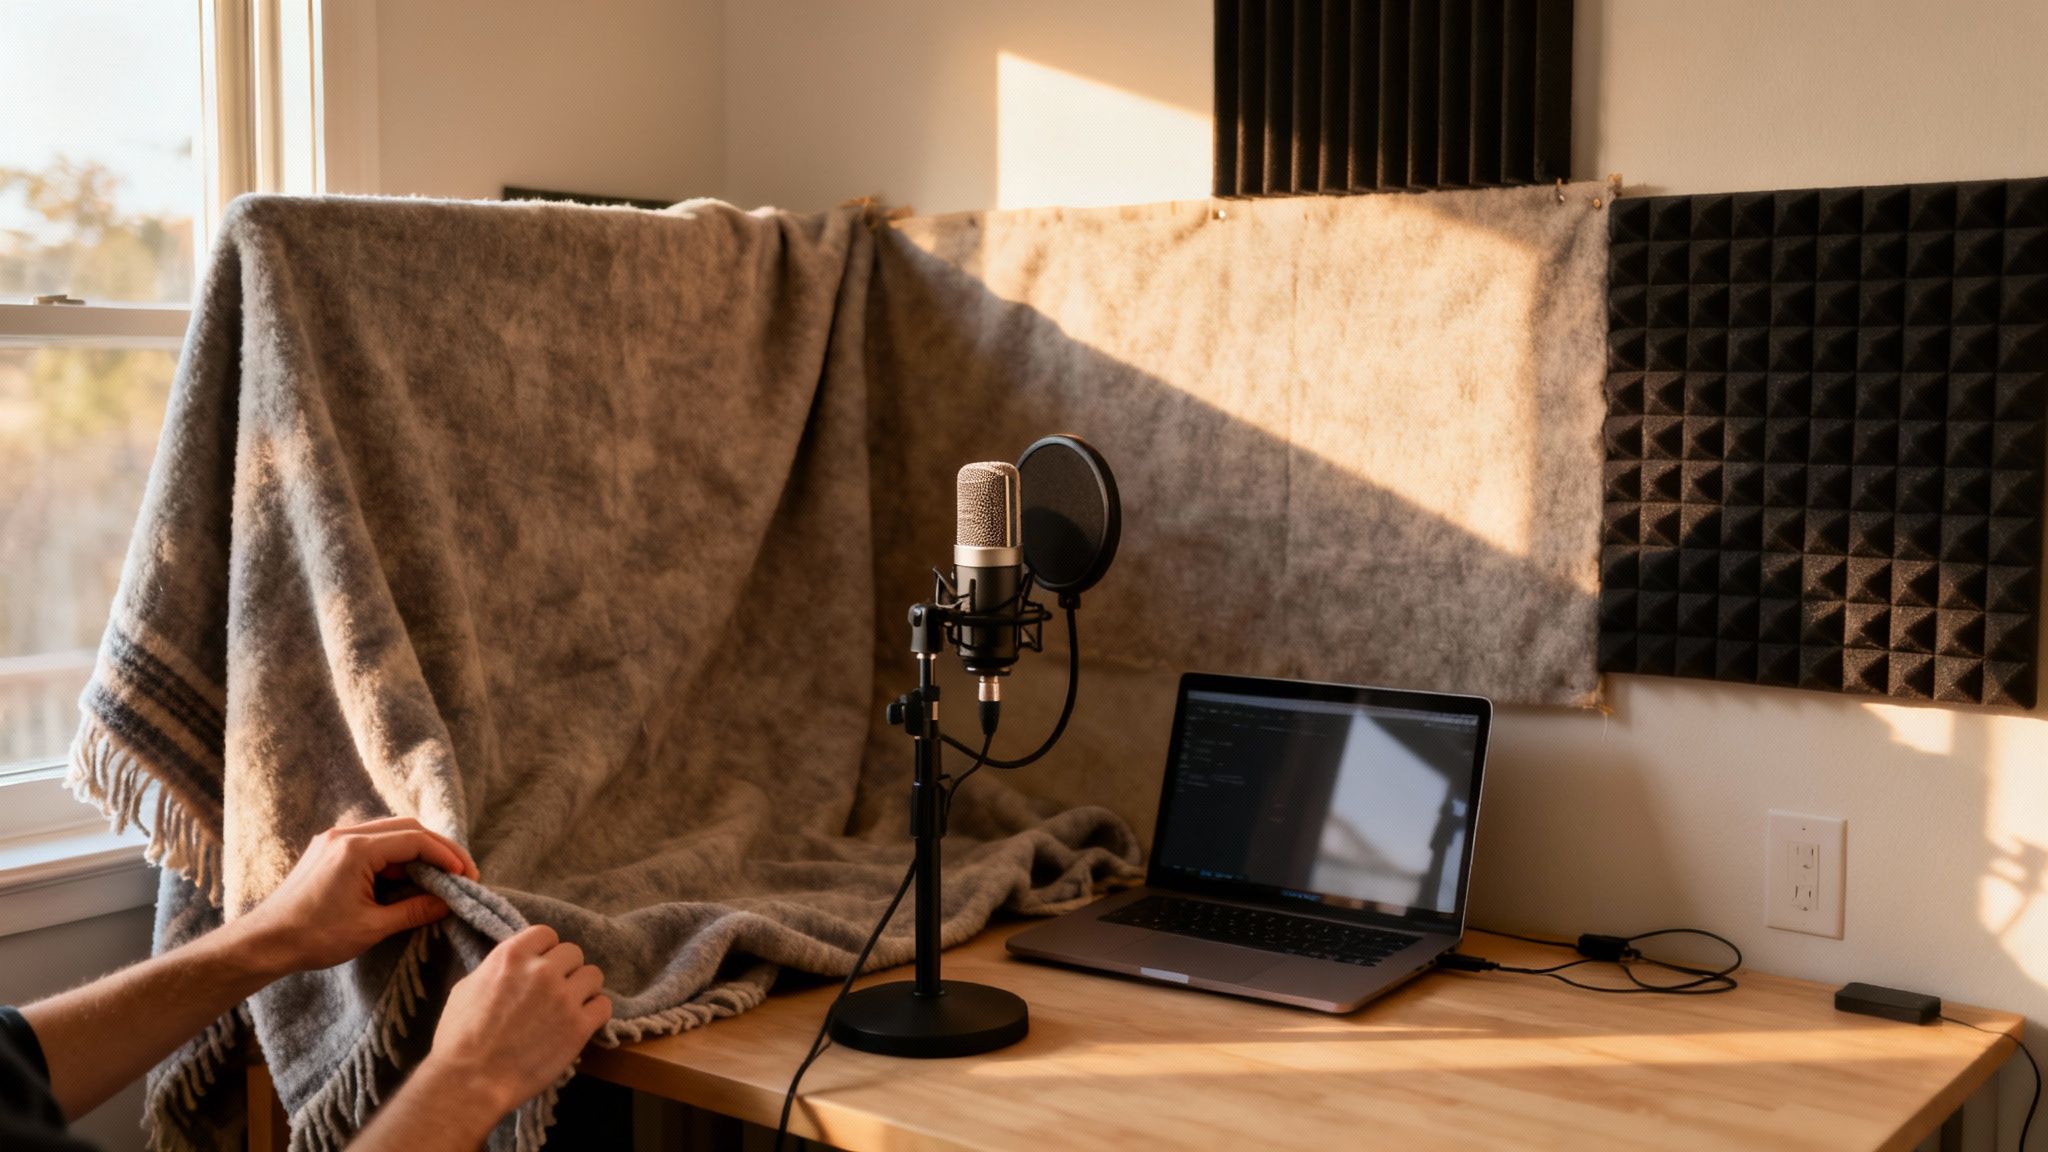
Low-Budget Acoustic Treatment Solutions
You don't need a professional studio budget to get good results. In fact, you probably have everything you need to dramatically improve your room's acoustics already.
| Noise Problem | DIY Solution | How It Works | Effectiveness |
|---|---|---|---|
| Echo / Reverb | Hang heavy blankets or comforters on walls. | The soft, thick fabric absorbs sound waves instead of letting them bounce around. | High |
| "Boxy" or "Hollow" Sound | Place pillows or cushions in room corners. | Bass frequencies build up in corners; soft materials trap and dampen them. | Medium |
| General Room Reflections | Record in a walk-in closet full of clothes. | The hanging clothes act as natural, irregular sound absorbers, creating a "dead" space. | Very High |
| Hard Surface Reflections | Lay a thick rug on a hardwood or tile floor. | Prevents sound from bouncing off the floor and back into the microphone. | Medium |
By getting creative with these common household items, you can create a much more controlled and professional-sounding recording environment.
The demand for these kinds of solutions is huge. The professional noise control market was valued at $6.82 billion in 2025, and it's still growing. Acoustic panels alone are expected to make up about 23% of that market, which shows just how vital acoustic treatment is. If you want to dig deeper, you can read the full noise control systems market research to see how these solutions are used worldwide.
Optimizing Your Gear to Capture Cleaner Audio
Your equipment is the first line of defense in the battle against noise. But here’s a secret many people miss: it’s not about having the most expensive gear. It’s about knowing how to use what you’ve got. A few small tweaks to your setup can make a massive difference, cleaning up your audio before you even hit record.
Let's start with the simplest, most effective technique people often forget: get closer to your microphone.
This is all about improving your signal-to-noise ratio. Think of it as a competition. Your voice is the "signal," and all the ambient sound in your room is the "noise." When you move closer to the mic, your voice becomes much louder relative to that background hum. This allows you to turn the microphone's sensitivity down, effectively pushing the noise floor into near silence.
As a rule of thumb, try positioning the mic about a palm's-width away from your mouth. This simple adjustment sets you up perfectly for the next crucial step.
Nail Your Gain Staging
So many people confuse gain with volume, but they're not the same thing. Gain controls your microphone's sensitivity. Setting it too high is one of the most common mistakes I see, and it’s a surefire way to introduce a layer of hiss into your recording.
Every audio interface or mic preamp has a "noise floor"—a tiny bit of electronic self-noise. When you crank the gain, you're not just making your voice louder; you're amplifying everything, including that inherent hiss.
The goal is to find that perfect sweet spot. Here’s how:
- Start talking into your mic at your normal recording volume.
- Keep an eye on the audio meter in your recording software or on your interface.
- Adjust the gain knob until your voice consistently peaks between -12dB and -6dB.
This range gives you plenty of headroom to avoid nasty digital clipping (distortion) if you get a little loud, but it keeps the signal strong. This way, you won't have to artificially boost it later, which would only bring that noise floor right back up with it. If you're finding it hard to get a good level without maxing out the gain, there are other techniques you can use to increase your mic volume safely.
Choose the Right Microphone Polar Pattern
Microphones don't just "hear"; they listen in specific directions. This is called a polar pattern, and picking the right one is a powerful tool for rejecting unwanted sound.
For anyone recording solo—like for a podcast, voiceover, or stream—the cardioid pattern is your best friend.
A cardioid mic is designed to pick up sound from the front while rejecting sound from the sides and, crucially, the back. This natural focus helps isolate your voice from distracting noises like keyboard clicks, whirring computer fans, or echo bouncing off the wall behind you. Compare that to an omnidirectional pattern, which captures sound from all directions. That’s great for recording a group conversation around a table, but it's a nightmare for a solo creator in a less-than-perfect room.
Getting these three things right—mic placement, gain staging, and polar patterns—solves most background noise issues at the source. This proactive approach will save you hours of tedious editing and give you a much cleaner, more professional recording from the start.
This constant push for clearer audio isn't just a hobbyist's concern; it's a massive industry. The market for noise suppression components, which covers everything from the tech in our mics to the circuits that filter out bad signals, was valued at $28.33 billion in 2025. It's expected to balloon to $86.33 billion by 2034, all because we demand crystal-clear sound in everything we do. You can discover more insights about the noise suppression components market to see how fast this technology is moving.
Cleaning Up Your Audio in Post-Production
No matter how carefully you plan your recording session, some stray sounds always seem to sneak in. It could be a distant siren, your dog deciding to bark at the mailman, or the persistent hum of your computer fan. This is where post-production becomes your best friend, transforming a good recording into a truly professional one.
The idea here isn't to create a completely sterile, dead-silent track—that actually sounds pretty weird and unnatural. Your goal is much simpler: reduce distracting background noise until the listener doesn't even notice it's there. This final polish lets your voice shine through and can make a massive difference in how polished your final product sounds.
The Secret Weapon: The Noise Print
The most common and effective way to clean up audio relies on a technique called noise profiling. Instead of just guessing what's noise and what's your voice, you essentially give your software a clean sample of the exact sound you want to eliminate. Think of this "noise print" as a sonic fingerprint of the room's ambient hum or your computer's hiss.
To get this fingerprint, you need to capture a few seconds of pure "room tone"—the sound of your recording space when you aren't talking. This is why I always make it a habit to record 3-5 seconds of silence at the start or end of every session. That little snippet is gold because it contains all the constant, unwanted sounds you're about to hunt down and remove.
A Practical Workflow With Noise Reduction Tools
Pretty much every Digital Audio Workstation (DAW) or audio editor has some form of a noise reduction effect built-in. While the name might change from one program to another, the core process is almost always a two-step dance. Let's walk through it using the popular effect in Audacity as an example, but you can apply these same principles anywhere.
First, you need to teach the software what to listen for.
- Capture the Noise Profile: Highlight that short section of silence you recorded. This is you telling the software, "Hey, this is the sound I want you to get rid of." Then, you'll click a button that says something like "Get Noise Profile."
Once the software has its marching orders, you can apply the fix.
- Apply the Reduction: Select the entire audio track you want to clean up. Go back to the same noise reduction tool, but this time, you'll hit "OK" or "Apply." The software will now scan your entire recording, find the frequencies from your noise print, and quiet them down.
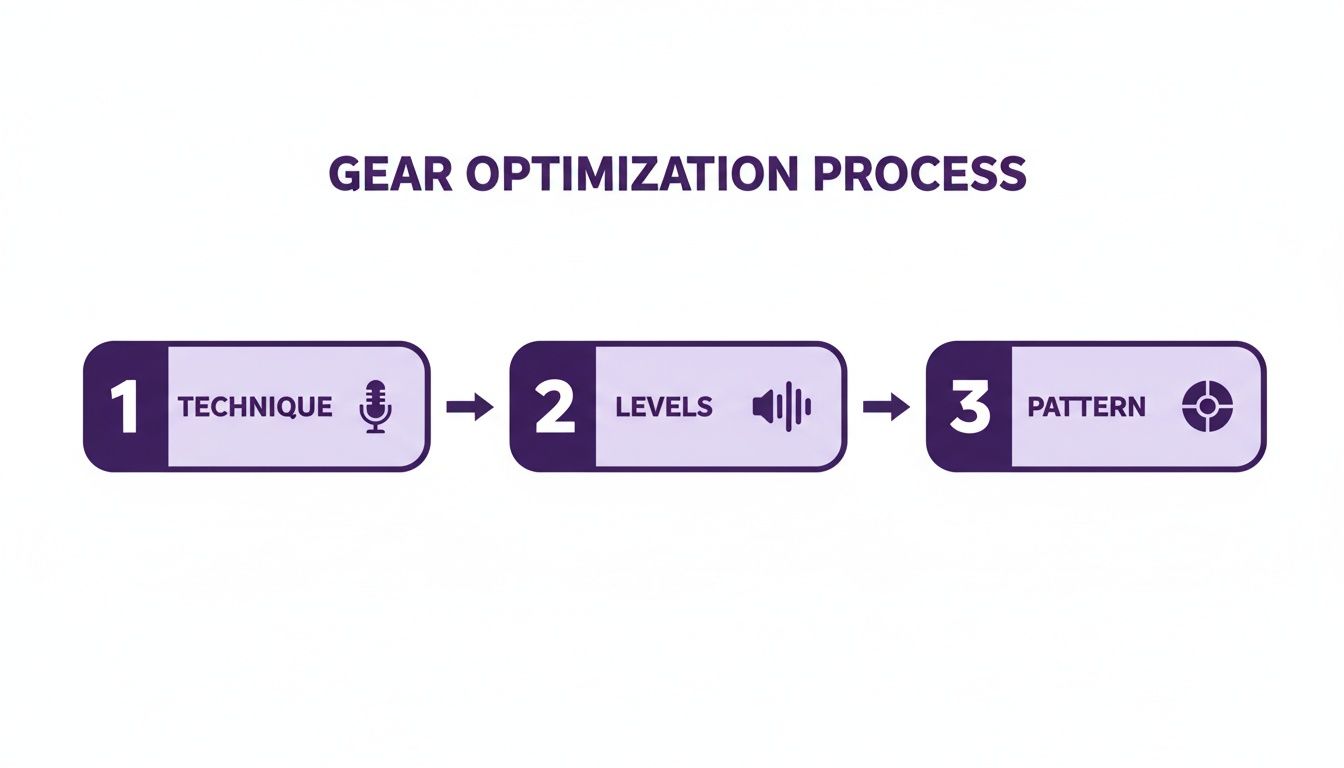
As this flowchart shows, remember that post-production cleanup is the final step. It works best when you've already optimized your recording technique and levels from the start.
Fine-Tuning Your Settings
Just applying the effect is only half the battle. The real magic happens when you start tweaking the settings to get a clean, natural-sounding result without introducing weird audio artifacts. If you get too aggressive with noise reduction, you can end up with that dreaded "underwater" or robotic vocal sound.
Here’s a breakdown of the typical controls you’ll find in most noise reduction tools:
- Noise Reduction (dB): This slider controls how much noise you’re cutting. I always recommend starting low, somewhere around 6-12 dB. Cranking this setting too high is the fastest way to distort your audio.
- Sensitivity: This setting tells the software how similar a sound has to be to the noise print to be considered noise. Higher sensitivity can be more effective, but it also risks cutting into the lower frequencies of your voice.
- Frequency Smoothing (Bands): This helps blend the cleaned-up audio back into the original, preventing jarring gaps where noise was removed. A setting between 3 and 6 is usually a safe bet to start with.
My best advice? Be conservative. It’s always better to apply two gentle passes of noise reduction than one heavy-handed pass that ruins your track. Always, always use the "Preview" button to listen to the changes before you commit.
If all that sounds a bit tedious, you're not alone. This is why many modern tools like SimpleClean use AI to handle the heavy lifting. Instead of you having to dial in settings manually, these platforms analyze the audio and apply smart, targeted adjustments. If you're curious, you can learn more about how software noise cancellation is using AI to get fantastic results with just a few clicks.
Going Beyond Basic Hum and Hiss
Sometimes, the noises you need to remove aren't constant. They're sudden, isolated events like a cough, a door slamming, or a phone notification. A standard noise reduction tool designed to remove consistent hum isn't going to catch those. For these kinds of surgical fixes, you need to reach for a spectral repair tool.
These are more advanced plugins that show you a visual representation of your audio, allowing you to see the noise as a blob or shape on a spectrogram. From there, you can use a tool—much like the healing brush in Photoshop—to literally paint over the unwanted sound and remove it while leaving the surrounding audio untouched. It takes a bit of practice, but it's an incredibly powerful way to rescue an otherwise perfect take.
Solving the Most Common Audio Noise Problems
Even when you've done everything right before hitting record, some stubborn, specific noises can still sneak into your final audio. Learning to pinpoint and fix these common culprits is a game-changer. This isn't about slapping a generic noise filter on everything; it’s about making targeted, surgical strikes on the most infamous audio pests.
Let’s get into the nitty-gritty of diagnosing the issue, figuring out what caused it, and applying the right fix.
Taming Electrical Hum and Buzz
One of the most persistent gremlins in audio is a low-frequency hum, usually sitting right around 50Hz or 60Hz, depending on your country's power grid. This is almost always electrical interference bleeding in from nearby power lines, appliances, or unshielded audio cables. It's that deep, constant drone you hear lurking beneath the main recording.
While a broad noise reduction tool can sometimes help, the best way to kill a hum is with a scalpel, not a sledgehammer. Your best bet is to use an EQ (Equalizer) to find that exact frequency and cut it out. A dedicated notch filter does the same thing automatically. This precise removal leaves the rest of your audio, especially the richness of a voice, completely intact.
Eliminating Plosives and Sibilance
Next up are two related issues that come directly from the human voice: plosives and sibilance.
- Plosives: Ever heard that ugly, bassy "thump" when someone says a word with a 'P' or a 'B'? That's a plosive. It's a blast of air hitting the microphone diaphragm, and it's incredibly distracting.
- Sibilance: This is the piercing, high-frequency hiss that can happen on 'S' and 'T' sounds. Some voices and microphones are more prone to it, and it can be really fatiguing for your listeners.
The first line of defense against plosives is a good pop filter placed between the speaker and the mic—it's a simple fix that works wonders. If you have to fix it after recording, a high-pass filter can gently roll off some of that low-end thump. For sibilance, the perfect tool is a de-esser. It's a specialized compressor that cleverly ducks the volume of only those harsh, hissy frequencies, leaving the rest of the vocal untouched.
Learning to hear these specific problems is empowering. Instead of just hitting a generic 'remove noise' button, you're becoming an audio detective, applying the right tool for the job to achieve a cleaner, more professional sound.
Fixing Digital Clipping
And then there's digital clipping. This is the one you really want to avoid. It’s that harsh, crackly distortion you hear when your recording levels were set way too high.
Clipping happens when the audio signal is too powerful for the digital converter to handle, so it literally chops off the tops and bottoms of the sound waves. While some fancy de-clipping software can try to guess what the missing audio looked like, the results are rarely perfect and often sound artificial.
The only reliable fix is prevention. This all comes down to setting your recording levels properly from the start. As a rule of thumb, aim for your audio to peak somewhere between -12dB and -6dB. Getting this right during the recording session is the best way to prevent the irreversible damage of digital clipping.
Here's a quick cheat sheet for when you're in the heat of an edit and hear something you don't like. Use it to identify the problem and find the fastest way to a solution.
Troubleshooting Common Audio Noise Issues
| Noise Type | Common Cause | Primary Solution | Prevention Tip |
|---|---|---|---|
| Hum/Buzz | Electrical interference from power lines or cables | Use a notch filter or an EQ to cut the specific frequency (50/60Hz) | Plug gear into a single power strip; use balanced, shielded cables |
| Plosives | Bursts of air from 'P' and 'B' sounds hitting the mic | Apply a high-pass filter (around 80-100Hz) to roll off the low-end thump | Use a pop filter and position the microphone slightly off-axis from the mouth |
| Sibilance | Harsh 'S' and 'T' sounds | Apply a de-esser plugin to target and reduce the hissy frequencies | Try a different microphone or adjust mic placement to be less direct |
| Clipping | Recording level set too high, causing distortion | Use a dedicated de-clipper plugin (results may vary) | Set recording levels so your audio peaks between -12dB and -6dB |
Think of this table as your first-aid kit for audio emergencies. While prevention is always the best medicine, knowing how to treat these common issues in post-production is an essential skill for getting a clean, professional sound every time.
Got Questions About Noise Reduction? We’ve Got Answers
As you get more into cleaning up your audio, you’ll probably run into the same questions that trip up most creators. Let's clear up some of the common ones so you can move forward with confidence.
Can I Really Get Rid of 100% of the Background Noise?
It’s tempting to try and scrub every last bit of noise from a track, but chasing 100% silence is usually a bad idea. When you push noise reduction tools that hard, they start to remove parts of the voice signal itself. This is what creates that weird, watery, or robotic sound you sometimes hear in over-processed audio.
The real goal isn't total silence. It's making the background noise so quiet that your audience doesn't even notice it. You want to strike a balance—clean enough to be professional, but natural enough to sound human.
Do I Need to Spend a Ton on Software to Get Good Results?
Absolutely not. While high-end software like iZotope RX is incredible for detailed surgical work, you can get fantastic, professional-sounding results with much simpler tools. The built-in noise reduction in a free program like Audacity can easily tackle common issues like air conditioner hum or computer fan hiss.
Newer AI-powered services like SimpleClean are also changing the game, offering seriously powerful cleanup without the complicated controls or hefty price. At the end of the day, how you record is always more important than what software you use to edit.
The secret to great audio is a two-part process: smart prevention while recording and careful, gentle reduction in post-production. Don't count on software to fix a problem you could have avoided by just closing a window or moving the mic a little closer.
What’s the Difference Between a Noise Gate and Noise Reduction?
This is a really important one. Think of a noise gate as an on/off switch for your audio. It listens for volume, and when the sound drops below a level you set (like during a pause between sentences), it just mutes the track completely. It’s perfect for killing hiss in the quiet moments but does nothing for the noise underneath your voice while you're actually talking.
Noise reduction, on the other hand, is much more sophisticated. It takes a "fingerprint" of the noise you want to remove and then carefully subtracts those specific frequencies from the entire recording—both in the silences and during the speech. For the best results, many audio engineers actually use a bit of both.
Ready to silence the noise in your recordings with zero effort? SimpleClean uses AI to automatically remove background noise, delivering studio-quality audio in seconds. Try it for free at https://simpleclean.app and hear the difference.