Quick Answer
If Final Cut Pro Voice Isolation is not working, the problem usually falls into one of three buckets:
- The control is missing: you are likely not looking in the Audio inspector, the enhancement controls are hidden, or you need to select an individual audio component first rather than just the parent clip. Apple notes that audio enhancements work at the component level, not the clip level.
- The control is visible but does nothing: check your Final Cut Pro and macOS compatibility, update the app, test the clip in a new library or project, reset Final Cut Pro preferences, and if the issue started after an update, revalidate Audio Units on next launch.
- It works but sounds worse: the Amount may be too high, multiple audio components may be processed at once, or the source audio may have problems Voice Isolation is not good at fixing, such as heavy wind, clipped speech, strong room echo, or multiple competing voices.
If you only need a fast salvage workflow, export the cleanest version you can from Final Cut Pro, then clean exported dialogue with SimpleClean and re-import the repaired file if needed.

Where Voice Isolation actually lives in Final Cut Pro
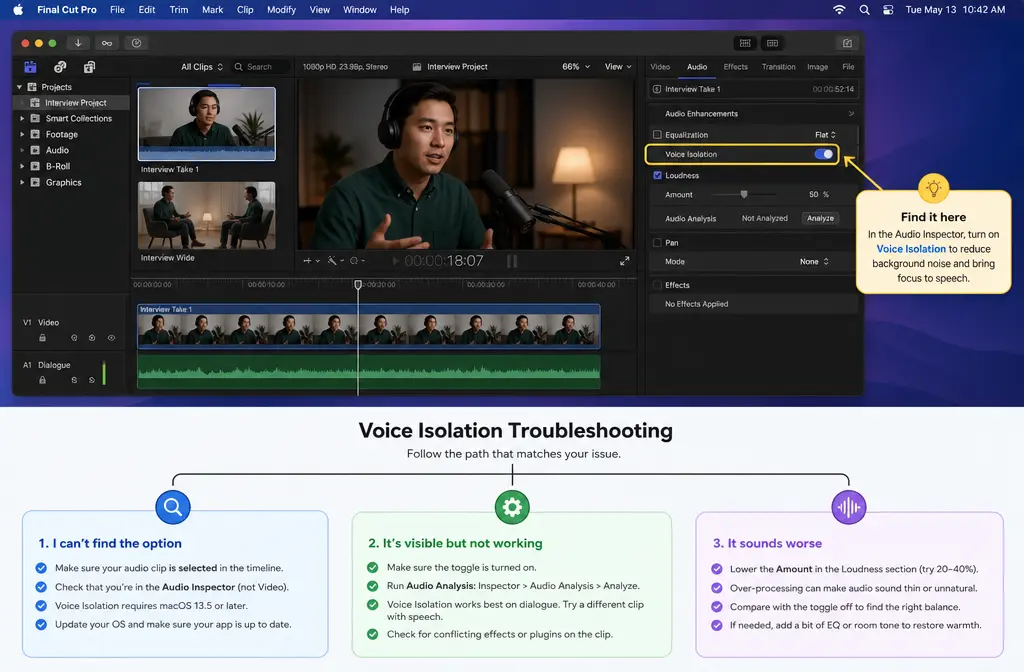
In current Final Cut Pro on Mac, Voice Isolation lives in the Audio inspector under Audio Enhancements. It is not always obvious at first glance because the section may need to be expanded, and the feature must be enabled manually.
According to Apple’s Final Cut Pro guide, you turn it on in the Audio inspector and adjust the Amount slider there. Apple also makes an important point that many troubleshooting threads miss: audio enhancement is applied to audio components. That is why users working with dual mono, multichannel, synced clips, or multicam angles often think the option is missing when it is actually attached to the component they have not selected yet.
- Select the clip in the timeline.
- Open the Inspector.
- Go to the Audio tab.
- Find Audio Enhancements.
- Enable Voice Isolation.
- If the option seems unavailable, select the specific audio component rather than only the parent clip.
Compatibility checks that solve a surprising number of cases
Voice Isolation was added in Final Cut Pro 10.6.2, released on April 12, 2022. Apple’s release notes say it required macOS Monterey 12.3 or later at launch. Current overall Final Cut Pro system requirements are higher than that, so if you are comparing older tutorials with a newer Mac setup, version mismatch can create confusion.
Apple’s current tech specs also note that some Final Cut Pro features require Apple silicon and newer macOS versions. That does not mean every Voice Isolation problem is a hardware problem, but it does mean version and platform checks should come before deeper troubleshooting.
| Check | Why it matters | What to do |
|---|---|---|
| Final Cut Pro version | Voice Isolation was introduced in 10.6.2 | Update if you are on an older version |
| macOS version | The feature launched with Monterey 12.3+ | Confirm your system meets the required OS level for your FCP version |
| Current app requirements | Modern Final Cut Pro releases have higher overall system requirements | Check Apple’s current tech specs if a newly updated Mac/app combo behaves oddly |
| Apple silicon caveat | Some features depend on newer hardware | Keep hardware expectations realistic when following old tutorials |
If Voice Isolation is missing
When users say the feature is “gone,” the fix is usually simpler than expected.
Most likely causes
- You are in the wrong inspector tab.
- The Audio Enhancements controls are collapsed.
- You selected the clip container, not the audio component.
- You are working with dual mono, multichannel, synced, or multicam audio and need to target the specific component.
- You are on an older Final Cut Pro version that predates Voice Isolation.
Fast diagnosis path
- Select the clip in the timeline.
- Open the Audio inspector.
- Expand Audio Enhancements.
- If you still do not see the expected control, select an individual audio component first.
- If it is still missing, verify your Final Cut Pro version and macOS version.
This component-level behavior is the biggest reason Apple’s documentation helps but many users still get stuck: the feature is there, but it is attached lower in the audio structure than expected.
Dual mono, multichannel, synced, detached, and multicam: the biggest gotcha
If you are editing camera audio with more than one channel, this is the section that matters most.
Apple says audio enhancement works on the component level. In practice, that means clips with dual mono, multichannel, synced audio, detached audio, or multicam audio can make Voice Isolation feel inconsistent or broken. Community discussions, including Creative COW, show this is where many editors lose time.
What to try
- Select an individual audio component first before enabling Voice Isolation.
- If the structure is awkward, try detaching audio so you can target the relevant section more directly.
- If you hear pops or strange transitions between adjacent clips after applying Voice Isolation, create a compound clip and apply the effect there. This workaround is commonly recommended in creator demonstrations.
Apple also warns that enabling Voice Isolation on multiple active audio components at the same time may cause garbled audio. So if you are hearing corruption, do not just lower the slider first. Check whether more than one component is being processed.

Why Final Cut Pro Voice Isolation sounds robotic, garbled, or pumps
Voice Isolation is useful, but it is not magic. Based on Apple’s own warning and creator examples, the ugly results usually come from one of these situations:
- The Amount is too high, which can make speech sound thin, phasey, or robotic.
- Multiple components are isolated at once, which Apple says can produce garbled output.
- The source audio is already badly compromised, such as clipping, aggressive wind, strong reverb, or overlapping voices.
- Clip boundaries create audible pops or sudden shifts, especially when nearby clips are processed differently.
Best-for guidance
- Best for: steady fan noise, AC noise, light hum, mild background noise, and some moderate room issues.
- Less reliable for: wind blasts, severe reverb, clipped speech, and scenes where another person is talking near the subject.
If it sounds worse, first reduce the Amount, then confirm only one relevant component is being processed. If the artifact remains, stop forcing the tool. That usually means the recording problem is outside Final Cut Pro’s comfort zone.
Version-specific bugs and app issues
Not every failure is operator error. Apple’s release notes mention a real bug in Final Cut Pro 10.6.7: the Voice Isolation Amount slider snapped to 0% when set below 7%. If you saw odd low-range behavior in older setups, that bug was real and Apple says it was fixed.
When Voice Isolation is present but appears to do nothing, use Apple’s general troubleshooting order:
- Update Final Cut Pro and macOS as appropriate for your system.
- Test in a new library or project to rule out library-specific corruption.
- Reset Final Cut Pro preferences.
- Revalidate Audio Units on next launch, especially if the issue appeared after an OS or app update.
The Audio Unit step is especially worth trying. An Apple Community thread describes a current case where Voice Isolation started failing after an OS update and was resolved by resetting preferences and validating Audio Units on the next launch. That is anecdotal, not the same as an Apple engineering note, but it matches the kind of plugin-validation breakage editors often see after updates.
How to revalidate Audio Units in Final Cut Pro
If Voice Isolation stopped behaving after an update, quit Final Cut Pro, relaunch it, and choose the option to validate Audio Units on next launch if you are troubleshooting plugin conflicts. Pair that with a preferences reset if needed. The goal is to rule out Audio Unit problems that interfere with audio processing.
Step-by-step: the fastest fix workflow
- Confirm the basics
Make sure you are in the Audio inspector and Audio Enhancements is expanded. - Enable Voice Isolation manually
It is not always on by default. Turn it on and listen before moving the Amount too far. - Select the right target
For dual mono, multichannel, synced, detached, or multicam audio, select an individual audio component first. - Check for multi-component conflicts
If more than one active component is isolated, disable Voice Isolation on the others and test again. - Lower the Amount
If the voice sounds robotic, garbled, or hollow, back the setting down. - Try a compound clip for boundary artifacts
If adjacent clips produce pops or shifting tone, make a compound clip and test the effect there. - Update and isolate the environment
Update Final Cut Pro, test in a new library, and reset preferences if the behavior feels inconsistent. - Revalidate Audio Units
If the problem started after an update or plugin change, validate Audio Units on next launch. - Export and clean externally if needed
If the source still sounds bad, export the cleanest file possible and repair it separately.
When to stop fighting Final Cut Pro
Voice Isolation is convenient inside the edit, but it is not always the right restoration tool. You will usually save time by switching workflows when the recording has:
- Strong wind noise
- Clipped or distorted speech
- Heavy room echo
- Multiple speakers in the same noisy room
- Exported audio that still sounds rough after reasonable tweaking
In those cases, the practical move is to export the cleanest possible audio or video from Final Cut Pro, then process the file separately in SimpleClean. That keeps the edit moving and avoids endless slider-chasing inside the timeline.
Fallback workflow: export, clean, re-import
Here is the simple fallback workflow when Final Cut Pro’s built-in tool is not enough:
- In Final Cut Pro, disable anything that is clearly making the audio worse.
- Export the cleanest workable version of the scene, interview, or episode.
- Use remove background noise from exported video with SimpleClean if the issue is mostly noise, rumble, or general dialogue cleanup.
- Re-import the cleaned file into Final Cut Pro if you still need to finish the edit there.
If you are also packaging the video for publishing, Best AI Captions can help add captions and subtitles after cleanup. If the video needs multilingual delivery, Translate Dub fits naturally after the audio is repaired. And if you are turning the cleaned final into clips, trailers, or episode promos across multiple platforms, Mallary.ai is useful for scheduling and distributing those posts from one place.
Final Cut Pro Voice Isolation vs separate cleanup: which is best for you?
| Situation | Use Voice Isolation in Final Cut Pro | Export and clean separately |
|---|---|---|
| Light fan, AC, or hum | Usually yes | Only if the result is still distracting |
| Dual mono or multichannel clip confusion | Yes, but select the component first | Use external cleanup if routing gets messy |
| Robotic or garbled result | Only after lowering Amount and checking active components | Often the better path |
| Wind blasts or clipped dialogue | Usually not ideal | Better fallback |
| Heavy room echo or competing voices | May help a little | Often faster and more effective |
| Need fast finish without timeline troubleshooting | Only for quick wins | Usually simplest |
Helpful related reads
- How to Fix Premiere Pro Noise Reduction Not Working
- How to Fix DaVinci Resolve Voice Isolation Not Working
- How to Remove Background Noise From Video Online
Bottom line
If Final Cut Pro Voice Isolation is not working, do not treat every case the same. First decide whether the control is missing, present but inactive, or making the audio worse. Most fixes come down to using the Audio inspector correctly, selecting the audio component instead of just the clip, updating and resetting the app when needed, and avoiding over-processing.
And when the recording problem is bigger than Final Cut Pro was built to solve, the faster answer is often to clean noisy dialogue outside Final Cut Pro and move on with the edit.
Sources and further reading
- Apple Support: Enhance audio in Final Cut Pro for Mac - Primary source for where Voice Isolation lives, manual enablement, component-level behavior, and Apple’s warning about garbled audio when multiple components are processed.
- Apple Support: Final Cut Pro release notes - Source for Voice Isolation arriving in Final Cut Pro 10.6.2, Monterey 12.3+ at launch, and the 10.6.7 fix for the slider bug below 7%.
- Apple Support: Final Cut Pro tech specs - Source for current system requirements and Apple silicon/newer macOS caveats for some features.
- Apple Support: If Final Cut Pro isn't working - Official troubleshooting flow supporting update, testing, and reset steps.
- Apple Community: Voice Isolation problem in FCPX after OS 26 - Anecdotal but useful example that resetting preferences and validating Audio Units can resolve post-update Voice Isolation failures.
- Creative COW forum: Voice Isolation for audio with multiple tracks in FCPX - Practical evidence of real-world confusion around multitrack and dual mono workflows.
- Curtis Judd YouTube: Final Cut Pro Voice Isolation Audio Noise Reduction - Useful practical reference for what Voice Isolation tends to handle well versus poorly in actual audio examples.
- Tom Buck YouTube: How To Use (And Fix) Final Cut Pro's Voice Isolation - Useful source for the compound-clip workaround when pops or transition artifacts appear between adjacent clips.