Got a recording that's full of distracting background noise, hiss, or echo? Don't toss it. You can actually clean up audio online free using some surprisingly powerful tools that work right in your browser. For podcasts, voiceovers, or course videos, you can get a dramatically better sound in just a few minutes.
Your Path to Instantly Better Audio
Not too long ago, getting clean audio meant booking time in a studio or buying expensive, complicated software. That's just not the case anymore. Today, anyone creating content has access to incredibly effective browser-based tools that do all the heavy lifting for you.
This guide walks you through a modern, straightforward workflow to fix your audio without ever hitting an "install" button. It’s like having an audio engineer on call who works at the click of a button.
This isn't just a small niche, either. The demand for crisp, clear audio in digital content has exploded. The market for online audio noise reduction software has ballooned to USD 838.96 million and is still climbing. You can dig into the full research on this market expansion to see just how big this has become.
To get started, it helps to understand the basic journey your audio file will take. This table breaks down the key stages of the cleanup process.
Key Stages for Free Online Audio Cleanup
Here’s a high-level overview of the essential steps for transforming noisy recordings into clean audio using online tools.
| Stage | Action | Why It Matters |
|---|---|---|
| 1. Preparation | Convert your file to a common format like MP3 or WAV and trim any unnecessary parts. | A clean, properly formatted file helps the AI tool work more accurately and saves you processing time. |
| 2. AI First Pass | Upload your audio to a one-click AI cleaning tool for an initial, automated cleanup. | This is the fastest way to remove 80% of common problems like hum, hiss, and general background noise. |
| 3. Manual Tweaks | Listen closely for specific leftover noises (wind, clicks) and use targeted tools if needed. | Some issues require a more focused approach that a general AI might miss. |
| 4. Export | Download your cleaned file in a high-quality format suitable for your final project. | The right export settings ensure you don't lose the clarity you just worked to achieve. |
Following these stages in order will give you the best shot at a professional-sounding final product, even when you're starting with a less-than-perfect recording.
The Power of One-Click AI Cleaning
Modern tools are built for speed and simplicity. Forget messing around with confusing equalizers and filters. You just upload your file, and the AI gets to work, intelligently figuring out what's a voice and what's a distracting background sound.
The real goal isn't just to cut out noise; it's to do it while keeping the speaker's voice sounding rich and natural. The best tools make it sound like the noise was never even there.
Many of these platforms have a dead-simple interface, often just a "drag and drop" box.
This focus on a user-friendly experience means you can get pro-level results without a massive learning curve. The benefits are pretty clear:
- No Installation: It all happens in your browser. This saves you hard drive space and you'll never have to worry about software compatibility issues.
- Speed and Efficiency: Cloud-based AI processing is incredibly quick. It can often clean an entire audio file faster than it would take you to listen to it once.
- Dramatic Improvement: The "before and after" difference is often night and day. You can take a noisy, unusable recording and turn it into a polished, professional track.
Preparing Your Audio for the Best Results
Before you even think about uploading a file to clean up audio online free, taking a few minutes to prep your recording can make a night-and-day difference. It’s a bit like prepping a wall before you paint; a little effort upfront guarantees a much cleaner finish. This isn’t about getting bogged down in technical details, but about giving the cleanup tools the best possible material to work with.
The first big decision is your file format. MP3s are everywhere, but they're "lossy," which means audio data gets thrown out to keep the file size small. If you have the choice, always start with a WAV file. It's an uncompressed format that holds onto every bit of the original audio, giving any tool, especially an AI one, much more information to work with for a more accurate clean.
The Power of Room Tone
Here’s a pro tip that seriously levels up any automated cleanup process: record some room tone. Before you say a word, just let your microphone record about five to ten seconds of the "silence" in your recording space. Of course, it's not truly silent. It's the unique ambient hum of your room—your computer fan, the HVAC system, a buzzing light fixture.
By capturing this audio fingerprint, you're essentially handing the AI a perfect sample of the exact noise it needs to surgically remove from the rest of the track. It's the single best thing you can do to help the tool separate your voice from the background.
This simple action creates a clean noise profile, letting the algorithm subtract that specific ambience with incredible precision, leaving your voice crisp and clear.
Avoid Common Recording Pitfalls
Even the smartest online tools have their limits. One of the biggest culprits that can ruin a recording is digital clipping. This is that awful, distorted sound you get when your recording level is set way too high and the audio waveform literally gets chopped off at the top.
The fix? Keep an eye on your levels while you record. A good rule of thumb is to have your audio peaks hitting somewhere between -6dB and -12dB. This sweet spot gives you plenty of headroom and keeps distortion at bay. If you find your audio is consistently too quiet, we've got a guide on how to safely increase mic volume without adding extra hiss.
For a broader look at how this fits into the bigger picture, checking out a guide on the complete podcast editing process can be incredibly helpful. By choosing the right format, grabbing room tone, and managing your levels, you’re setting yourself up for success and preventing problems instead of just fixing them later.
A Practical Walkthrough with a Free AI Audio Cleaner
Alright, enough with the theory. Let's get our hands dirty and actually clean up audio online for free using one of the many one-click AI tools available. The best part about these platforms is their simplicity—you don’t need an engineering degree, just your audio file and a browser.
The process usually starts with a simple drag-and-drop. Find the audio file you prepped earlier (hopefully, it's a high-quality WAV) and pull it into the uploader window on the website. The tool will kick into gear, analyzing the file, which can take anywhere from a few seconds to a minute or two depending on how long your recording is.
Upload and Let the AI Do Its Thing
Once your file is uploaded, the magic begins. The AI’s main job is to figure out what's a human voice and what's... everything else. It scans the frequency patterns to pinpoint consistent background noise—that annoying air conditioner hum, the whir of a computer fan, or even faint traffic rumble—and separates it from the much more dynamic frequencies of speech.
This is far more advanced than a basic noise gate or filter. The technology has gotten so good that it’s now a standard feature in many consumer gadgets. In fact, a whopping 77% of consumer electronics brands now embed this kind of background noise reduction directly into their products. It just goes to show how much we all value clean audio. You can dig into the full report on this audio technology trend if you're curious.
This workflow is a great visual reminder of how to get your file ready for the best possible result.

Giving the AI a clean format and a bit of room tone to sample is like giving it a cheat sheet—it makes its job infinitely easier and gives you a much more natural-sounding final product.
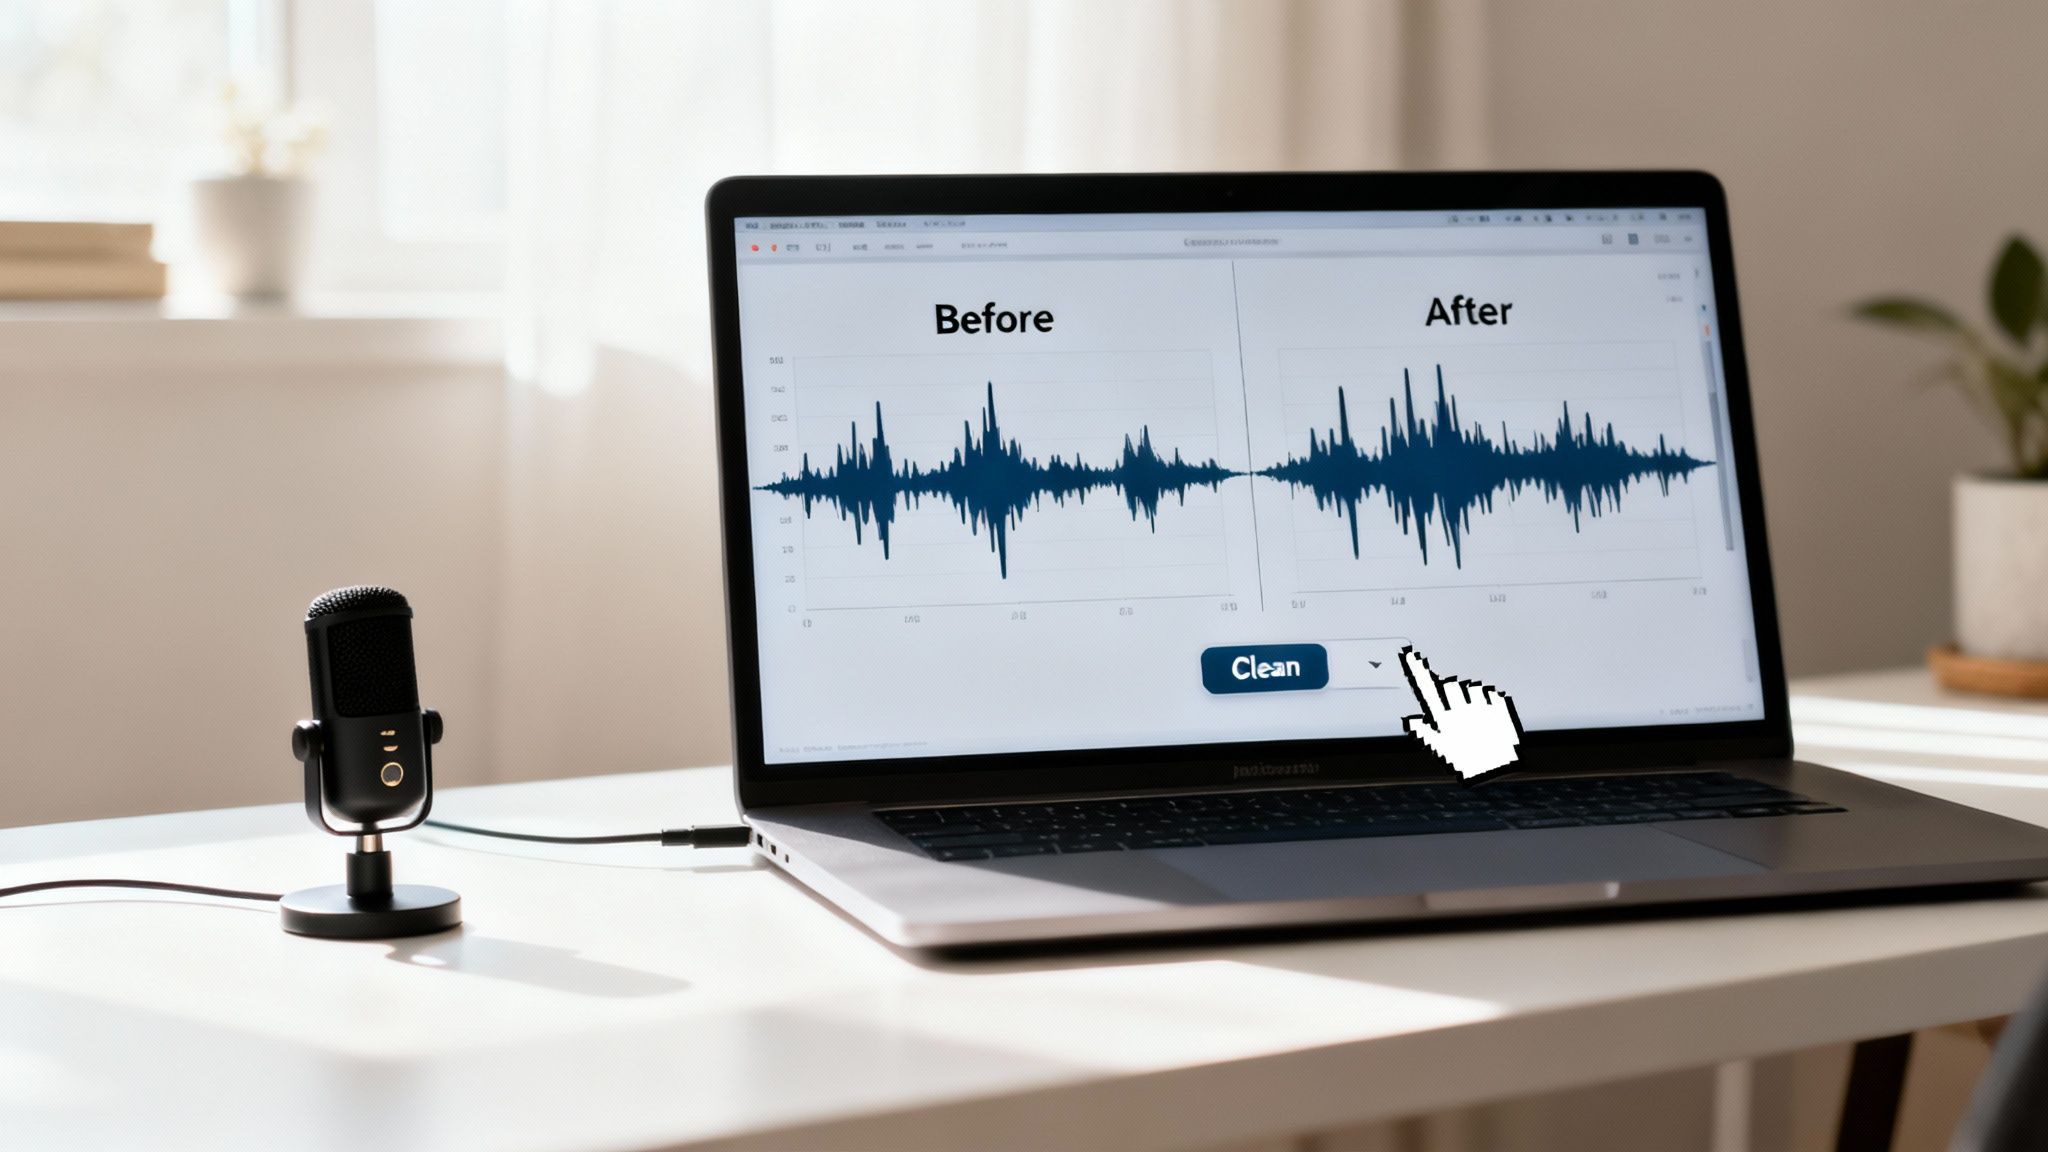
Listen, Compare, and Confirm
After the AI has worked its magic, you'll almost always see a "before and after" comparison player. This is the most crucial step, so don't just rush to hit the download button. Stop and listen.
- Play the "Before" track: Reacquaint yourself with the original problems. Was it a low hum? Distant traffic? A bit of room echo?
- Play the "After" track: Is the voice clear? Is it front-and-center? Most importantly, does it still sound like you? The goal is to strip away the distracting noise, not to turn your voice into a robot.
- Use headphones, always: Your laptop speakers are liars. They can easily hide weird digital artifacts or a tinny quality that was introduced during processing. A good pair of headphones will tell you the real story.
There's a real "wow" moment when you hear your voice, crisp and clear, without that distracting buzz you thought had ruined the take. A great AI tool makes it feel like the noise was never there to begin with, leaving the warmth and character of your performance intact.
Most tools make this A/B comparison dead simple, often with a toggle switch or side-by-side players. Once you're happy with the result, it’s just a matter of downloading the clean file and getting it into your project.
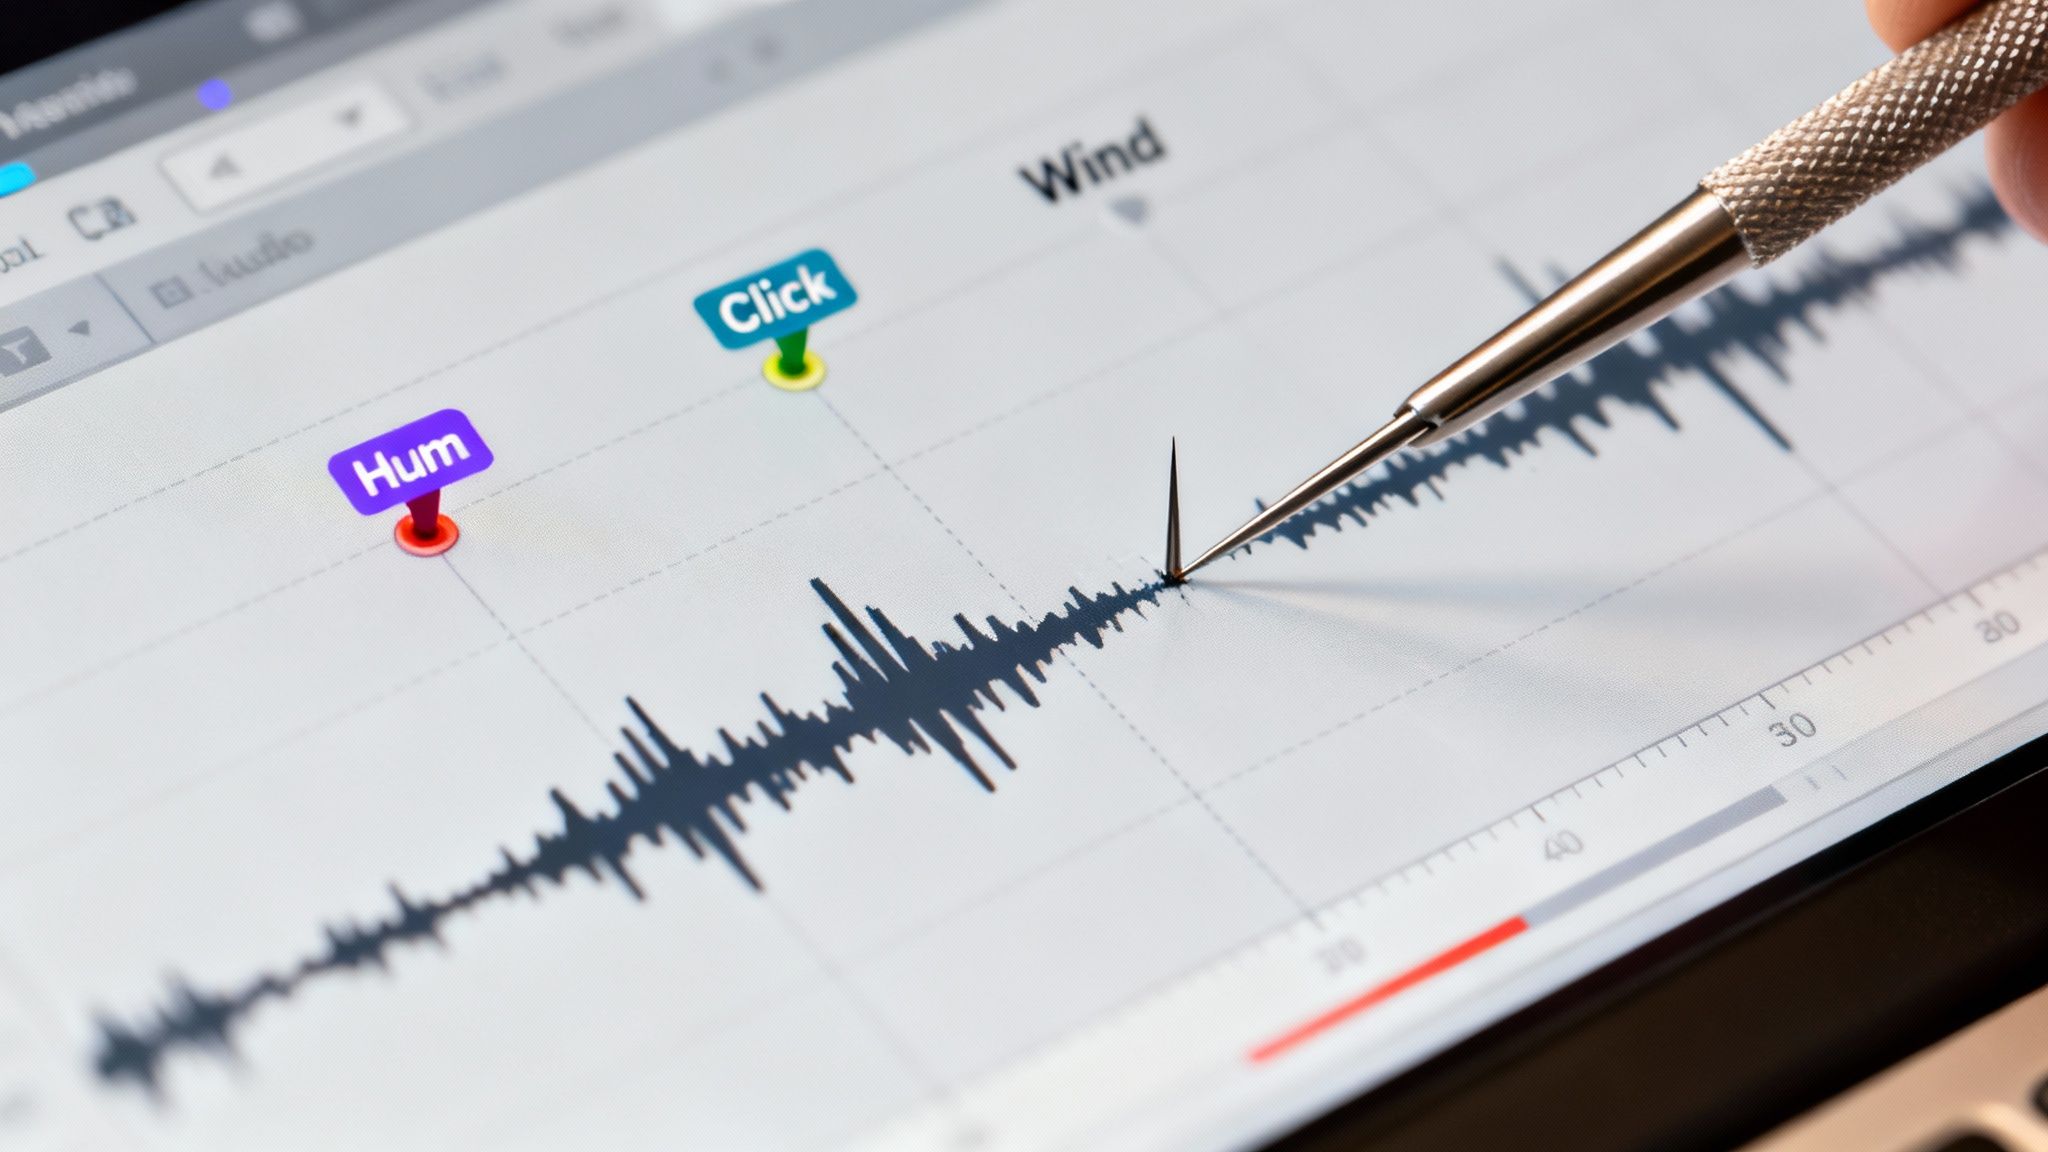
Tackling Specific Noises Like Wind, Hum, and Clicks
A one-click AI pass is a fantastic starting point for dealing with general background noise, but what happens when you’re left with those really stubborn, specific sounds? I'm talking about things like the low electrical hum from a nearby appliance, gusts of wind from an outdoor interview, or distracting mouth clicks from a close-mic'd voiceover. These often slip right through a general automated cleanup.
This is where a multi-tool workflow really shines. I often use an initial AI cleaner to knock out 80% of the problem—the basic room tone and hiss. Then, I’ll pivot to another free online tool with more surgical features to hunt down and eliminate those individual audio pests. This combination lets you clean up audio online free with a level of precision that makes a huge difference in the final product.
Isolating Electrical Hum and Hiss
Electrical hum is one of the most common audio gremlins out there. It's usually caused by poorly grounded equipment or power line interference, and it creates a constant, low-frequency drone that is incredibly distracting for a listener.
To get rid of it, look for a free online editor with a simple equalizer (EQ) or, even better, a dedicated de-hum feature. These tools are designed to target the specific frequency of the hum (typically 50Hz or 60Hz, depending on your country's power grid) and turn it down without messing with the rest of your audio. Think of it like using a scalpel to remove a single bad thread instead of tearing the whole cloth.
Reducing Wind and Plosives
Wind noise is a beast to deal with because it's not a consistent frequency; it's just chaotic, low-frequency rumbling that can completely overwhelm a microphone. Plosives—those bursts of air from saying "p" and "b" sounds too close to the mic—create a similar bassy pop that can be just as jarring.
A two-pronged attack works best here:
- Start with a High-Pass Filter: This is a simple but incredibly powerful tool you'll find in most online editors. It just cuts out all audio below a certain frequency. By setting it somewhere around 80-100Hz, you can get rid of the worst of the wind rumble without making the speaker's voice sound thin.
- Make Manual Volume Adjustments: For sudden, loud gusts of wind, you’ll probably need to get your hands dirty. Find that specific spot on the audio waveform and manually dip the volume just for that moment. It takes a little more effort, but it's extremely effective.
Managing Clicks and Pops
Mouth clicks, lip smacks, and other sharp, transient noises can be super distracting in spoken-word content like podcasts or voiceovers. These are very short, high-frequency sounds that automated tools can sometimes miss.
The key to removing clicks without damaging the main audio is speed and precision. You need a tool that lets you zoom way in on the waveform, identify the tiny spike that represents the click, and either delete or silence just that minuscule section.
Many creators are now adopting these integrated workflows. For YouTubers and podcasters, this means using free online tools to strip out wind, clicks, and traffic from their uploads instantly. Some services even support bulk jobs with email alerts—no software hassles, just upload, process with AI, and download. You can see how popular these solutions have become by exploring the market research on background noise reduction.
This hybrid approach combines the broad strokes of AI with the targeted fixes only a focused tool can provide. Another common issue, room echo, also requires its own specific strategy; you can learn more about how to remove echo from your audio in our detailed guide.
You've put in the work to clean up your audio online for free, and now you're at the finish line. Don't stumble here. Getting the final step right—handling your export settings, understanding privacy, and knowing the tool's limits—is just as important as the cleanup itself. This is where all your effort pays off.
Picking the Right Final Format: WAV vs. MP3
Once the processing is done, you'll usually get a choice between a few audio formats. The two big ones are WAV and MP3.
Here’s a simple way to think about it: WAV is the high-fidelity, uncompressed original. It’s a bigger file because it keeps every bit of audio data, making it the go-to for professional use, archiving, or if you plan to use the audio in a video project where quality is paramount.
MP3 is its smaller, compressed cousin. It's designed for easy sharing and is perfect for embedding on a website, sending in an email, or uploading to a podcast host where smaller file sizes are a huge advantage. Just match the format to where it's headed.
If you want to dig a bit deeper into the technicals, we have a whole guide explaining the difference between MP3 and WAV files.
Privacy: The Elephant in the Browser
Let's be real—uploading your audio to some random website can feel a little sketchy. And it should. You might be uploading unreleased songs, a sensitive interview, or just private voice notes.
Before you upload anything, take a minute to check out the tool’s privacy policy. You need to know exactly how they handle your data.
A trustworthy service will be completely transparent about what happens to your files. Look for a clear statement saying your original and processed audio are automatically deleted from their servers after a short period. If their policy is vague on this, that's a massive red flag.
The best tools build their business on trust. They know your content is your livelihood and make it a priority to keep it secure, only holding onto your files for the time it takes to process them.
Knowing the Limits of Free Tools
Free online tools are lifesavers, but they're not a free-for-all. They almost always have some guardrails in place. Knowing what they are ahead of time will save you a lot of frustration.
Here are a few common restrictions you’ll run into:
- File Size Caps: Many free services will cap uploads, often somewhere around 1 GB.
- Duration Limits: You might find that you can only process files up to a certain length, like 30 or 60 minutes.
- Usage Quotas: It's common for free plans to give you a set amount of processing time—say, one hour per month—that resets on a schedule.
For cleaning up a single podcast episode, a quick voiceover, or a short interview, these limits are usually no problem. But once you start dealing with longer recordings, multiple files at once, or just have a higher volume of work, you’ll quickly see the need for a paid plan.
This table gives you a quick look at what separates the free experience from the paid one.
Comparing Free vs Paid Audio Tools
When you're just starting out, free tools are a fantastic way to get great results without any investment. But as your needs grow, understanding the value of a paid plan becomes crucial. Here’s a typical breakdown.
| Feature | Typical Free Plan | Typical Paid Plan |
|---|---|---|
| Processing Time | Limited (e.g., 60 mins/month) | Generous (e.g., 10-100 hours/month) |
| File Size Limit | Smaller (e.g., 1 GB per file) | Larger (e.g., 5-10 GB per file) |
| Batch Processing | Usually not available | Often includes bulk upload features |
| Priority Support | Basic or community-based | Dedicated customer support |
Thinking about these limitations helps you choose the right tool for the job you have today and lets you know when it's finally time to graduate to a more powerful solution.
Got Questions About Cleaning Up Audio Online?
Dipping your toes into the world of free online audio tools can bring up a few questions. It's totally normal to wonder about the quality, security, and limitations before you start uploading your files. Let's walk through some of the most common things people ask so you can get started with confidence.
Think of this as a quick debrief to help you avoid the common pitfalls and get the most out of these surprisingly powerful browser-based tools.
Can I Really Get Professional-Sounding Audio for Free?
For most creators, the answer is a resounding yes. Modern AI has gotten incredibly good at isolating and zapping common background annoyances. We’re talking about that low-level air conditioner hum, the whir of a computer fan, or even the rumble of distant traffic that you didn't notice while recording.
If you're creating content like podcasts, YouTube videos, or online courses, the results you can get from a good free tool are often fantastic. To the average listener, it’s a night-and-day difference that sounds clean and professional.
Now, let's be realistic. A seasoned audio engineer working in a dedicated studio will always have the edge for a Hollywood film score or a major album release. But for the rest of us, these free tools have dramatically closed the quality gap, giving you a huge audio upgrade for zero cost.
What’s the Best Audio Format to Use?
If you have a choice, always start with a lossless format like WAV.
Think of your audio file like a digital photo. A WAV file is like the raw camera image—it contains every single bit of original data. This gives the cleanup AI the richest, most detailed information to work with, allowing it to make a much cleaner distinction between your voice and the noise you want to remove.
But don't stress if all you have is a high-quality MP3. You can still get great results. The most important thing is always the quality of the original recording itself. A clean, well-recorded MP3 will always beat a distorted, clipped WAV file after processing.
The rule of thumb is simple: give the tool the best quality source file you have. The more data the AI has to analyze, the better and more natural your final audio will sound.
It’s the easiest win you can get before you even hit the "upload" button.
How Do I Know My Uploaded Files Are Safe?
This is a big one, and you’re right to be cautious. You should only ever use services that are crystal clear about their privacy practices. Before you upload a sensitive interview or your next big project, take a minute to find and read their privacy policy.
A trustworthy service will explicitly state that they automatically delete your original and processed files from their servers after a short period, like a few hours. This ensures your content isn't just hanging around indefinitely. If a tool is vague about how it handles your data or makes you hunt for its policy, that's a serious red flag.
What If the AI Cleaner Doesn't Fix Everything?
AI tools are brilliant for doing the heavy lifting and can often get you 90% of the way there in seconds. But they're not magic. They can sometimes miss sudden, sharp sounds—a dog barking, a door slamming, or you accidentally bumping the mic.
When that happens, your job isn't over; you just move on to phase two.
If you still hear a few stray noises after running the AI cleaner, your next move is to open the file in a free online audio editor. These tools give you manual control to fix those last few imperfections. You'll typically find features like:
- Waveform Editing: This lets you see the audio visually. That dog bark will look like a big spike. You can just highlight that tiny section and delete or silence it.
- Spectral View: This is a more advanced view that shows you a map of all the frequencies in your audio. It’s perfect for surgically removing things like a faint phone notification that has a distinct "shape" in the spectral display.
This two-step process—a quick automated pass followed by a targeted manual edit—is an incredibly effective workflow that costs you nothing.
Ready to hear the difference for yourself? SimpleClean uses powerful AI to remove background noise and enhance speech with a single click. Upload your file and get studio-quality audio in minutes, completely free to start. Get your first hour of audio cleanup free at SimpleClean.