Getting your audio right isn't just about fancy tools. It's about combining smart AI for the heavy lifting with some classic manual techniques to really make it shine. The process boils down to finding the noise, letting software like SimpleClean handle the bulk of the cleanup, and then adding those finishing touches—like EQ and de-essing—that signal a pro.
Why Crystal-Clear Audio Is No Longer Optional

Let's cut to the chase. We're all drowning in content—podcasts, video meetings, social media clips. In this environment, bad audio is the fastest way to get skipped. It’s more than just a minor annoyance; it's a credibility killer that screams to your audience that you don't respect their time. If someone has to fight through a background hum or wince at harsh "S" sounds, they're gone.
This guide isn't just about hitting a "remove noise" button. We're going to dig into why you need to clean up audio with purpose and lay out a clear path to getting that polished, professional sound.
The Psychology of Bad Sound
Poor audio hits listeners on a subconscious level. When the brain is forced to work overtime just to separate your voice from the noise, it gets tired. This is called cognitive fatigue, and it’s a silent killer for your message. Research on auditory processing has shown that too much background noise torpedoes both comprehension and memory.
Your audience might not consciously think, "Wow, this audio is terrible," but they'll feel it. They'll get distracted, their minds will wander, and eventually, they’ll just click away. We’ve all been there:
- The Important Client Call: That weird echo on the line makes you sound far away and less confident, chipping away at trust before you even get to the important stuff.
- The Online Course: Students trying to learn over the drone of your air conditioner will retain less and are far more likely to leave a frustrated review.
- The Passion Project Podcast: You record a fantastic interview outdoors, but the wind noise makes the whole thing unlistenable. All that effort, wasted.
Bad audio is the digital equivalent of showing up to a job interview in a wrinkled shirt. It signals a lack of preparation and respect for the listener, instantly damaging your authority on the subject.
From Frustration to Flawless Audio
The good news? You don't need an audio engineering degree or a thousand-dollar mic to sound amazing anymore. Great sound is more accessible than ever. The secret is having a solid workflow that pairs powerful, modern tools with a few fundamental techniques.
Throughout this guide, we'll walk through that entire process. We'll start with how to spot common audio issues, get your files prepped the right way, and use AI-powered cleaners to do the grunt work. Then, we’ll get into the hands-on tweaks—like EQ and gating—that add that final layer of professional polish. Think of this as your complete playbook for making sure your message is always heard, loud and clear.
Getting Your Audio Ready for Cleanup
Before you even think about opening an editing app, there’s some prep work to do. Taking a few minutes to get organized can be the difference between a quick, painless cleanup and an afternoon spent chasing your tail with frustrating edits. This isn’t just busywork; it's about building a solid foundation so every move you make later actually counts.
Diving straight into noise reduction without a plan is like trying to drive across a new city without GPS. You might get there, but you’ll probably take a dozen wrong turns and waste a ton of time. The idea here is to be intentional, not just reactive.
First, Just Listen
This is the most important step, period. You can't fix what you can't hear. Grab a good pair of over-ear headphones—they're best for isolating sound—and listen to your raw recording all the way through. Pay attention to everything, not just the main speaker's voice.
As you listen, jot down notes with timestamps. You’re basically a detective trying to identify all the different audio culprits.
- Steady-State Noise: This is the constant stuff. Think of the low drone of an air conditioner, the hiss from an old amplifier, or the whir of a computer fan. It's predictable.
- Transient Noise: These are the quick, sharp sounds that pop up and disappear. A mouth click, a keyboard tap, a door slamming, or a digital glitch are all classic examples.
- Ambient Noise: This is the unpredictable background clutter. A distant siren, a dog barking next door, or muffled voices from another room fit into this category.
- Vocal Quirks: Listen specifically for those harsh "s" sounds (sibilance) or the big, punchy "p" and "b" sounds (plosives). They aren't technically "noise," but they often need to be tamed.
Being able to tell the difference between a 60Hz electrical hum and the broadband hiss from a cheap microphone preamp is what separates the pros from the amateurs. Each problem has its own unique fix, and a good diagnosis is half the battle.
Get Your Files in Order
A messy project folder is a recipe for a headache. Before you touch a single file, set up a simple, logical folder structure. This little bit of housekeeping prevents you from accidentally saving over your original files and makes finding things a breeze later on.
A good, simple structure looks something like this:
- Project Main Folder (e.g., "Podcast Episode 42 Interview")
- RAW Audio (Your original, untouched recordings live here.)
- PROCESSED Audio (This is where your cleaned-up files will go.)
- FINAL Mix (For the finished product, once you add music or other elements.)
Always, always, always back up your raw audio. Make a copy of your original files and only work on the duplicates. This is your safety net. There's nothing worse than realizing you've permanently baked a weird processing sound into your only copy of an important recording.
Start with the Best Possible Source
The quality of your finished audio is directly linked to the quality of the file you start with. If you can, always record and edit using a lossless audio format like WAV or AIFF. These formats keep all the original audio data, giving you much more to work with during the cleanup process.
Trying to clean up a compressed file like an MP3 is like trying to restore a blurry, faded photo. A lot of the detail is already gone, which makes it incredibly difficult to separate the voice from the noise. If your original recording levels were too low, you might also want to read our guide on how to safely increase microphone volume without adding extra noise.
The push for crystal-clear sound is huge right now. The global market for noise suppression components—the tech that helps clean up audio in our everyday gadgets—was valued at USD 24.15 billion and is projected to hit USD 73.04 billion by 2033. It just goes to show how critical clean audio is becoming in everything we use.
The Modern AI-Powered Audio Cleanup Workflow
Getting started with AI audio tools isn't about learning a complex new piece of software. It’s about shifting your mindset to a smarter, faster workflow. If you've ever spent hours painstakingly applying filters or hunting down every little click and pop, you know the grind of traditional audio cleanup. The new approach, powered by tools like SimpleClean, completely flips that script. It lets intelligent analysis do the heavy lifting for you right from the start.
This isn't about letting a robot take over. Think of it as augmenting your own ears. AI is fantastic at telling the difference between the human voice and all the junk you don't want—the hiss, the hum, the background chatter. By handing off that tedious work to an algorithm, you free yourself up to focus on the creative side of things that really make your audio shine.
From Upload to Analysis: How It Works
The first real step in the process is feeding your audio to the AI. This is where that initial prep work really pays off. When you upload a high-quality WAV file, you’re giving the AI more data to work with, which almost always means a cleaner, more natural-sounding result. Most tools, including SimpleClean, make this easy with a simple drag-and-drop interface.
Once your file is uploaded, the magic happens. The AI doesn't just slap on a generic filter. Instead, it dives deep into the waveform, analyzing the unique frequencies of speech versus the tell-tale patterns of common noise.
- Dialogue Detection: The AI figures out exactly where the talking happens.
- Noise Profiling: It identifies and isolates those annoying, constant sounds like an air conditioner humming or a faint electronic hiss.
- Transient Identification: It pinpoints those sudden, sharp noises—a mic bump, a loud click, or a keyboard tap.
This detailed analysis is what makes AI so powerful. It can tackle a bunch of different problems all at once, saving you from having to stack multiple plugins and tweak endless settings for each issue.
Audio issues come in all shapes and sizes. Sometimes, a quick AI pass is all you need, while other problems might require a more hands-on approach. Here’s a quick breakdown of common problems and the best way to tackle them.
Common Audio Problems and AI Solutions
This table can help you quickly decide whether to lean on an AI tool or roll up your sleeves for some manual work.
| Audio Problem | Description | Primary Solution (AI vs. Manual) | Specific Technique/Tool |
|---|---|---|---|
| Background Hiss/Hum | A constant, low-level noise from electronics or ventilation. | AI | AI Noise Reduction (like SimpleClean), Noise Profiling |
| Background Chatter | Distant, unintelligible conversations or crowd noise. | AI | AI Dialogue Isolation, Spectral Repair |
| Room Reverb/Echo | Sound reflecting off hard surfaces, making speech sound distant or hollow. | AI | AI De-reverberation Tool |
| Plosives ('P' Pops) | A blast of air hitting the mic on "p" or "b" sounds. | Manual | High-Pass Filter (EQ), Pop Filter during recording |
| Sibilance ('S' Hiss) | Harsh, piercing "s" or "sh" sounds that are sharp on the ears. | Manual or AI | De-esser Plugin (Manual), some advanced AI tools have this built-in |
| Mouth Clicks/Pops | Small, sharp clicks from saliva or mouth movements. | AI or Manual | AI Click & Pop Removal, Manual editing in a DAW |
| Wind Noise | Low-frequency rumbling caused by wind hitting the microphone. | AI | AI Wind Reduction, often paired with a high-pass filter |
Ultimately, the best workflow often involves a combination of both. Let the AI handle the broad strokes, then use your own judgment for the fine-tuning.
Beyond a Single File: The Power of Bulk Processing
For most creators, cleaning audio isn't a one-and-done deal. If you're a podcaster, you might have multiple guest tracks. If you're a video editor, you could have a whole series of voiceovers to get through. This is where batch processing becomes an absolute lifesaver. Instead of feeding files into the cleaner one by one, you can queue up an entire project's worth of audio and let it run.
Honestly, this feature is a game-changer. Imagine you just finished a documentary interview and have ten separate clips to clean up. You can upload them all at once, let the AI do its thing in the cloud, and get a notification when they’re all ready. What used to be hours of mind-numbing work is now just a few minutes of setup.
AI batch processing automates the most tedious part of audio post-production. It gives creators back their most valuable resource—time—so they can focus on storytelling instead of technical chores.
Before you even get to the upload stage, a little organization goes a long way. This simple workflow shows how to prep your files to get the best results from any tool.
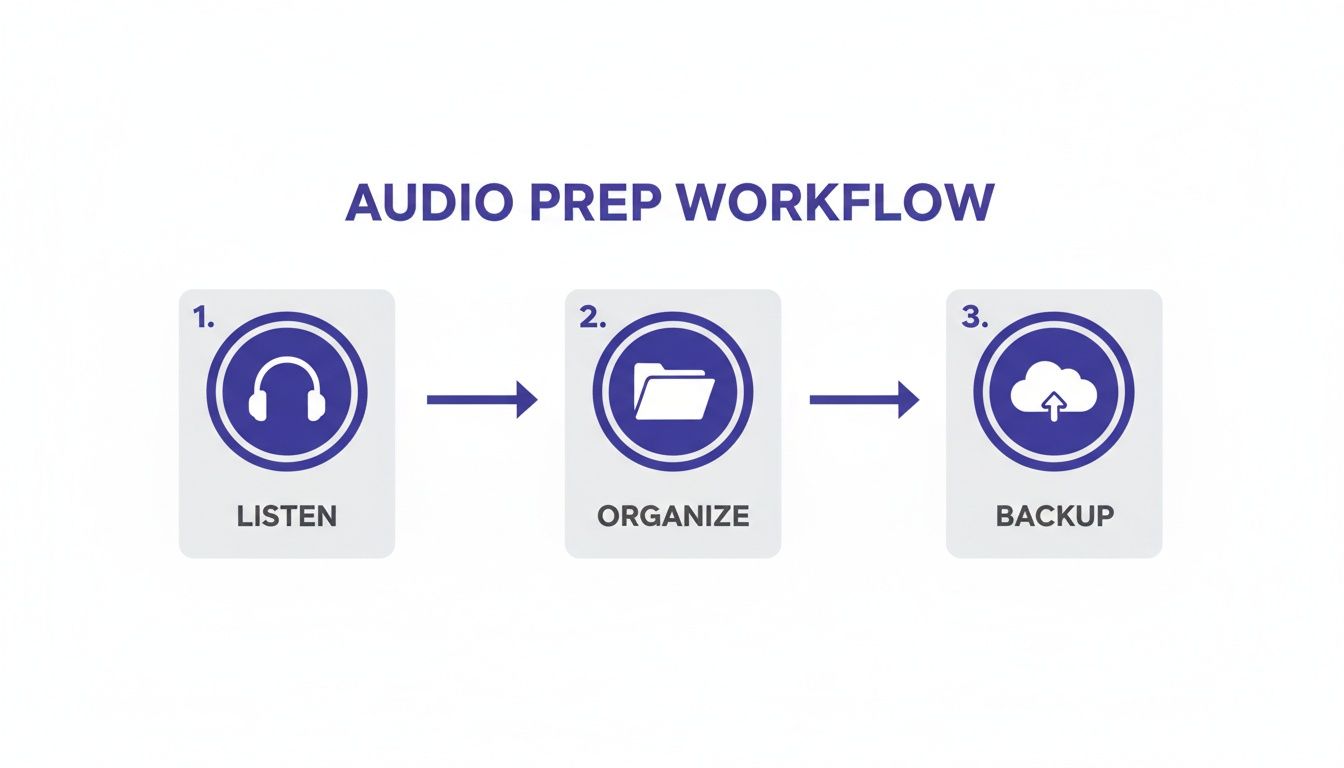
As you can see, it all starts with listening critically, getting your files in order, and making backups. This groundwork sets the stage for the AI to deliver its best possible performance.
Getting Your Files Out: Making Sense of Export Settings
Once the AI has worked its magic, the last step is to get your clean audio back. The settings you choose here are crucial for balancing pristine quality with a practical file size. Let's cut through the jargon.
File Format (WAV vs. MP3): My rule of thumb is simple. If you're going to do any more editing—like adding music or tweaking EQ—export as a WAV. It’s a "lossless" format, meaning it keeps every bit of audio data. If the audio is completely finished and ready for the world, MP3 is your best bet. It’s smaller, which is perfect for podcasts and web streaming.
Bitrate (for MP3): This controls the file's quality and size. For spoken-word content, you really don't need to go crazy. 128 kbps is a great standard for stereo files, and 96 kbps works perfectly for mono. Going higher gives you a bigger file with almost no noticeable quality improvement for voice.
Sample Rate: This is how many "snapshots" of the audio are taken per second. 44.1 kHz is the standard for CDs and is more than enough for almost all online content. Video projects often use 48 kHz. The best practice? Just stick with whatever your original recording was, unless you have a very specific reason to change it.
The demand for clean audio is exploding. The market for noise reduction software is projected to balloon from USD 2.31 billion to an incredible USD 45.02 billion by 2034. That growth is fueled by everything from remote work to the boom in content creation. With 71% of electronics manufacturers already building noise suppression into their devices, it's clear that people expect and demand crystal-clear sound.
Getting a handle on these AI workflows and export settings is what separates amateur audio from a professional product. You can spend less time fighting with your files and more time creating something great. If you want to get a bit more technical, we've put together a deeper look into how software-based noise cancellation operates.
Adding the Final Polish: Manual Techniques for Pro-Level Sound
AI cleaners are workhorses, and they can get your audio 90% of the way there. Seriously, they do the heavy lifting beautifully. But that last 10%? That’s where you step in. This is where a little hands-on tweaking turns a "clean" recording into a "professional" one, adding a human touch that no algorithm can fully replicate.
Think of AI as the ultimate prep chef, dicing and sorting everything perfectly. You're the head chef, taking those prepped ingredients and seasoning them just right for the final presentation. We’re not fixing huge problems here; we’re shaping the sound to be its absolute best.
Sculpting the Tone with an Equalizer (EQ)
The most powerful tool you have for this final shaping is the equalizer, or EQ. It lets you turn up or down specific frequencies, giving you precise control over the tonal character of a voice or instrument. It’s like the bass and treble knobs on your old stereo, but with surgical precision.
A classic problem, especially in home studio recordings, is that "muddy" or "boomy" quality in a voice. This almost always hangs out in the 200-500 Hz frequency range.
- Fixing Muddiness: Try making a gentle cut somewhere in that 200-500 Hz range. You don't need much—even a small 2-3 dB reduction can instantly make a voice sound clearer without making it sound thin or weak.
- Adding Clarity and Presence: To help a voice stand out, especially against music, try a subtle boost in the 2-5 kHz range. This is where the crispness of consonants lives, and a little lift here brings a voice forward.
The real secret to EQ is subtlety. If you push things too far, you'll end up with a harsh, unnatural sound. Always A/B your changes—toggle the EQ on and off—to make sure you’re actually improving things.
A Pro Tip for EQ: Always try to cut before you boost. It's far more natural to remove a frequency that's causing a problem than it is to add a frequency that isn't really there. This "subtractive EQ" approach almost always gives you a cleaner result.
Taming Sibilance with a De-Esser
Ever listen back to a recording and wince every time someone says an "s" or "sh" sound? That sharp, piercing hiss is called sibilance. It’s a super common issue, often made worse by certain microphones. Thankfully, there’s a specific tool for it: a De-Esser.
A De-Esser is basically a smart compressor that only listens for one thing. It springs into action to lower the volume only when it detects those specific high-frequency sounds, which usually live between 5-8 kHz.
So, if you’re editing an interview and the guest's "s" sounds are whistling, you don't have to go through and manually dip the volume on every single one. Just apply a De-Esser, set the threshold so it only catches the harshest peaks, and it will smooth them out while leaving the rest of the audio untouched. It’s a graceful way to tame the hiss without sacrificing vocal brightness.
Creating True Silence with a Noise Gate
After your AI tool has done its magic, you might still hear a tiny bit of leftover room tone or hum in the silent gaps between words. A Noise Gate is the perfect tool for zapping that last bit of noise.
It works like an automatic "on/off" switch for your audio.
You just set a volume level, called the threshold.
- When the audio is louder than the threshold (like when someone is talking), the gate stays open, and you hear everything.
- The moment the audio drops below that threshold (in the pauses), the gate slams shut, creating total silence.
This is a fantastic trick for getting that ultra-clean, polished feel on voiceovers and podcasts. Just be careful not to set the threshold too high, or you'll risk chopping off the soft beginnings and ends of words. Subtle settings are your friend here.
While a noise gate is great for this, if you're battling more significant room sound or reflections, you might need a different approach. For a deeper dive into that, check out our guide on how to remove echo from audio recordings.
Tackling the Tough Stuff: Advanced Audio Problems

Sometimes, you’re up against more than just a bit of background hiss. Think of a field recording on a windy day, that nagging electrical buzz from a sketchy outlet, or an interview where a side conversation keeps bleeding into the main track. These are the audio nightmares where a simple "denoise" button just won't do the trick.
For these gnarly issues, you need to get a bit more hands-on. The best approach I've found is a hybrid one: let an AI tool do the heavy lifting first, then come in with manual tools for the fine-tuning. This layered strategy can help you clean up audio you might have otherwise written off as a lost cause.
How to Deal With Destructive Wind Noise
Wind is a notorious pain to remove. It's not a steady sound; it's a chaotic, low-frequency rumble that gusts and swells, often completely swallowing the speaker's voice. A generic noise reducer usually chokes on this, leaving behind weird, gurgling artifacts.
A much better game plan involves two steps:
- Hit it with a dedicated AI wind reduction tool first. Tools like SimpleClean are trained on countless hours of windy recordings. They're shockingly good at telling the difference between turbulent air and a human voice. Make this your first, most aggressive pass.
- Clean up the rest with a manual high-pass filter (HPF). Most of the leftover wind rumble will live in the super-low frequencies, usually below 100 Hz. By gently rolling off this low-end with an HPF, you can remove the mud without making the speaker's voice sound thin.
This one-two punch lets the AI handle the chaotic, unpredictable part of the noise, while you use a simple EQ move to tidy up what's left.
Killing That Annoying Electrical Hum and Buzz
That constant hum you hear is almost always electrical, caused by ground loops or equipment that isn't properly shielded. It shows up as a steady tone at a very specific frequency—60 Hz in North America or 50 Hz in Europe—plus a few fainter copies of that tone higher up the frequency spectrum (called harmonics).
An AI cleaner can often nail this, but for a really faint hum, a manual approach can be even more precise.
- Find the Hum on a Spectrum Analyzer: Use an EQ with a spectrum analyzer to visually pinpoint the hum. You'll see a sharp, tall spike sticking out at 50 Hz or 60 Hz.
- Use a Notch Filter: A notch filter is like a surgical scalpel for audio. It makes a super deep, super narrow cut at one specific frequency. You can place these notch filters right on the main hum frequency and its most obvious harmonics (120 Hz, 180 Hz, etc.).
This technique is fantastic because it surgically removes only the buzz, leaving the rest of the audio completely untouched. It’s a crucial skill when you need to clean up audio without causing collateral damage.
Erasing Clicks, Pops, and Other Sudden Noises
Out-of-the-blue sounds like a cough, a door slam, or a digital pop can ruin a perfect take. A standard noise reducer will miss them entirely because they’re isolated events, not a constant background noise. For these, your absolute best friend is a spectral repair tool.
Think of your audio as an image. A spectral editor shows you that image, with time running left-to-right and pitch running bottom-to-top. A loud cough will look like a bright, ugly blob on that display.
Spectral repair is basically Photoshop for sound. You can literally see the unwanted noise, draw a box around it, and tell the software to remove it. It then intelligently rebuilds the audio in that spot using the sound from the surrounding area.
This is an incredibly powerful way to salvage recordings. You can remove a single stray sound without ever touching the dialogue happening underneath it. It's the kind of precision that truly separates good audio work from great work.
Frequently Asked Questions About Cleaning Audio
Jumping into audio cleanup always brings up a few questions. You're probably wondering if that one really noisy file is a lost cause, or if you risk making things sound worse. Let's tackle some of the most common questions I hear from people just getting started.
Can I Really Fix Extremely Noisy Audio?
Honestly, you'd be shocked at what's possible now. Modern AI tools are incredibly good at telling the difference between a human voice and all sorts of background chaos.
Of course, there are limits. If the background noise is so loud it completely buries the speaker, you might be out of luck. But for most situations, it's absolutely worth running the file through an AI cleaner before giving up. I've seen it rescue recordings I was sure were goners.
One pro tip: always start with the best quality file you have. A lossless format like WAV gives the AI much more information to analyze, which almost always leads to a cleaner, more natural-sounding result.
Does Cleaning Audio Reduce Its Quality?
This is a great question, and the answer is: it can if you get too aggressive. Pushing noise reduction too hard is what creates those weird, "watery" or robotic artifacts that scream "over-processed." You can literally strip the life right out of the original voice.
The real art is finding that sweet spot—where the distracting noise is gone, but the voice you want to keep sounds full and natural.
This is exactly why I'm a big believer in a hybrid approach.
- Let a smart AI tool like SimpleClean do the initial heavy lifting.
- Then, use your own ears and apply subtle manual tweaks—a bit of EQ, maybe a De-Esser—for that final polish.
- Always, and I mean always, A/B test your cleaned audio against the original. It’s the only way to be sure you haven't taken it too far.
What Is the Difference Between Noise Reduction and Audio Restoration?
People often use these terms interchangeably, but there's a real distinction. The easiest way to think about it is that noise reduction is just one tool inside the much larger audio restoration toolkit.
Noise reduction is hyper-focused on getting rid of steady, consistent background sounds—think the hum from an air conditioner, the hiss from an old preamp, or a constant fan drone. Audio restoration is the whole shebang. It covers noise reduction plus fixing things like sudden clicks, vinyl pops, digital clipping, and even correcting tonal problems with EQ.
Should I Normalize My Audio Before or After Cleaning It?
This one is non-negotiable, and getting the order right is critical. Always clean your audio before you normalize it.
Think about it: normalizing (or compressing) boosts the volume of everything in the track. If you do that first, you're also cranking up the volume of every bit of hum, hiss, and background noise you were trying to eliminate. This just makes the cleanup tool's job way harder, and the results will be less clean.
A professional workflow always looks like this:
- Edit: Get your clips in order and cut out any mistakes.
- Clean: Remove all the unwanted noise, clicks, and hum.
- Enhance: Now you can apply your EQ, compression, and finally, normalize to bring everything up to the final level.
Ready to hear what AI can do for your tracks? SimpleClean is designed to eliminate background noise and make voices sound crisp and clear in just a few clicks. Give it a try for free and see how easy it is to get studio-quality sound.