
Quick answer
To remove background noise in Filmora on desktop, select your clip in the timeline, open the right-side Audio or Properties panel, and use the denoise tools there, as shown in Filmora’s audio editing guide. On current Windows documentation, Filmora lists six cleanup modes: AI Speech Enhancement, Wind Removal, Normal Denoise, DeReverb, Hum Removal, and Hiss Removal, according to the Windows AI Audio Denoise guide. On current Mac documentation, Filmora highlights an AI Denoise workflow with Hum Removal, Hiss Removal, and DeReverb in the Mac AI Audio Denoise guide. On mobile, select the clip, open the toolbar, and use Noise Reduction, per Wondershare’s Filmora mobile support article.
The safest workflow is to test one mode at a time, start with the lightest useful setting, compare the exact same spoken sentence before and after, and export a short sample before processing the whole project. If stronger cleanup makes the voice thin, metallic, brittle, or watery, stop pushing Filmora and clean the exported file separately instead of stacking more processing.
Where Filmora’s background-noise controls live now
Filmora’s current documentation places audio cleanup in the clip properties area rather than in an old standalone checkbox workflow.
- Desktop: Import media, add it to the timeline, select the clip, then use the right-side Audio or Properties panel to access denoise-related controls, as shown in Wondershare’s desktop audio guide.
- Windows docs: Show a dedicated AI Audio Denoise workflow with six mode choices in the Windows guide.
- Mac docs: Show an AI Denoise workflow, but the visible options called out in the current guide are not identical to Windows, according to the Mac guide.
- Mobile: Select the clip in the timeline, open the toolbar, and use Noise Reduction for one-tap cleanup, as shown in Filmora mobile support.
If you are following an older tutorial and cannot find a simple Remove background noise checkbox, that is likely because the interface and wording changed across versions. That older terminology appears in legacy documentation such as the Filmora 12 Mac user guide, which helps explain why older screenshots may not match what you see today.
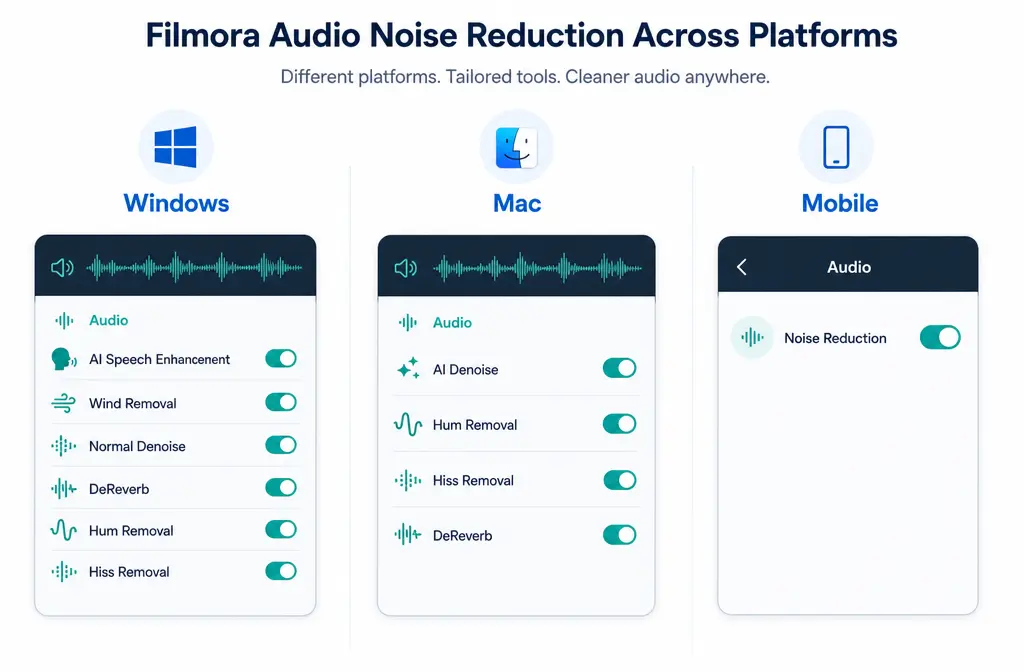
Windows vs. Mac vs. mobile: why Filmora tutorials do not always match
This is one of the main reasons users think the feature is missing.
| Platform | What the docs currently show | What to expect |
|---|---|---|
| Windows | AI Speech Enhancement, Wind Removal, Normal Denoise, DeReverb, Hum Removal, Hiss Removal | Most detailed mode selection and the clearest Low / Mid / Strong note for Normal Denoise |
| Mac | AI Denoise workflow with Hum Removal, Hiss Removal, and DeReverb called out | You may not see the same menu wording or identical set of options shown in Windows tutorials |
| Mobile | Noise Reduction from the clip toolbar | Fast one-tap cleanup, but far less control for troubleshooting |
Best takeaway: if a tutorial shows six Windows modes and your Mac screen does not, that does not automatically mean Filmora is broken. It may be a platform or version mismatch based on the differences between Wondershare’s current Windows and Mac documentation.
What Filmora can remove well
Based on Filmora’s current named tools, it is a reasonable first pass for:
- Steady hiss
- Electrical hum
- Some room reverb or echo
- Some wind noise
- General background noise around spoken audio
That follows from the tools listed in Filmora’s audio guide and the mode-specific Windows documentation for AI Audio Denoise. It is less likely to fully rescue heavy echo, strong wind bursts, clipped dialogue, or overlapping voices. In those cases, stronger settings often trade noise reduction for damaged voice quality.
Which Filmora denoise mode should you use?
Do not start by turning on everything. Match the problem to the most specific tool first.
| If your clip sounds like... | Try this first | Why | Watch out for |
|---|---|---|---|
| General low-level room noise around speech | Normal Denoise | It is the broadest cleanup option and includes Low / Mid / Strong choices on Windows | Too much can dull consonants and make speech sound processed |
| Speech needs lift more than pure noise cutting | AI Speech Enhancement | Best fit when the voice itself needs help standing out | Can sound unnatural if combined aggressively with other cleanup |
| Wind rumble or outdoor gusts | Wind Removal | More targeted than general denoise for wind-type noise | Strong processing may thin out the voice if the wind overlaps speech |
| Room echo or reverb | DeReverb | Targets reflected room sound rather than constant hiss | Overuse can create watery or phasey speech |
| Electrical buzz or mains hum | Hum Removal | Most appropriate when the noise is a steady tonal hum | If the problem is not actually hum, this may not help much |
| Steady high-frequency hiss | Hiss Removal | Best match for air-like hiss from mic or recording chain | Too much can make dialogue dull or lifeless |
The mode names above come from Filmora’s Windows AI Audio Denoise documentation. The artifact warnings are practical editing guidance: if the voice gets worse, back off rather than stacking more tools.
Normal Denoise vs. AI Speech Enhancement
This is the comparison many Filmora users actually need.
- Use Normal Denoise when the voice already sounds decent and you mainly want to reduce general background noise.
- Use AI Speech Enhancement when the voice needs more help standing out and sounding clearer, not just quieter surroundings.
On Windows, Filmora specifically notes that Normal Denoise includes Low, Mid, and Strong levels, and that lower settings preserve more of the original audio, according to the Windows guide. That makes Low the safest starting point for talking-head videos, tutorials, webinars, and podcasts.
Best for most spoken clips: start with Normal Denoise on the lightest useful setting before trying something stronger. If the problem is clearly wind, hiss, hum, or reverb, skip straight to the matching targeted tool instead.
Safe workflow: remove noise without wrecking the voice
- Duplicate the clip or project first. Give yourself a clean fallback before testing stronger settings.
- Select the exact problem clip. Many “Filmora denoise is missing” complaints come from adjusting the wrong clip or no clip at all.
- Pick one mode based on the actual noise type. Use Hiss Removal for hiss, Hum Removal for hum, DeReverb for echo, and so on.
- Start low. If you are using Normal Denoise on Windows, begin with Low because Filmora notes that lower settings preserve more of the original signal in its Windows documentation.
- Preview the same spoken sentence each time. Do not judge only during silent gaps. A setting can make the background seem quieter while damaging intelligibility.
- Increase only if needed. Move from light to moderate cleanup rather than jumping straight to strong processing.
- Export a short test file. Check a brief section outside the preview before committing to the full export.
The compare-the-same-passage and short-export habits are practical workflow advice also echoed in this secondary workflow guide.
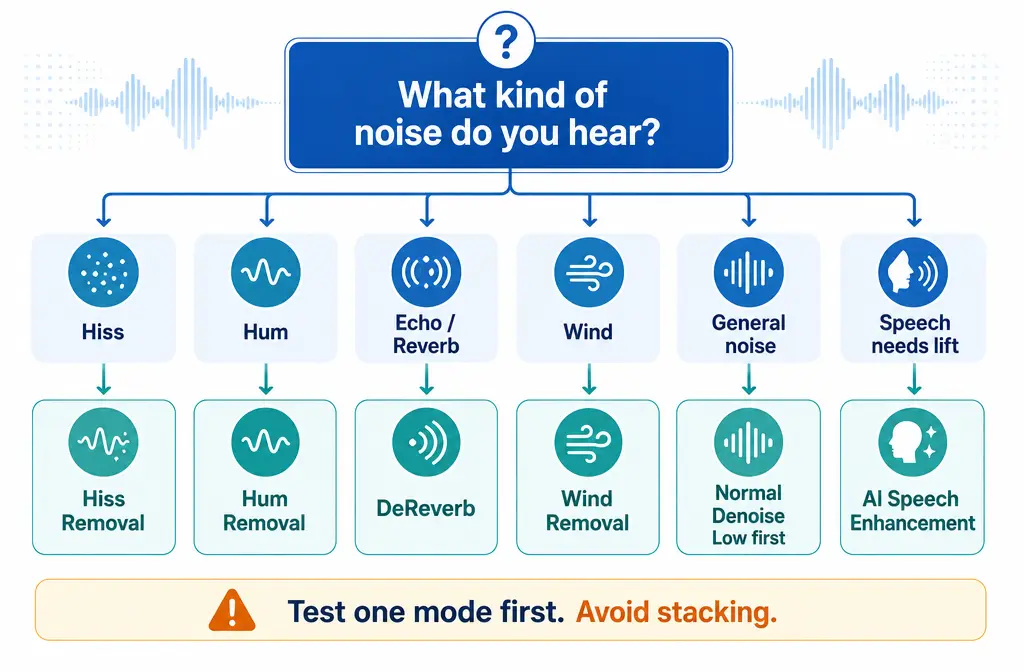
What not to stack inside Filmora
Filmora gives you multiple cleanup modes, but that does not mean you should pile them on the same spoken clip.
Avoid stacking denoise, dereverb, and speech enhancement all at once unless you have already confirmed each step helps more than it hurts. In practice, layering too many cleanup passes can make speech sound:
- Metallic
- Thin
- Brittle
- Watery
- Uneven
This is an editorial best-practice inference from Filmora’s multi-mode setup: every extra process has a chance to solve one problem while creating another. If one mode gets you most of the improvement, that is often better than pushing for a perfectly clean file that ends up less intelligible.
Best mode by problem
- Fan or AC noise: try Normal Denoise first.
- Steady hiss: try Hiss Removal first.
- Electrical buzz: try Hum Removal first.
- Room echo: try DeReverb first.
- Outdoor wind: try Wind Removal first.
- Speech buried in mixed background noise: try AI Speech Enhancement or light Normal Denoise first, but stop early if the voice gets unnatural.
Troubleshooting Filmora noise reduction
I do not see Denoise in Filmora
- Make sure the clip is selected in the timeline.
- Look in the right-side Audio or Properties panel, not just the timeline toolbar, based on Filmora’s current desktop guide.
- Check whether you are following a Windows tutorial while using Mac.
- Remember that older tutorials may show the legacy “remove background noise” wording instead of the current denoise panel.
My Mac interface looks different from Windows tutorials
That is expected based on the current documentation. Windows guides show six named modes, while the current Mac guide specifically calls out AI Denoise with Hum Removal, Hiss Removal, and DeReverb. If a Windows tutorial shows a mode you cannot find on Mac, treat it as a platform difference first, not a user error.
Strong sounds worse than Low or Mid
That is common with spoken audio. Filmora’s Windows guide explicitly notes that lower Normal Denoise settings preserve more of the original sound. If Strong makes the voice hollow, metallic, or smeared, go back down.
The preview sounded okay, but the export sounds bad
Export a short test file before the full render. If the result sounds worse after export, back off the setting, compare the same sentence again, and avoid stacking multiple cleanup modes. If artifacts remain obvious even at moderate settings, the clip may need separate cleanup outside Filmora.
Can Filmora mobile remove noise from an existing video?
Yes. Wondershare’s mobile support page shows selecting a clip and using Noise Reduction from the toolbar. It is convenient for quick cleanup, but it offers less control for careful troubleshooting.
When to stop using Filmora and clean the exported file separately
Filmora is a good first-line fix, not an unlimited restoration suite. Stop and export the audio or video for separate cleanup when you run into any of these:
- Heavy room echo that DeReverb does not tame cleanly
- Strong wind bursts
- Overlapping speakers and background noise at the same time
- Clipping or distortion in the original recording
- Artifacts appearing as soon as you move into stronger settings
That is the point where a separate cleanup pass is often safer than forcing the issue in the editor. If you want a follow-up tool after export, SimpleClean is another tool from our team for cleaning exported spoken audio before you bring it back into the edit.
Filmora workflow summary for spoken-word creators
If you are editing tutorials, interviews, webinars, podcasts, or screen recordings, the best Filmora habit is simple:
- Identify the noise type first
- Use the most specific mode available
- Start with the lightest setting
- Preview the same spoken sentence
- Export a short test
- Stop before the voice starts sounding processed
That approach beats randomly toggling every audio tool almost every time.
If your issue is more specific than general background noise, these guides may help too: remove background noise in DaVinci Resolve, remove echo in DaVinci Resolve, remove echo in Adobe Audition, and Adobe Podcast vs iZotope RX.
FAQ
Where is background noise removal in Filmora now?
On desktop, select the clip and use the right-side Audio or Properties panel, as shown in Filmora’s audio guide. On mobile, select the clip and use Noise Reduction from the toolbar.
What is the difference between Normal Denoise and AI Speech Enhancement in Filmora?
Normal Denoise is the safer first choice for general background noise when the voice already sounds decent. AI Speech Enhancement is better when the speech itself needs more help standing out. Both appear in Filmora’s Windows denoise documentation.
Does Filmora on Mac have the same denoise controls as Windows?
Not exactly, based on Wondershare’s current documentation. Windows guides list six modes, while the current Mac guide calls out a different AI Denoise workflow and specifically mentions Hum Removal, Hiss Removal, and DeReverb.
Can Filmora remove wind noise and echo from speech?
It can help with some wind and some reverb using Wind Removal and DeReverb in supported workflows, but strong wind bursts or heavy room echo may still need separate cleanup after export.
Why does Filmora denoise make my voice sound metallic or thin?
Usually because the setting is too aggressive or because multiple cleanup modes were stacked together. Back off to a lighter setting and test one mode at a time.
Should I use Low, Mid, or Strong in Filmora Normal Denoise?
Start with Low. Filmora’s Windows guide notes that lower settings preserve more of the original audio. Only increase if Low is clearly not enough.
Can Filmora mobile remove background noise from an existing video?
Yes. Filmora mobile includes a Noise Reduction tool after you select the clip in the timeline, according to Wondershare’s support article.
When should I export from Filmora and use a separate cleanup tool instead?
Do that when Filmora starts reducing noise at the cost of voice clarity, or when the source has heavy echo, strong wind, clipping, overlapping voices, or obvious artifacts from stronger settings.