How to Remove Background Noise in Audacity Without Making Your Voice Sound Robotic
If you want to remove background noise in Audacity, the key decision is whether the noise is steady or variable. Audacity’s built-in Noise Reduction works best for constant noise like fan hiss, hum, buzz, and steady room tone. It is not meant for irregular noise like background talking, music bleed, or changing traffic noise, according to the official Audacity Noise Reduction manual.
Quick Answer
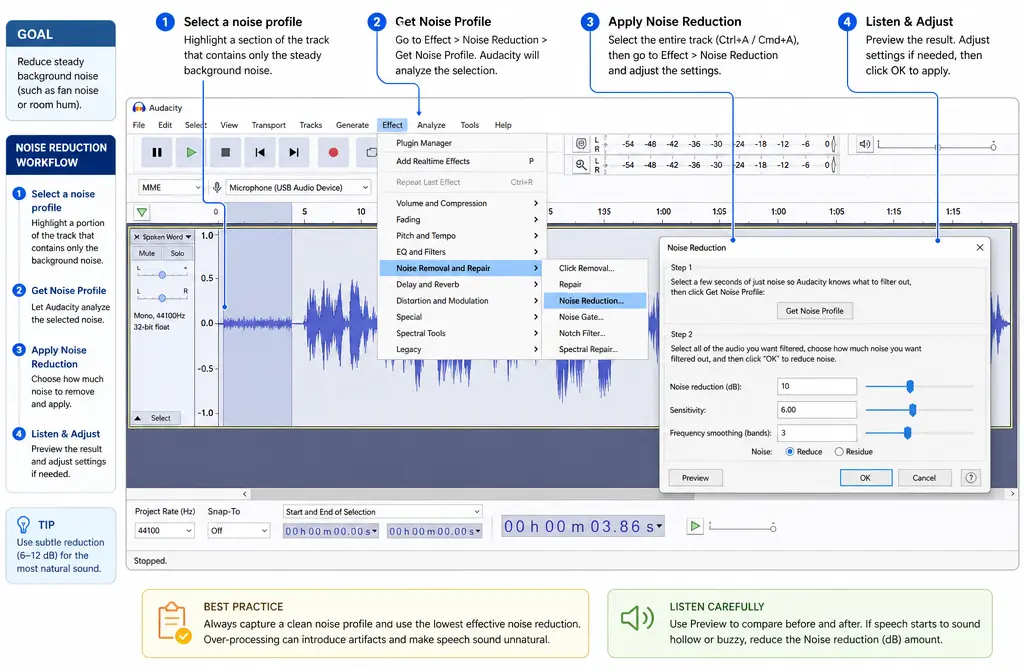
For steady background noise in Audacity:
- Select a section that contains only the noise.
- Go to Effect > Noise Removal and Repair > Noise Reduction.
- Click Get Noise Profile.
- Select the full track.
- Open Noise Reduction again, use Preview, then apply a light pass.
This is the official two-step workflow described in Audacity’s manual and Noise Reduction feature page. If Preview already makes the voice sound metallic, watery, or robotic, stop there instead of stacking more processing.
When Audacity Noise Reduction Works Best
Audacity’s built-in Noise Reduction is designed for constant background noise. Good fits include:
- Computer fan noise
- Air conditioner hiss
- Steady electrical buzz
- Consistent room tone
- Some hum problems, though a notch filter may be a better first step
Poor fits include:
- Background voices
- TV or music in another room
- Street noise that rises and falls
- Wind bursts
- Heavy room echo or reverb
That line matters because Audacity itself says the effect is not suitable for irregular sounds like talking or music in the background in the official documentation.
Before You Start
- Save a copy of your project before processing.
- Find a region that contains noise only, with no speech.
- Use the cleanest sample you can. Audacity requires at least 2048 samples, and the manual says a longer sample is better.
- Know that the noise profile is not retained after closing Audacity, so you need a new profile in a new session.
If your sample includes breaths, consonants, or the tail of a word, Audacity may learn part of your voice as noise. That is one of the most common causes of robotic-sounding speech after cleanup.
How to Remove Background Noise in Audacity Step by Step
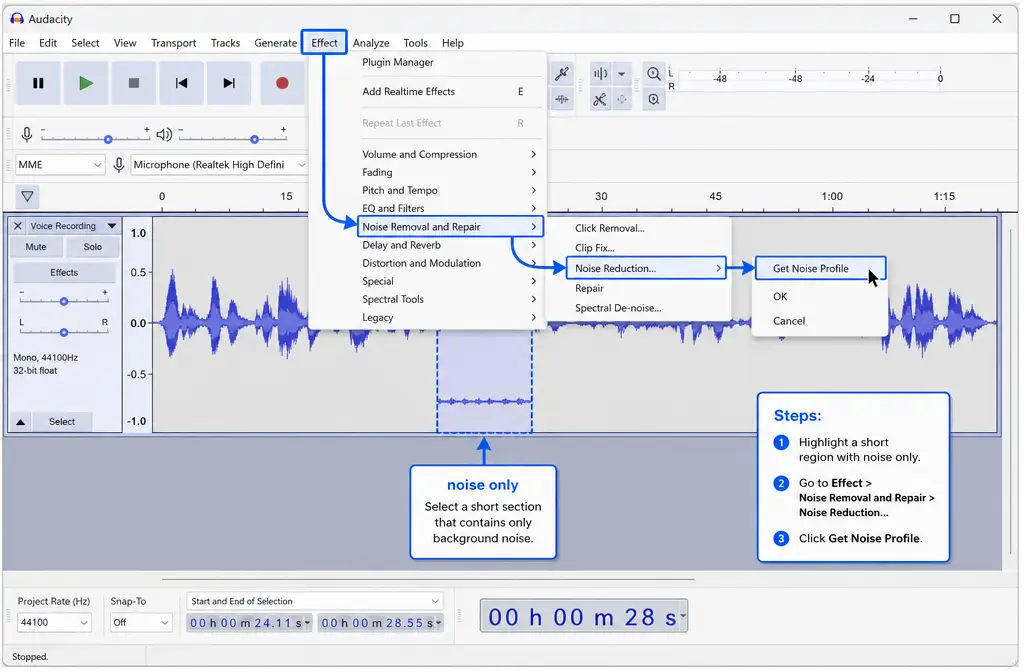
- Select the noise-only section. Highlight a short segment where nobody is speaking.
- Open the effect. Go to Effect > Noise Removal and Repair > Noise Reduction.
- Click Get Noise Profile. Audacity analyzes the sample and closes the dialog. This is normal, as noted in the manual.
- Select the audio you want to clean. Usually that means the full track.
- Reopen Noise Reduction. Go back to Effect > Noise Removal and Repair > Noise Reduction.
- Preview first. Listen for reduced hiss, but also for metallic, phasey, or underwater artifacts.
- Apply a light pass. If needed, repeat with another gentle pass instead of one aggressive pass.
That two-step profile workflow is the standard Audacity method, documented in both the manual and the feature overview.
Starter Settings for Voice That Usually Sound Safer
Audacity warns that stronger reduction increases distortion, so the safest starting point is a conservative first pass with Preview enabled rather than trying to force total silence in one move. The practical takeaway from the manual is simple: start light and listen closely.
| Control | What it does | Safer starting mindset |
|---|---|---|
| Noise reduction (dB) | How much noise Audacity tries to subtract | Start light, not aggressive |
| Sensitivity | How readily Audacity decides something is noise | Keep moderate so it does not grab your voice |
| Frequency smoothing | Blends processing across nearby frequencies | Use enough to sound natural, not smeared |
A good editing habit is to prefer multiple light passes over one heavy pass, because heavier settings are more likely to create the robotic effect creators complain about.
What Each Audacity Noise Reduction Control Does
Noise reduction (dB): Controls how much of the learned noise profile gets removed. Push it too far and speech loses detail.
Sensitivity: Controls how aggressively Audacity decides what counts as noise. If set too high, it can start treating parts of your voice as background noise.
Frequency smoothing: Smooths reduction across nearby frequencies. Too little can sound harsh or metallic; too much can soften speech clarity.
The Audacity manual notes that distortion after reduction is normal, especially when the noise is loud or variable. In real spoken-word editing, the goal is often improvement, not perfect silence.
Why Audacity Makes Voices Sound Robotic
The usual causes are:
- The noise sample was not truly noise-only.
- Noise reduction was pushed too hard.
- Sensitivity was too aggressive.
- The background noise changes over time, so the profile stops matching it.
- You are trying to remove echo, chatter, or wind with a tool meant for steady noise.
If Preview already sounds bad, take that as your stopping point.
Best Tool in Audacity by Noise Type
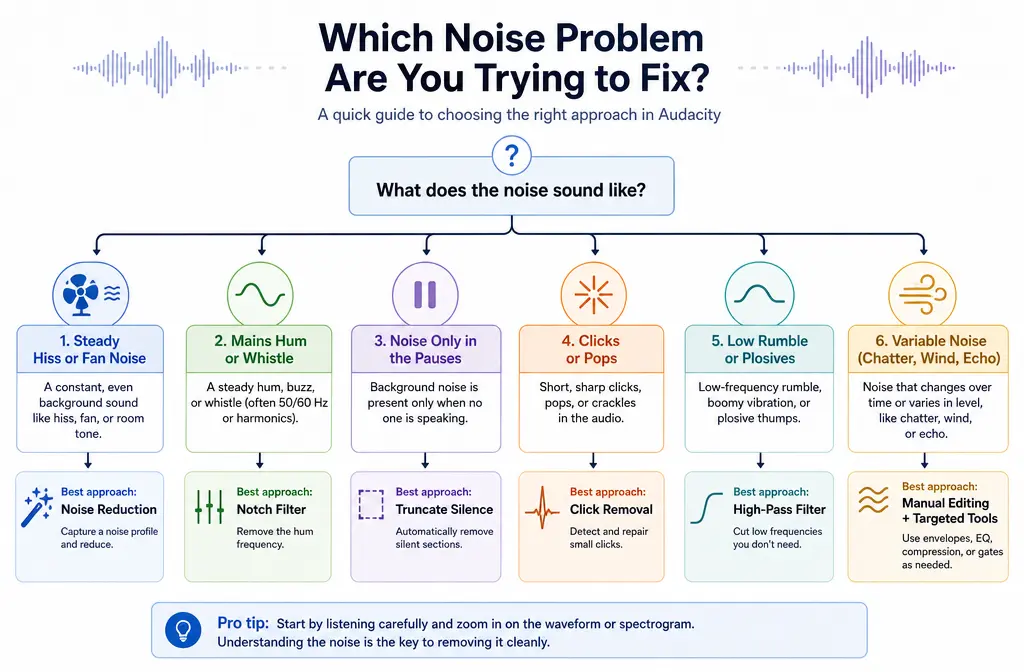
| Noise problem | Best Audacity approach | Why |
|---|---|---|
| Fan hiss, constant room noise, steady buzz | Noise Reduction | Best match for consistent background noise |
| Mains hum or narrow whistle | Notch Filter, then Noise Reduction if needed | The manual specifically points to notch filtering for hum or whistle |
| Noise only during pauses | Noise Gate | Useful for reducing gaps between phrases; see Audacity’s effects index |
| Clicks and pops | Click Removal or Repair | Better fit for short transient defects; listed in the effects index |
| Low rumble or plosives | High-pass or low-cut style filtering | Targets low-frequency problems more directly |
| Background voices, wind, echo, changing street noise | Usually not built-in Noise Reduction | These are irregular problems, which the manual says are a poor fit |
Choosing the right tool matters more than hunting for one “best” setting.
Noise Gate vs Noise Reduction in Audacity
Use Noise Reduction when noise sits underneath the voice the whole time, like fan hiss.
Use Noise Gate when the audio is acceptable during speech but the pauses are too noisy.
A gate does not actually clean noise under speech. It mainly reduces what you hear when nobody is talking, which is why it is useful for pause cleanup but not full denoising.
How to Remove Hum in Audacity
If the issue is a specific electrical hum or whistle, Audacity’s manual points toward using a Notch Filter. That is often a better first move than broad noise reduction because hum tends to sit in narrow frequency bands. After reducing the hum, you can test a light Noise Reduction pass if steady background noise still remains.
Can Audacity Remove Background Voices or Echo?
Not well with the built-in Noise Reduction effect. The official documentation says it is not suitable for irregular sounds like talking or music in the background. Echo and reverb are different problems from steady noise, so noise reduction may lower hiss while still leaving the voice boxy, distant, or hollow.
Optional AI Path Inside Audacity: OpenVINO Noise Suppression
If you want to stay inside Audacity but need another option for spoken-word cleanup, Audacity’s AI plugin ecosystem includes OpenVINO Noise Suppression. Audacity’s plugin documentation says the OpenVINO effects run locally, and the Audacity 3.7.4 changelog confirms OpenVINO effects became available on macOS in that release. Audacity’s OpenVINO macOS announcement also frames these tools as part of its AI plugin workflow.
This is best treated as an optional alternate path that may help spoken-word recordings. It is not a guaranteed fix for every kind of variable noise, wind, or echo.
When to Stop and Use a Different Workflow
You should usually stop tweaking Audacity if:
- Preview already sounds metallic or robotic
- The noise changes constantly
- There are background voices or music
- Wind bursts keep overwhelming the voice
- Room echo is the main problem
- You are stacking notch, gate, and repeated noise reduction with little improvement
If you need a faster fallback after exporting the file, SimpleClean is another tool from our team. It makes sense here only as a post-Audacity option when the recording problem is variable noise, chatter, wind, or echo rather than steady hiss.
Simple Workflow: Audacity First, Then Fallback if Needed
- Try one careful Audacity pass for steady noise.
- Use Notch Filter first if the problem is hum or whistle.
- Use Noise Gate only for pause cleanup, not full denoising.
- Export once voice quality starts dropping.
- Switch workflows instead of stacking more destructive passes.
This approach saves time and helps protect the voice from over-processing.
Troubleshooting
“Get Noise Profile does nothing.”
The dialog closing is normal. Audacity analyzes the selected sample, then you select the target audio and reopen the effect, as shown in the manual.
“Why did my voice get damaged?”
Usually because the sample was not noise-only, the reduction was too aggressive, or the recording had variable noise that the effect could not model well.
“Why didn’t anything change?”
The noise may not be steady enough, the sample may be too weak or contaminated, or the real issue may be hum, clicks, rumble, echo, or chatter rather than broad steady noise.
“Do I need a new profile every session?”
Yes. Audacity does not retain the profile after you close the app, according to the manual.
“What if there is no clean silence to sample?”
Your results will be limited because Noise Reduction depends on a noise-only sample. If you do not have one, it is usually better to change tools or methods rather than force bad subtraction.
Final Take
Audacity can remove background noise from spoken-word recordings when the problem is a steady hiss, buzz, hum, or room tone and you use a clean noise sample with conservative settings. But if the recording has background voices, wind, echo, or changing street noise, the official Audacity guidance says built-in Noise Reduction is the wrong fit. That mismatch is what usually creates the robotic sound people blame on the software.
If you want more diagnosis after trying the built-in effect, see our guide to fixing Audacity noise reduction when it isn’t working.
Sources and further reading
- Tom's Hardware | How To Remove Background Noise, Distortion in Audacity - Secondary source for broader filter-oriented context and cleanup framing.