Quick Answer
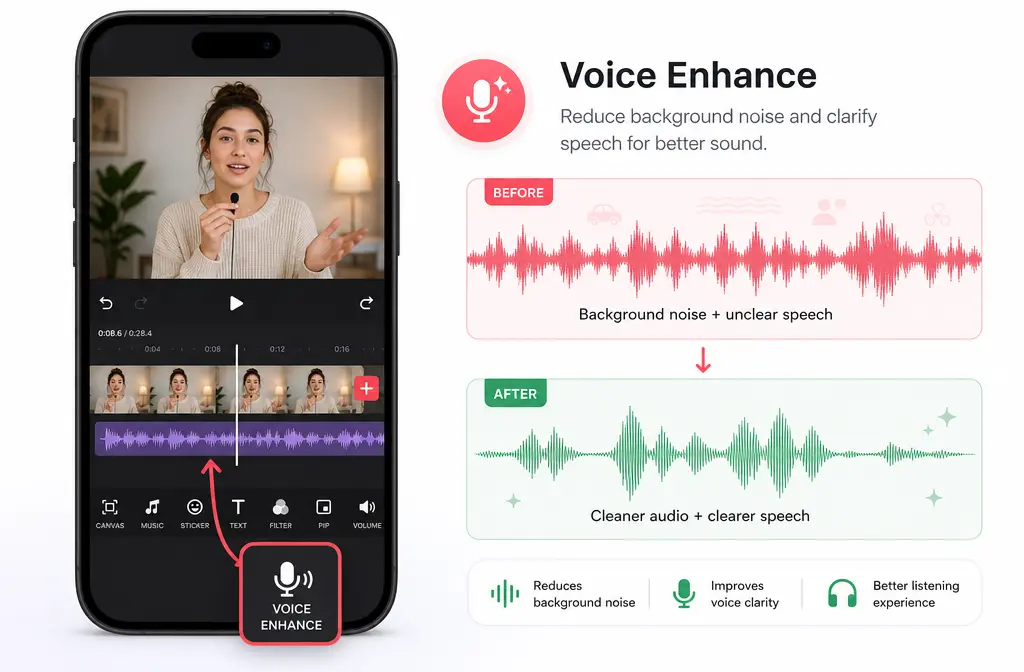
Yes, InShot can improve some noisy voice audio, but it helps most with light, steady background noise behind close speech rather than severe audio problems. On iPhone and iPad, InShot’s App Store history and feature page explicitly reference Voice enhance or AI Voice Enhance. On Android, the current Google Play listing confirms InShot as a mobile editor and mentions export support up to 4K 60fps, but it is less explicit about Voice Enhance by name. So if you want to remove background noise in InShot, the honest advice is: update the app, check whether Voice Enhance appears in your version, test it lightly, and export the file for separate cleanup if the noise is strong or the voice starts sounding metallic.
For many TikTok, Reels, Shorts, and talking-head clips, InShot is enough for a quick cleanup pass. If your audio has wind, echo, crowd noise, overlapping music, or distant dialogue, you will usually get a better result if you finish your visual edit in InShot first, export the MP4, and then clean exported InShot audio with SimpleClean.
Does InShot have noise reduction?
Sort of, yes. The clearest official wording comes from Apple’s App Store materials for InShot. The iOS version history in the research brief notes that Voice enhance appeared in version 1.92.1 on December 19, 2025, then again in 1.92.2 on December 26, 2025, and 1.92.3 on January 9, 2026. Apple also hosts an AI Voice Enhance feature page describing it as a tool that can emphasize your voice or bring surrounding ambience to life.
That wording matters. It suggests InShot is offering a voice-focused enhancement tool, not a full restoration suite with advanced controls for every kind of noise. That matches how the app is positioned overall: a fast, all-in-one mobile video editor, not a desktop DAW or specialized audio repair app.
Bottom line: InShot can reduce or improve some background noise, but you should not expect it to fully remove all noise from every recording.
Where is Voice Enhance in InShot?
This is where a lot of articles get vague. The feature name and placement can vary by version and platform, so it is safer to describe the workflow than to promise one exact button path for every phone.
- On iPhone/iPad, official Apple materials explicitly reference Voice enhance / AI Voice Enhance.
- On Android, the Google Play listing does not spell it out as clearly, so you should update InShot first and verify whether the tool appears in your in-app audio options.
- In practice, look for the tool in the audio editing controls after selecting your clip or voice track.
If you do not see it, skip ahead to what to do if the feature is missing.
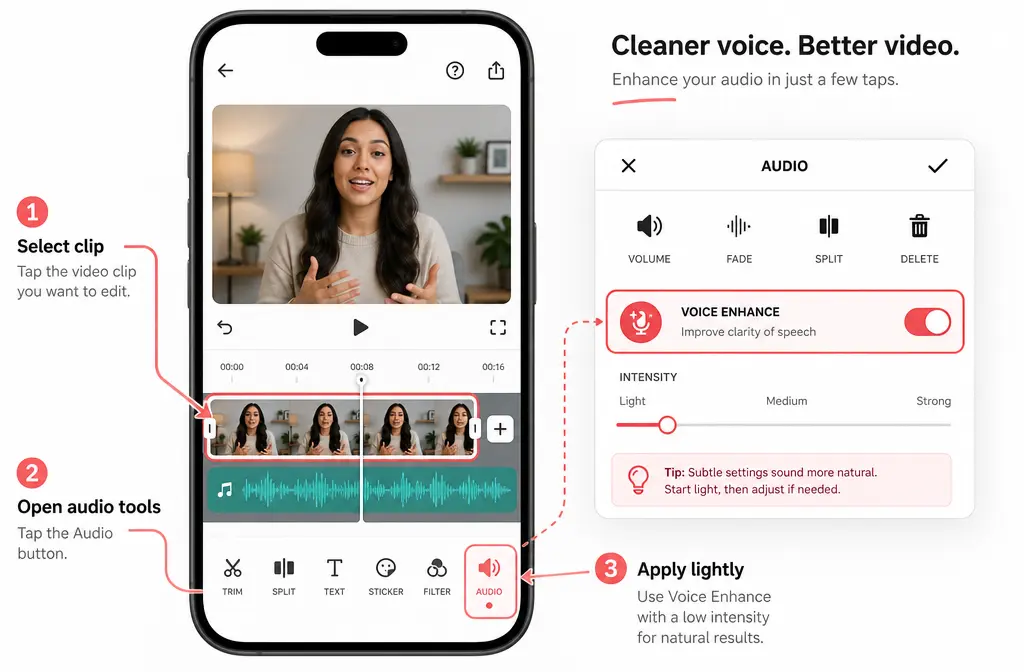
How to remove background noise in InShot for a spoken clip
If you already have your video in InShot, this is the fastest speech-first workflow.
- Open your project and select the clip with the noisy speech.
- Listen first before applying anything. Decide whether the problem is steady hiss, light room noise, AC/fan noise, street wash, wind, echo, or music bleed.
- Open the clip’s audio tools and look for Voice Enhance, AI Voice Enhance, or a similar voice-focused cleanup option.
- Apply the enhancement lightly. If your version shows a strength slider or intensity control, start low rather than maxing it out.
- Preview difficult words, especially consonants and sibilants like S, T, F, and CH. These are often the first places where overprocessing becomes obvious.
- Compare before and after. If the background becomes quieter but the voice starts sounding watery, phasey, or robotic, back it off.
- Avoid stacking too many enhancers on the same speech clip. If you are already using a voice enhancement effect, be cautious with additional processing that changes tone or ambience.
- Finish your edit and export only if the result still sounds natural.
This works best when the speaker is already fairly close to the phone or mic and the noise is not overpowering the dialogue.
Best use cases for InShot Voice Enhance
InShot is most useful when you need a quick mobile cleanup and the original recording is still understandable.
Good fits:
- Steady hiss
- Light room noise
- Fan or AC behind close speech
- Mild outdoor street noise behind a phone-recorded talking head
- Simple voiceovers recorded in a slightly noisy room
Best for: creators who want to stay inside one mobile editing app and only need a modest improvement, not forensic audio repair.
When InShot is the wrong tool
There is a point where mobile in-app enhancement stops being the smart move. If the noise is severe, the voice is far away, or the recording itself is damaged, Voice Enhance may reduce some distraction but often at the cost of a strange-sounding voice.
Poor fits:
- Strong wind
- Heavy room echo or reverb
- Overlapping music
- Crowd noise
- Distant speech
- Clipped or distorted audio
For those cases, it is usually better to complete your cuts, captions, and timing in InShot, export the MP4, and then remove background noise from the exported video with a dedicated cleanup workflow.
Why InShot can make your voice sound robotic or watery
This is a common tradeoff with aggressive noise reduction. When a tool pushes too hard, it can strip away parts of the voice along with the noise. The result is often described as metallic, robotic, watery, or underwater.
In InShot, that risk is higher when:
- The original clip is very noisy
- The speech is quiet or far from the mic
- You push the enhancement too hard
- You stack multiple processing steps that all try to “fix” the same problem
How to avoid it:
- Use the effect lightly
- Preview consonants and sibilants before exporting
- Do not assume stronger is better
- If the voice starts sounding artificial, undo it and switch to an exported-file cleanup workflow
If this issue already happened to you, our guide on how to fix metallic voice after noise reduction explains what usually causes it and how to back out of it.
Platform and version caveat: Apple’s App Store history explicitly shows Voice enhance on iOS. The Android Google Play listing is less specific. That does not prove Android lacks the feature; it just means you should update the app and confirm in the interface instead of assuming perfect feature parity.
What to do if Voice Enhance is missing
- Update InShot from the App Store or Google Play.
- Reopen the project and check the clip-level audio controls again.
- Test both imported video audio and voiceover audio, since tool placement may differ depending on what you selected.
- Verify your platform. iOS support is more clearly documented in the official Apple listing than Android.
- Use an export-first workflow if your version does not show the feature.
Because InShot is officially positioned as a mobile editor, not a desktop editor, your fallback plan should be simple: edit visually in InShot, export, then clean the finished file elsewhere.
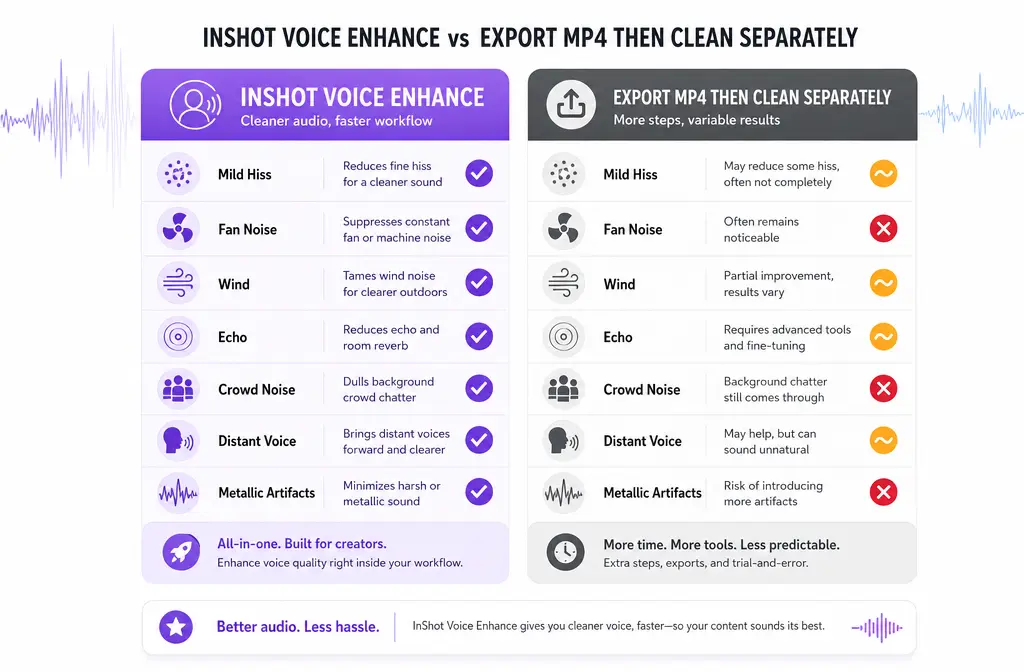
InShot vs exported-file cleanup
| Option | Best for | Usually works well on | Weak on | Main advantage |
|---|---|---|---|---|
| InShot Voice Enhance | Fast mobile edits already in progress | Light hiss, mild room tone, fan/AC behind close speech | Wind, echo, crowds, overlapping music, distant voice, distortion | You stay inside one app |
| Export MP4, then clean separately | Important voice clarity or harder recordings | Cases where in-app enhancement sounds unnatural or too weak | Less convenient than one-tap mobile editing | More control over the final speech result |
When you should export from InShot before cleaning audio
Choose the export-first route if any of these are true:
- The voice is understandable, but InShot is not cleaning enough noise
- Voice Enhance helps a little, but the result starts sounding metallic
- You have already finished your cuts, transitions, text, and timing
- The clip is important enough that audio quality matters more than speed
A practical workflow is:
- Finish the visual edit in InShot.
- Export the final MP4.
- Run cleanup on the exported file instead of trying to over-fix audio inside the app.
- Publish the cleaned result to your social platforms.
If you also need subtitles after cleanup, Best AI Captions can help add captions and subtitles to the video. If you want to repurpose the clip for multilingual audiences, Translate Dub is a natural next step for translated dubbing and captions. And once the cleaned video is ready to publish across channels, Mallary.ai fits well for scheduling, cross-platform distribution, first comments, and social publishing automation.
Best workflow by creator type
- Best for speed: InShot only, if the noise is mild and the voice already sounds decent.
- Best for speech clarity: Finish editing in InShot, then clean the exported file.
- Best for short-form creators posting everywhere: Edit in InShot, clean the final MP4, add captions, then distribute with Mallary.ai.
- Best for multilingual content: Clean the audio first, then translate and dub after the voice is clearer.
Does InShot have desktop?
Based on the supplied official sources, InShot is presented as a mobile-first app for iPhone, iPad, and Android rather than a desktop editor. That matters because mobile tools usually prioritize speed and convenience over deep audio restoration controls.
Can InShot export 4K?
The supplied Google Play source confirms support for custom export resolution up to 4K 60fps. That is useful if you want to finish your edit in InShot first and only then clean the exported file.
Does Voice Enhance work on voiceovers only or full video audio?
The safest answer is that you should verify the tool on the specific audio element you selected in your project. Some users may apply it to spoken audio attached to a video clip, while others may be using a separate voiceover track. Because feature naming and placement can vary by version, the practical advice is to test the clip you actually want to improve and compare before/after on that exact audio source.
Should you use InShot or a separate cleaner?
Use InShot first when:
- You are already editing there
- The noise is mild
- You need speed more than perfect restoration
Use a separate cleaner after export when:
- The noise is obvious or distracting
- The voice sounds worse after enhancement
- You are trying to rescue a windy, echoey, or far-away recording
That is the most honest answer to “remove background noise in InShot.” Yes, it can help. No, it is not magic. And once you hit the mobile limit, the smartest next move is not stacking more effects. It is exporting the finished video and using a dedicated speech-cleanup workflow. If that is where you are, SimpleClean is the direct next step for cleaning the exported file without re-editing your whole project.
FAQ
Where is Voice Enhance in InShot?
It should appear in InShot’s audio editing controls, but the exact label and placement may vary by version and platform. iOS support is more clearly documented in Apple’s official listing than Android.
Can InShot remove wind noise?
Not reliably if the wind is strong. Mild background noise is a better fit. Heavy wind usually needs a separate cleanup workflow after export.
Can I clean audio in InShot on Android?
Possibly, but you should verify it in your current app version. The Google Play listing confirms InShot on Android, but it is less explicit than Apple’s listing about Voice Enhance by name.
Can InShot remove echo?
Do not expect strong echo or reverb removal from a mobile enhancement tool. Light improvement may be possible in some cases, but heavy room echo is a poor fit.
Why does InShot make my voice sound robotic?
Usually because the enhancement is working too hard for the amount or type of noise in the clip. Back off the effect, preview speech carefully, and consider cleaning the exported file instead.
Should I export from InShot before cleaning audio?
Yes, if the noise is still distracting after a light pass in InShot or if the voice starts sounding watery or metallic. Finish the edit, export the MP4, then clean the exported file.
Sources and further reading
- InShot App Store listing - Official iOS source for app scope, platform support, and version-history references cited in the article.
- InShot App Store feature page: AI Voice Enhance - Official wording for AI Voice Enhance used to describe the feature carefully without overclaiming.
- InShot on Google Play - Official Android source for platform presence and 4K 60fps export support.
- InShot official website - Official brand source confirming InShot as a mobile-first editor.